October 27, 2023
Take A Bite Out Of These Frightfully Fun Halloween Scrapbook Ideas

Trick-or-treating and jack-o’-lanterns might be the stars on a dark All Hallows’ Eve night, but they’re just the tip of a witch’s hat! You can enjoy Halloween parades and parties, bob for apples, trek around trunk-or-treats, make pumpkin seeds or watch scary movies with a bucket of sweet candy, head over to harvest festivals, dress up your pooch or cat in an adorable costume and partake in a mystery dinner with friends… oh, and add blog contributor Kylie Kingham’s Halloween scrapbook ideas to your devilishly delightful to-do list, too! Have a frightfully fun time with her fang-tastic layout, spirited card and daring border!

To create these projects you will need:
- Happy Hauntings Paper Pack or (Shop Canada | Shop Australia)
- Happy Hauntings Laser Cut Embellishments or (Shop Canada | Shop Australia)
- Full Moon Fun Paper Pack or (Shop Canada | Shop Australia)
- Full Moon Fun Stickers or (Shop Canada | Shop Australia)
- Purple, Black & White Solid Cardstocks or (Shop Canada | Shop Australia)
- Black Shimmer Solid Core Paper Pack or (Shop Canada | Shop Australia)
- Spider Webs Frame Punch or (Shop Canada | Shop Australia)
- Original Border Maker System with Bats & Stars Border Maker Cartridge or (Shop Canada | Shop Australia)
- Piece by Piece Mini Trio Punch Set or (Shop Canada | Shop Australia) OR Black Dual-Tip Pen or (Shop Canada | Shop Australia)
- Custom Cutting System with Circle & Oval Patterns or (Shop Canada | Shop Australia)
- 12-inch Trimmer with Straight & Scoring Blades or (Shop Canada | Shop Australia)
- Micro-Tip Scissors or (Shop Canada | Shop Australia)
- Repositionable Tape Runner or (Shop Canada | Shop Australia)
- Foam Squares Variety Pack or (Shop Canada | Shop Australia)
- CM Zero-Centering Ruler or (Shop Canada | Shop Australia)
- Marker


Step 1: Trim a sheet of Full Moon Fun stripes paper to measure 10” x 10” and align and adhere to the Happy Hauntings purple stars paper. (Tip: To conserve paper you can ‘gut’ or remove the middle of the base paper first.)

Step 2: Using the Spider Webs Frame Punch, punch a border strip from Black Shimmer Solid Core paper. Carefully trim this strip from the paper and separate each web with scissors. (Note: You will need a total of eight web halves.)
Step 3: Adhere two web halves at each corner of the top layer of base paper.
Step 4: Using the Bats & Stars Border Maker Cartridge, punch a strip from Black Shimmer Solid Core paper. Trim the strip away from the paper and cut to a 10” long length. Using the Happy Hauntings Halloween icons paper, cut a 10” long length the same width as your punched border and adhere behind. Adhere the border 1-2” down from the top of the stripes paper. Trim a border sticker to 10” long and adhere tucked under the top edge of the punched border.
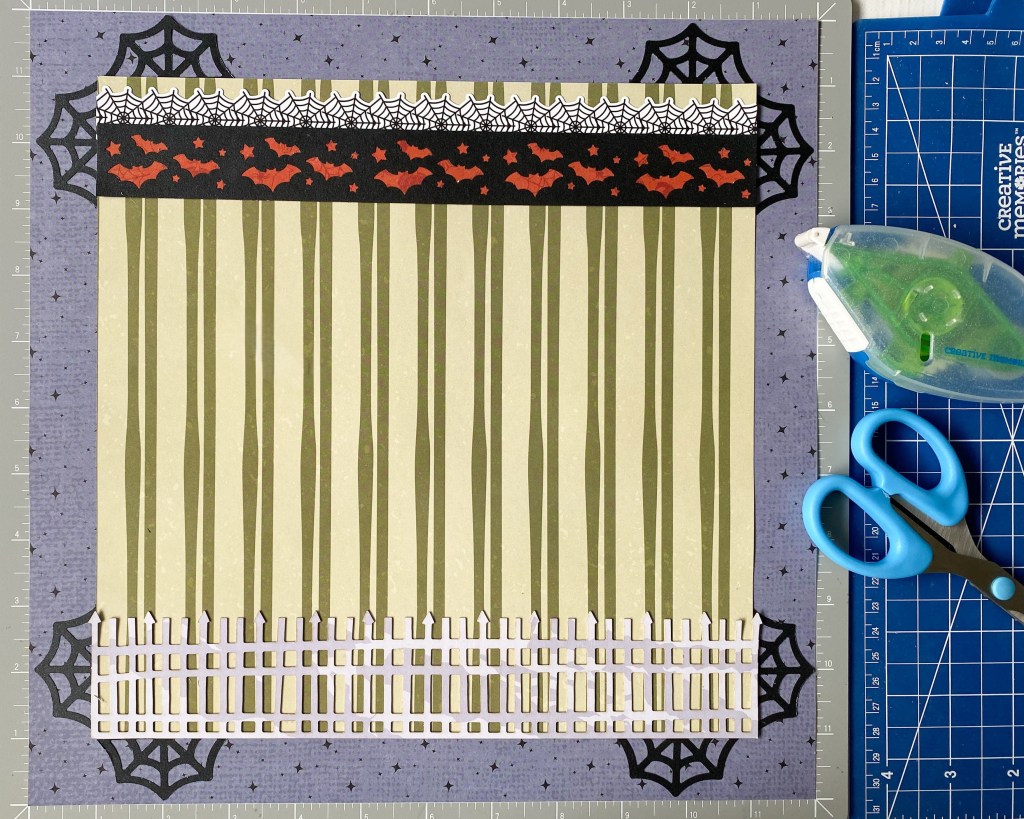
Step 5: Trim a laser-cut border to a 10” length and adhere to the bottom of the stripes paper. Set the background page aside for now.
Step 6: Create your vampire by cutting the following shapes:
- From Purple Ice Solid Cardstock:
- Cut one circle with the smallest Circle Custom Cutting System Pattern on the outside edge with the Red Blade.
- Cut one circle with the medium Circle Custom Cutting System Pattern on the inside edge with the Blue Blade.
- Cut one oval with the smallest Oval Custom Cutting System Pattern on the inside edge with the Blue Blade.
- From Black Shimmer Solid Core Paper:
- Cut one half-circle with the smallest Circle Custom Cutting System Pattern on the outside edge with the Red Blade.
- Cut one half-oval with the second smallest Oval Custom Cutting System Pattern on the outside edge with the Red Blade.
- Cut one half-circle with the medium Circle Custom Cutting System Pattern on the inside edge with the Red Blade.
- Cut one circle with the medium Circle Custom Cutting System Pattern on the inside edge with the Blue Blade.
- Cut two circles with the smallest Circle Custom Cutting System Pattern on inside edge and the Blue Blade.
- OPTIONAL: Cut two small circles with the Piece by Piece Mini Trio Punch Set for shirt buttons. This can be substituted by drawing them with a pen.
- From White Solid Cardstock:
- Cut two ovals with the second-smallest Oval Custom Cutting System Pattern on the inside edge with the Blue Blade.
- Freehand cut two fangs.
- Cut one 1/2” x 4” strip.

Step 7: Using the pieces you just cut, begin assembling as follows:
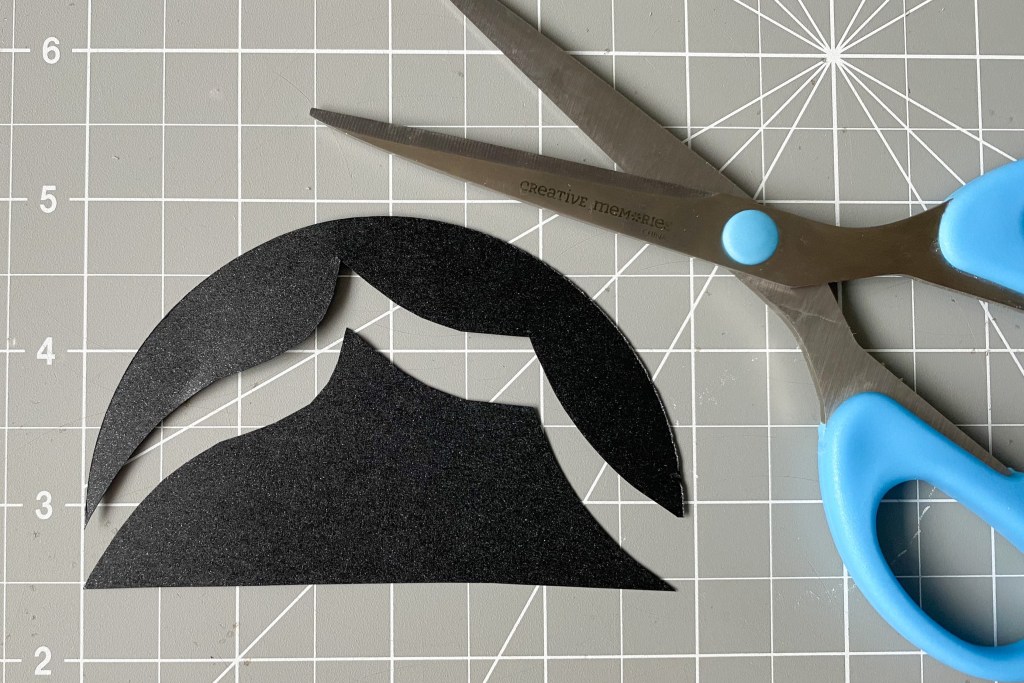
- With the largest black circle, freehand cut the vampire’s hair around the inside of the curved edge. This does not need to be too wide. Adhere to the top of the large purple ice circle. Trim the smaller purple ice circle into quarters. Adhere two as pointy ears behind the head.
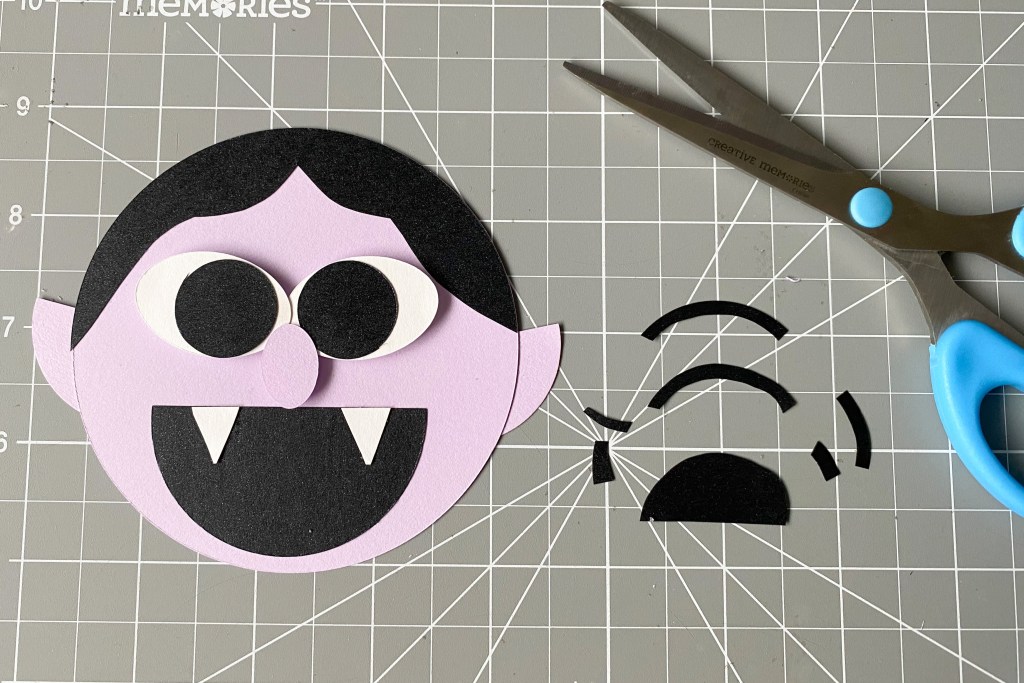
- Adhere the two larger black circles to the two white ovals and add as eyes with Foam Squares. Adhere the small purple ice oval as a nose with a Foam Square.
- Adhere the black half-circle as a mouth and add the two fangs in place.
- Cut the remaining black circle in half and save one half. Cut around the curved edge of the other half twice, so that you have two thin curved halves as shown below. Trim them both a little shorter and add as eyebrows.
- Add the white strip atop the middle of the black half-oval. Add the two small circles as buttons or draw them with a pen. Adhere the head over the curved top of the oval half to create the body. Take the remaining black half-circle and cut in half again. Add each piece behind the head at the top of the shoulders as a cape collar.
Step 8: Create photo mats by cutting two 6” x 4” mat and one 4” x 3” mat from Black Shimmer Solid Core paper. (Photo sizes are two 5-3/4” x 3-3/4” and one 3-3/4” x 2-3/4”.)


Step 9: Adhere the vampire to the page with Foam Squares. Add photos and embellishments to finish.

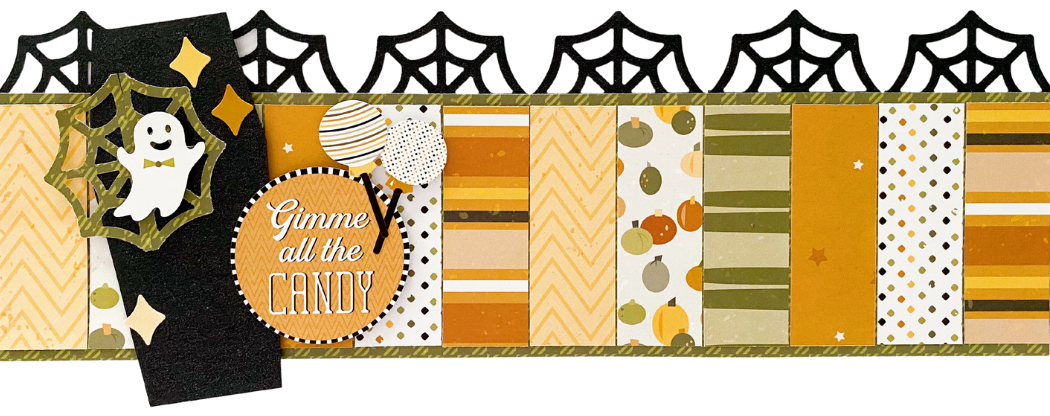
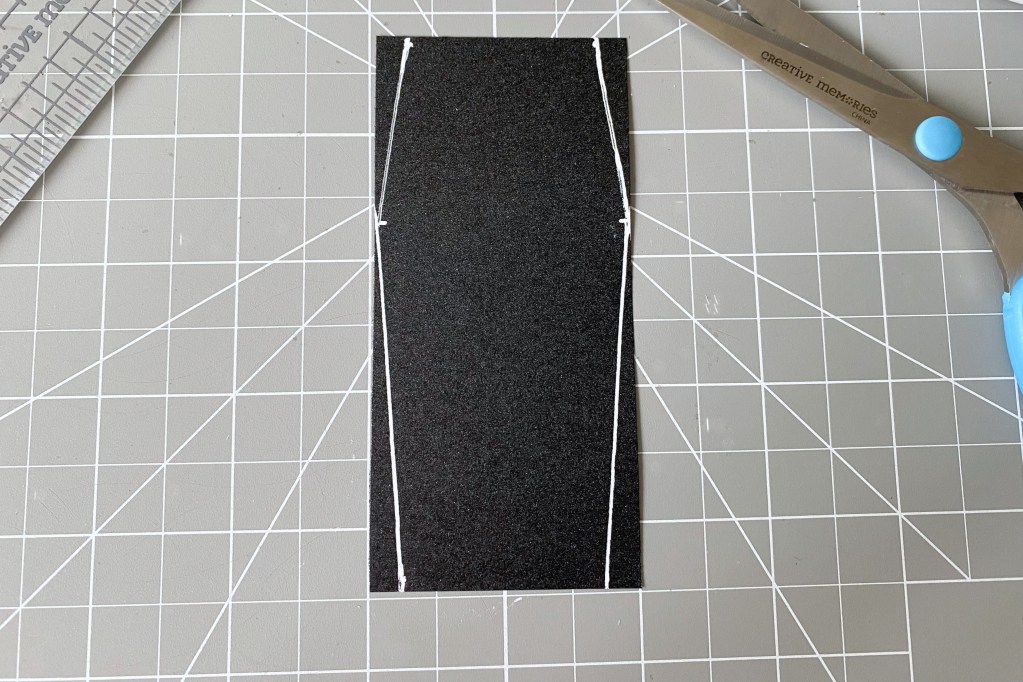
Step 1: Trim a strip of Black Shimmer Solid Core paper to measure 2” x 4-1/4”. Mark 1/4” in from each corner, top and bottom on both short edges. Mark 1-1/2” down both long sides from the top. Rule each mark together to form a coffin shape and cut out.

Step 2: Using the Spider Webs Frame Punch, punch two spider web halves from Full Moon Fun vine green plaid paper. Trim them evenly away from the paper and adhere them together to form one circular web on the coffin.
Step 3: Trim a strip of Full Moon Fun vine green plaid paper to measure 12″ x 3”.
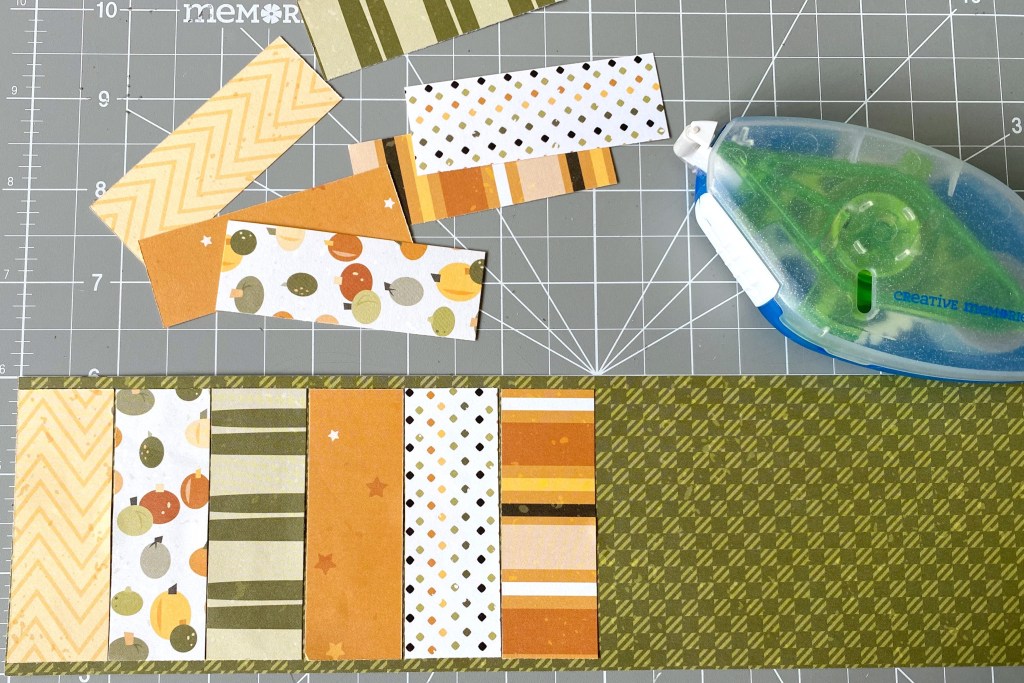
Step 4: Trim a variety of Full Moon Fun paper strips to measure 1” x 2-3/4” each. You will need 12 strips. Alternate each strip along the border piece, leaving a 1/8” space on the top and bottom.
Step 5: Using the Spider Webs Frame Punch, punch a strip from Black Shimmer Solid Core paper. Trim the border away from the black shimmer paper and adhere behind the top edge of the border.
Step 6: Adhere the coffin to the border with Foam Squares. Complete the border by adding some stickers as desired.


Step 1: Trim a strip of Black Solid Cardstock to measure 8-1/2” x 5-3/4”. Using the 12-inch Trimmer and the Scoring Blade, score halfway at 4-1/4”. Fold the cardstock sharply along the score line to form the card base.
Step 2: Trim a piece of Happy Hauntings Halloween icons paper to measure 4” x 5-1/2”. Adhere to the front of the card.
Step 3: Trim a piece of Full Moon Fun chevrons paper to measure 3-3/4” x 5-1/4”. Adhere to the Halloween icons paper as shown below.
Step 4: Using the Circle Punch, punch one circle from Full Moon Fun stripes paper and one circle from Happy Hauntings purple stars paper. Adhere each circle at the top and bottom of the right side (open) edge of the card.


Step 5: Using the Spider Webs Frame Punch and Black Shimmer Solid Core paper, punch three times and carefully trim them as a joined strip away from the paper. Adhere this short border down the left side of the card and trim away any overhang.
Step 6: Complete the card by adhering some stickers with Foam Squares as desired.
How are you celebrating Halloween this year? Will you get the project party startled with these Halloween scrapbook ideas?


While you’re working on your creepily cool projects, check out the new limited-edition 12×12 Orange Haunted House Album Cover! It’s perfect for sharing spellbinding stories of haunted hayrides and houses, Halloween parties, pumpkin carving, trick-or-treating and so much more! But beware… you’ll want to get yours before it disappears on All Hallow’s Eve (31 Oct.)!
And that’s not all… the bewitching Orange Shimmer Solid Core Paper Pack that sold out when it originally launched is BACK and has been added to the main line!
Are these fang-tastic products casting a spell on you? US | CA | AU
P.S. Are YOU a member of the Virtual Crop Facebook Group? It’s your go-to place for MONTHLY Virtual Crops, MONTHLY Completed Album Challenges, WEEKLY LIVE STREAMING of Fast & Fun Projects with Noreen, LIVE QUARTERLY Secret Box Openings with project tutorials and so much more! We hope you’ll join our community of more than 36,000 fellow memory-keeping enthusiasts — you’ll feel right at home!
