November 15, 2023
Exude Understated Elegance: Beige Scrapbook Layout

Let’s set the record straight: Beige is not boring. Beige is classic, versatile, restful, warming and pretty. And did you know “beige” is a French word for the hue of natural wool — not washed, bleached or dyed, but natural, in all its muted, magnificent, elegant beauty?! So let’s cruise into neutral gear with this beige scrapbook layout that will make your most vibrant or meaningful memories pop right off the page. (See, we told ya beige isn’t boring!)

To create this layout you will need:
- Totally Tonal Beige Paper Pack or (Shop Canada | Shop Australia)
- Totally Tonal Beige Stickers or (Shop Canada | Shop Australia)
- Beige Solid Cardstock or (Shop Canada | Shop Australia)
- 12-inch Trimmer or (Shop Canada | Shop Australia)
- Custom Cutting System with Circle Patterns or (Shop Canada | Shop Australia)
- Micro-Tip Scissors or (Shop Canada | Shop Australia)
- Repositionable Tape Runner or (Shop Canada | Shop Australia)
- Foam Squares Variety Pack or (Shop Canada | Shop Australia)
- Black Dual-Tip Pen or (Shop Canada | Shop Australia)


Step 1: Cut four photos to 4” x 4” and adhere on the bottom-right corner of a sheet of Beige Solid Cardstock as shown.
Step 2: Use a Black Dual-Tip Pen to add small dashed lines around the outside of the layout and in-between the photos as shown.
Step 3: Use the 12-inch Trimmer to cut (18) 1-1/2” x 1-1/2” squares from various papers.
Step 4: Adhere the squares as shown, leaving about 7/8” in-between each square.
Step 5: Cut a 3-1/4” x 1-1/2” piece and adhere to the bottom-left of the layout as shown. Journal with a Black Dual-Tip Pen.
Step 6: Use the largest Circle Custom Cutting System Pattern and the Blue and Red Blades to cut a hollow circle piece from Beige Solid Cardstock. Cut on the outside edge with the Blue Blade first. Without moving the Circle Pattern, cut again with the Red Blade on the outside edge.
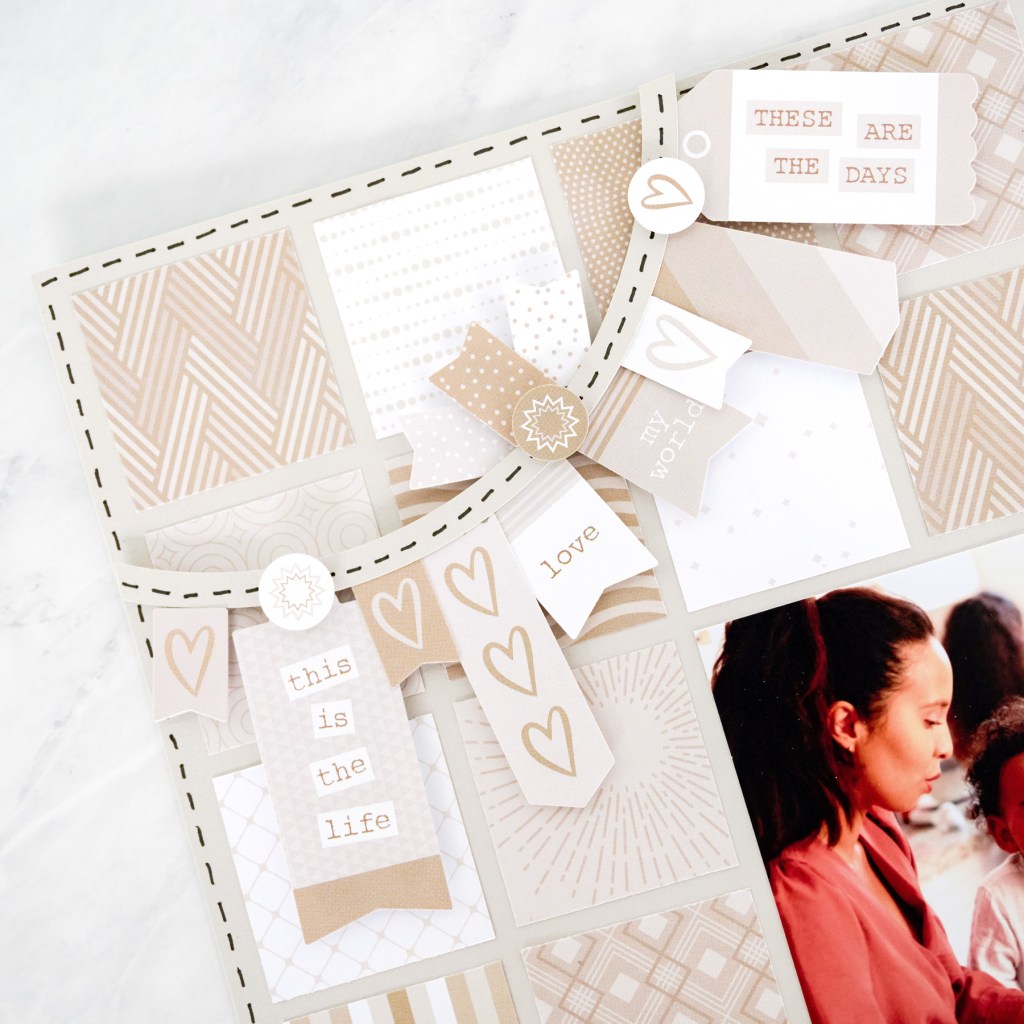
Step 7: Position the hollow circle piece on top of the layout and cut with Micro-Tip Scissors to fit as shown. Use the Black Dual-Tip Pen to add small dashed lines to the hollow circle piece. Use Foam Squares cut in half to adhere the hollow circle piece to the layout.
Step 8: Use Foam Squares to adhere stickers as shown. Use Foam Squares to add three additional word/phrase stickers as shown.
Do you like the muted but magnificent look of this beige scrapbook layout? Tell us in the comments what you admire most about it!
P.S. Are YOU a member of the Virtual Crop Facebook Group? It’s your go-to place for MONTHLY Virtual Crops, MONTHLY Completed Album Challenges, WEEKLY LIVE STREAMING of Fast & Fun Projects with Noreen, LIVE QUARTERLY Secret Box Openings with project tutorials and so much more! We hope you’ll join our community of more than 36,000 fellow memory-keeping enthusiasts — you’ll feel right at home!

I really love the simplicity of this layout and the subtle color.