June 7, 2024
A Swell Summer Scrapbook Layout
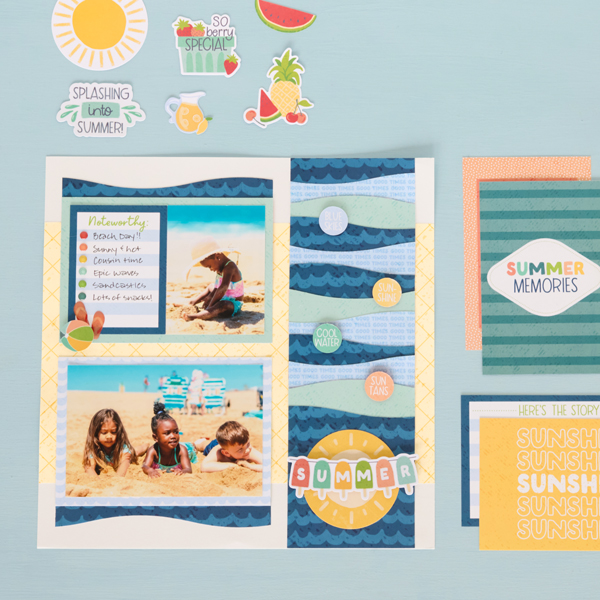
Wave hello to this summer scrapbook layout! Using the 12-inch Decorative Trimmer and Summer Break collection, you can create this page that’s shore to make a splash in your album!

To create this layout you will need:
- Summer Break Paper Pack or (Shop Canada | Shop Australia)
- Summer Break Variety Mat Pack or (Shop Canada | Shop Australia)
- Summer Break Embellishments or (Shop Canada | Shop Australia)
- White Solid Cardstock or (Shop Canada | Shop Australia)
- Custom Cutting System with Circle Patterns or (Shop Canada | Shop Australia)
- 12-inch Trimmer or (Shop Canada | Shop Australia)
- 12-inch Decorative Trimmer or (Shop Canada | Shop Australia)
- Personal Trimmer or (Shop Canada | Shop Australia)
- Tape Runner or (Shop Canada | Shop Australia)
- Repositionable Tape Runner or (Shop Canada | Shop Australia)
- Foam Squares Variety Pack or (Shop Canada | Shop Australia)
- Black Dual-Tip Pen or (Shop Canada | Shop Australia)
- Scrap paper


Step 1: Use a piece of White Solid Cardstock as the base for this layout. Using the 12-inch Trimmer, cut a sheet of ice cream cone paper to 12? x 8? and adhere on the middle of the layout.
Step 2: Cut a 4? x 12? strip with scrap paper to build the border. Choose the waves and good times papers and an island waters variety mat. Cut a 4? x 12? strip with the papers and cut the mat to 4?. Cut one 4? x 1? strip off the waves paper and adhere on the top of the scrap strip. Using the swell edge of the 12-inch Decorative Trimmer, cut a swell on the tops of each paper and mat strip. Trim each off at 1-1/2?. Layer and adhere pieces on the scrap strip, starting at the top and alternating colors. Repeat until you’ve layered 10 swell strips. Cut a swell edge on the final waves pieces and trim to approximately 4-1/4?. Adhere on the bottom of the strip. Mount the border on the layout as shown.
Step 3: Choose textured island waters and waves 6-1/2? x 4-1/2? variety mats and adhere them on the layout. Using the swell edge of the 12-inch Decorative Trimmer, cut two 6-1/2? x 1? strips with waves paper. Tuck one above the top island waters mat and one below the bottom waves mat.
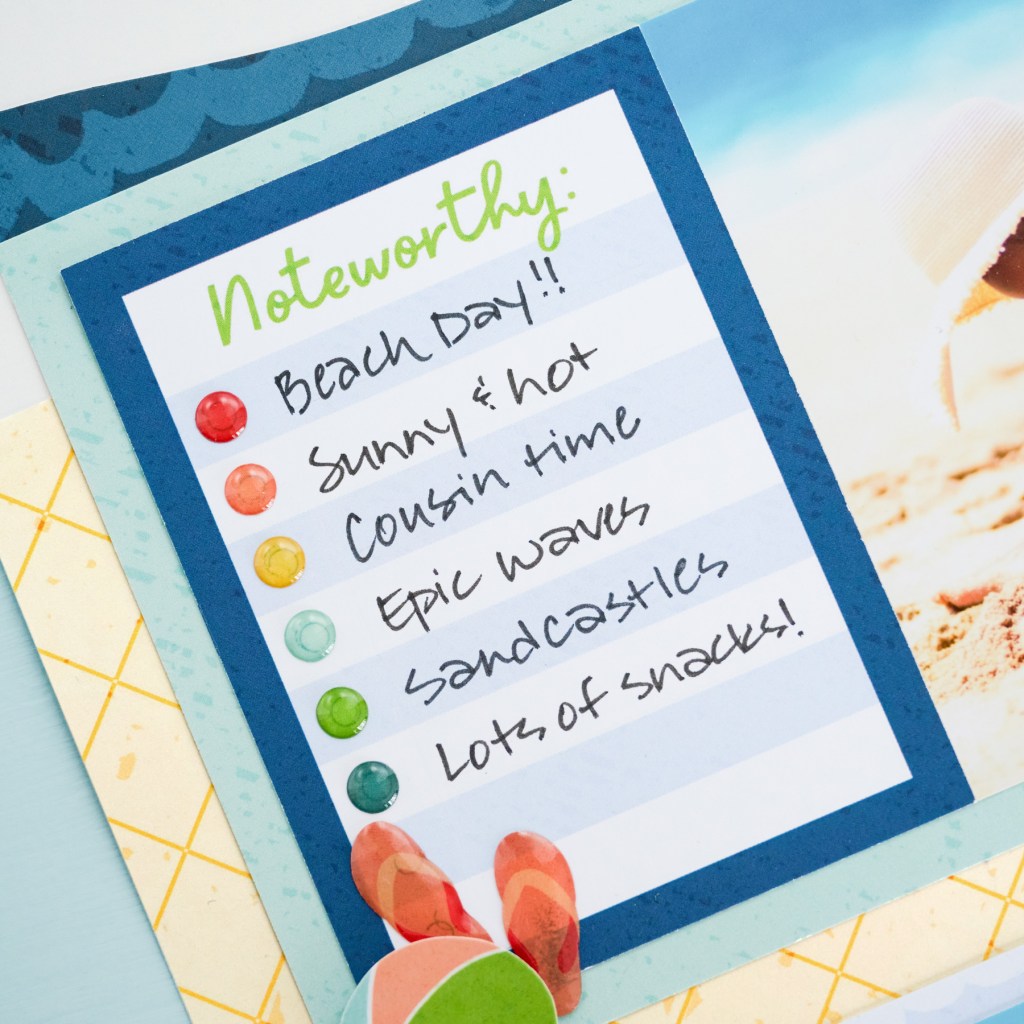
Step 4: Mount a 6? x 4? photo on the waves mat. Cut a duo 6? x 4? variety mat in half and adhere the “Noteworthy” half on the island waters mat. Using the Personal Trimmer, crop a photo to 3? x 4? and adhere next to the mat.

Step 5: Using the inside edge of the small Custom Cutting System Circle Pattern and the Blue Blade, cut out the circle titles (“Blue Skies”, “Sun-Shine”, “Cool Water” and “Sun Tans”) from the recorded duo variety mat. Adhere the circle titles on the border using Foam Squares. Adhere enamel stickers and additional embellishments, popping some up with Foam Squares for dimension.
Step 6: Journal as desired.
Will you be trying out the wave border technique featured on this page? Would you rather spend the day at the beach or a day at the pool? Share with us in the comments!
P.S. Are YOU a member of the Virtual Crop Facebook Group? It’s your go-to place for MONTHLY Virtual Crops, MONTHLY Completed Album Challenges, WEEKLY LIVE STREAMING of Fast & Fun Projects with Noreen, LIVE QUARTERLY Secret Box Openings with project tutorials and so much more! We hope you’ll join our community of more than 40,000 fellow memory-keeping enthusiasts — you’ll feel right at home!
