August 22, 2024
Burn Some Rubber: Tire Tracks BMC Projects
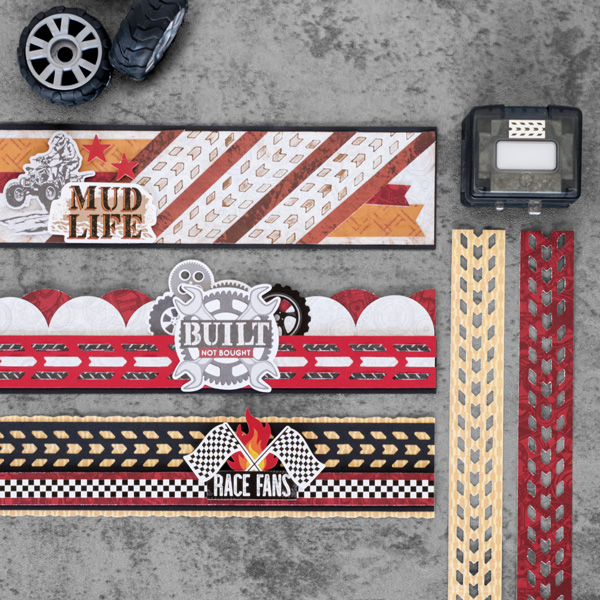
Make your mark with these borders created with the Tire Tracks BMC! Stock up on materials from the Revved Up! collection to create these projects. Pro tip: You can rub the Brown Dual-Tip Pen on a makeup sponge or a cotton round to add some extra grunge to your layouts. Keep reading to find out how!
To create the borders you will need:
- Revved Up! Paper Pack or (Shop Canada | Shop Australia)
- Revved Up! Stickers or (Shop Canada | Shop Australia)
- Revved Up! Embellishments or (Shop Canada | Shop Australia)
- Black and Cranberry Solid Cardstock or (Shop Canada | Shop Australia)
- Border Maker System with Tire Tracks BMC or (Shop Canada | Shop Australia)
- Circle Punch or (Shop Canada | Shop Australia)
- 12-inch Trimmer with Straight and Deckle Blades or (Shop Canada | Shop Australia)
- Makeup Sponge
- Brown Dual-Tip Pen or (Shop Canada | Shop Australia)
- Foam Squares Variety Pack or (Shop Canada | Shop Australia)
- Foam Tape or (Shop Canada | Shop Australia)
- Tape Runner or (Shop Canada | Shop Australia)
- Repositionable Tape Runner or (Shop Canada | Shop Australia)
- All-Purpose Scissors or (Shop Canada | Shop Australia)

Race Fans:

Step 1: Cut a piece from the geo pattern paper to measure 12” x 2-1/4” using the Deckle Blade on the Trimmer for the base of the border.
Step 2: Using the Tire Tracks BMC, punch along an edge of Black Cardstock. Then, cut to measure 12” x 2”. Adhere to the base of the border.
Step 3: Cut a piece of vehicle parts paper to measure 12” x ¾”. Adhere to the border using Foam Tape.
Step 4: Adhere the checkered border sticker to the top of this strip.
Step 5: Adhere stickers using Foam Squares.
Mud Life:

Step 1: Cut a piece of Black Cardstock to measure 12” x 2-3/4” for the base of the border.
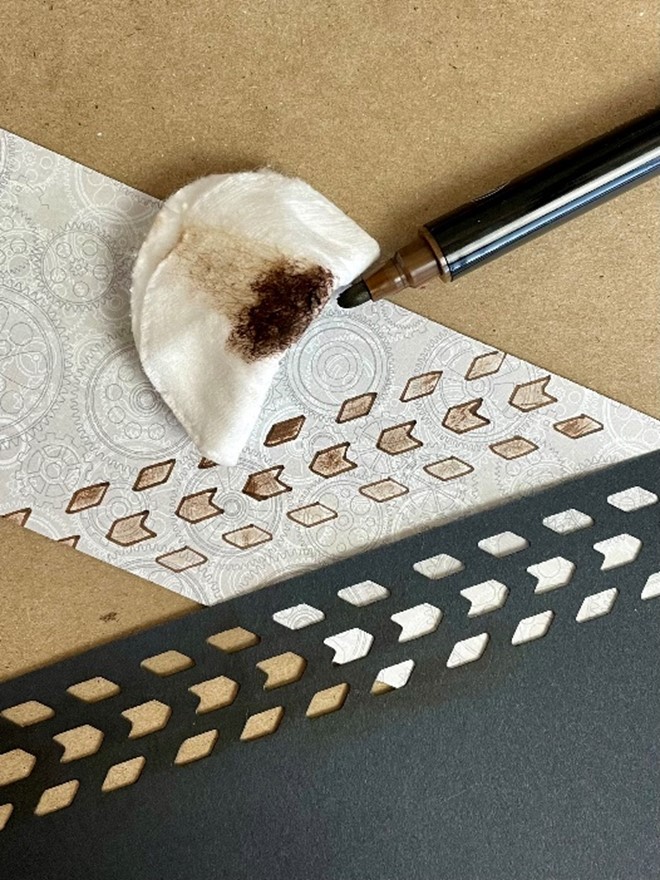
Step 2: Cut a piece of layered gears paper to measure 12” x 2-1/2”. Use the Brown Dual Tip Pen and run it on the makeup sponge. Then rub the makeup sponge along the top edges this piece of paper to grunge it up.
Step 3: Using a piece of cardstock, punch along the edge using the Tire Tracks BMC in the Border Maker System. Use this as the template for the tire tracks.
Step 4: Lay the tire tracks template at an angle on the layered gears paper strip, then run the bold tip of the pen on the makeup sponge, then over the top of the tire track template. Before lifting the template, use the fine point of the pen to trace along the inside areas of the template. Repeat this angled tire tracks three times.
Step 5: Cut a piece of tracks paper to measure 12” x 1/3”. Adhere between the tire tracks, cutting with scissors along the edges of the layered gears paper.
Step 6: Cut two pieces from the tire crosshatch paper to measure 5-1/4” x ¾” and 2-1/4” x ¾”. Cut a “v” into one end of the paper strips, then cut the other end at a 45-degree angle on the trimmer. Adhere to the border.
Step 7: Cut two pieces from the vehicle parts paper to measure 4-1/4” x 1/3 and 1” x 1/3”. Cut a “v” into one end of the paper strips, then cut the other end at a 45-degree angle on the trimmer. Adhere to the border.
Step 8: Adhere this layered gears strip to the top of the black cardstock base.
Step 9: Adhere the stickers and embellishments using Foam Squares for added dimension.
Built Not Bought:

Step 1: Cut a piece of Black Cardstock to measure 12” x 1-1/2” for the base of the border.
Step 2: Using the Tire Tracks BMC in the Border Maker System, punch along the edge of Cranberry Cardstock. Then, cut to measure 1-1/4”.
Step 3: Cut two strips from the metal plate paper to measure 12” x 1/8”. Weave through the top and bottom track marks.
Step 4: Cut one strip from the layered gears paper to measure 12” x 1/8”. Weave through the center track mark.
Step 5: Adhere the weaved Cranberry Cardstock piece to the center of the Black Cardstock using Foam Tape.
Step 6: Using the Circle Punch, punch four circles from the layered gears paper. Cut in half. Adhere each half along the top edge of the black cardstock.
Step 7: Using the Circle Punch, punch four circles from the vehicle parts paper. Cut in half. Adhere behind the previous half circles.
Step 8: Adhere stickers and embellishments using Foam Squares on some for added dimension.
What did you think of using a makeup sponge on these borders?
P.S. Are YOU a member of the Virtual Crop Facebook Group? It’s your go-to place for MONTHLY Virtual Crops, MONTHLY Completed Album Challenges, QUARTERLY Secret Box Openings with project tutorials and so much more! We hope you’ll join our community of more than 40,000 fellow memory-keeping enthusiasts — you’ll feel right at home!
