February 5, 2025
Rock Out With These Headphones Borders
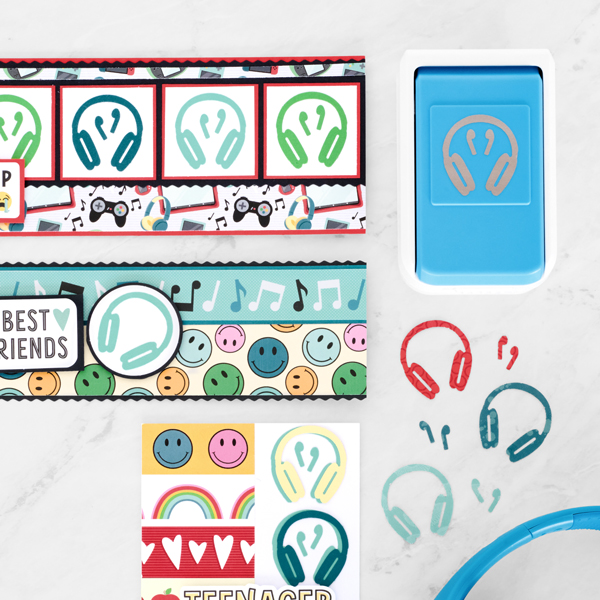
Whether you’re jamming to ’80s pop, relaxing to some classical tunes or streaming the Top 40, there’s a music fan in all of us. Celebrate all your favorite memories of concerts, making mix tapes and playing instruments with the Headphones Border Punch. You can use it to make borders, cards and more — see how below!
To create these borders and card you will need:
- Growing Up Designer Papers or (Shop Canada | Shop Australia)
- Many Firsts Embellishments or (Shop Canada | Shop Australia)
- Black, Bright White, Red, Canary, Island Waters, Dark Sea Green and Kelly Green Solid Cardstock or (Shop Canada | Shop Australia)
- White Cards & Envelopes (15/pk) or (Shop Canada | Shop Australia)
- 12-inch Trimmer with Pinking Blade or (Shop Canada | Shop Australia)
- Headphones Punch or (Shop Canada | Shop Australia)
- Custom Cutting System with Circle Patterns, Blue Blade and Mat or (Shop Canada | Shop Australia)
- Circle Punch or (Shop Canada | Shop Australia)
- Repositionable Tape Runner or (Shop Canada | Shop Australia)
- Foam Squares Variety Pack or (Shop Canada | Shop Australia)

Growing Up Fast Border

Step 1: Cut Red Solid Cardstock to 12” x 3-1/2”.
Step 2: Cut icon paper to 12” x 1” adhere 1/8” from the bottom of the red strip.
Step 3: Cut Black Solid Cardstock to 12” x 2-1/2” using the Pinking Blade on both long ends. Adhere 1/8” from the top of the border.
Step 4: Cut icon paper to 12” x ¼” and adhere 1/8” from the top of the black strip.
Step 5: Cut six 1-7/8” x 1-7/8” squares from Red Solid Cardstock. Center and adhere across the open space on the border.
Step 6: Cut six 1-3/4” x 1-3/4” squares from Bright White Solid Cardstock and adhere to the red squares.
Step 7: Use the Headphones Punch to punch two sets of headphones and earbuds from Kelly Green, Island Waters and Dark Sea Green Solid Cardstock. Adhere the pieces to the centers of the white squares.
Step 8: Cut Red Solid Cardstock to 2-5/8” x 1-1/4”. Adhere the embellishment title to the rectangle and adhere to the border using Foam Squares.
Best Friends Border

Step 1: Cut Black Solid Cardstock to 12” x 2-3/4” using the Pinking Blade for both long ends.
Step 2: Cut the smiley face paper to 12” x 2-1/2” and adhere 1/8” from the bottom edge of the border.
Step 3: Cut Dark Sea Green Solid Cardstock to 12” x 1-1/8” and adhere 1/8” from the top edge of the border.
Step 4: Cut the music note border from the sheet of printed borders. It should be 12” x 1”. Adhere to the center of the dark sea green strip.
Step 5: Use the Custom Cutting System with the medium Circle Pattern and Blue Blade on the inside edge to cut three circles from Black Solid Cardstock.
Step 6: Use the Circle Punch to punch three 1-3/4” circles from Bright White Solid Cardstock. Adhere to the black circles.
Step 7: Use the Headphones Punch to punch one set of headphones from Black, Island Waters and Dark Sea Green Solid Cardstock. Adhere the pieces to the centers of the white circles.
Step 8: Cut Black Solid Cardstock to 2-1/4” x 1-1/2” and adhere title embellishment to the center.
Step 9: Use Foam Squares to adhere the circle pieces and the title piece as shown.
Teenager Card
Step 1: Cut a 2-1/8” x 5-1/2” strip from the paper with the printed borders. Adhere vertically to the left edge of a blank white card base.
Step 2: Use the Headphones Punch to punch three sets of headphones and earbuds from Island Waters Cardstock and one set each from Canary, Red and Dark Sea Green Solid Cardstock. Adhere the Island Water Solid Cardstock pieces to the right side of the card as shown leaving space for the title embellishment. Offset and adhere the Canary, Dark Sea Green and Red Solid Cardstock headphone pieces to the Island Waters Solid Cardstock headphones.
Step 3: Adhere a title embellishment with Foam Squares as shown.
Do you listen to music while you scrapbook? If so, what?
P.S. Are YOU a member of the Virtual Crop Facebook Group? It’s your go-to place for MONTHLY Virtual Crops, MONTHLY Completed Album Challenges, QUARTERLY Secret Box Openings with project tutorials and so much more! We hope you’ll join our community of more than 43,000 fellow memory-keeping enthusiasts — you’ll feel right at home!

These would be perfect for my Silent Disco photos from one of my cruises!
There’s missing information in the Instructions for the first Border “Growing Up Fast” Border regarding the top black cardstock piece that is behind the top icon paper piece (12″ x 1/4″) and also behind the headphone grouping. In Step 3, we are instructed to cut black cardstock to 12 x 2.5″ using the Pinking Blade on both long edges. However, the image shows black pinking edge behind the top piece of icon paper which is adhered in Step 2. AND then it also shows that the headphone & red cardstock squares are backed by black cardstock that has one long edge trimmed with pinking blade. The complete and correct order of instructions for cutting and adhering the black cardstock to the parts of border is missing. So here’s my ideas on how to create the border based on the image and current instructions: Step 1- Cut Red Cardstock to 12″ x 3.5″. Step 2 – Cut Icon paper 12″ x 1″
and adhere 1/8″ from bottom. Step 3 -Cut Black cardstock to 12″ x 2.5″ using the Pinking blade on the long edges. Then cut that 12 x 2.5″ black cardstock again using the straight blade: Cut it to two pieces: 12″ x 2″ and 12 x 1/2″ – thus you have 2 pieces of black cardstock with one pinking edge and one straight edge. (Set aside the 2″ x 12″ that will be used to back the 6 squares of headphones on cardstock squares) Step 4 – Cut another piece of Icon paper 12″ x 1/4″. Adhere the Icon Paper to the 12″ x 1/2″ Black Cardstock. Then adhere to top of Red base leaving it 1/8″ from top as image shows. Mount the pinking edge to the top. Step 5 – Cut 6 1.875″ x 1.875″ squares from Red Cardstock. Step 6 – Cut 6 1.75″ x 1.75″ squares from Bright White Cardstock.. Step 7 – Using the Headphones Punch, punch 6 headphones/earbuds from 3 cardstock colors: Kelly Green, Island H2O, and Dark Sea Green. 2 of each color Step 8 – Adhere punched pieces to the white squares. Then adhere the white squares to the red squares. Then adhere the squares to the 12″ x 2″ black cardstock with the pinking edge along bottom. Step 9 – Adhere the headphone/earbud & cardstock squares on black piece to the border piece as shown in image. Step 10 – Cut a 2 5/8″ 1 1/4″ piece Red Cardstock. Adhere embellishment to red rectangle and adhere to the lower bottom of border as shown using Foam Squares.