May 9, 2025
Making Memories With a Pull Tab Greeting Card for Mother’s Day

Nothing says “I love you” quite like a handmade gift. This Mother’s Day, let’s create something truly special and interactive — a charming Pull Tab Greeting Card! This fun project allows you to showcase your favorite photos and memories in a delightful way that will be cherished. Imagine her surprise as she pulls the tab and reveals a cascade of beautiful images and heartfelt messages!
Project by Annalisa Smola— CM Home Office
Let’s get started!
To create this project, you will need:
- 1 Sheet of Cardstock or (Shop Canada | Shop Australia)
- Greeting Card or (Shop Canada | Shop Australia)
- 3×3 Peekaboo Pockets or (Shop Canada | Shop Australia)
- 12-inch Trimmer or (Shop Canada | Shop Australia)
- Tape Runner or (Shop Canada | Shop Australia)
- Dual-Tip Black Pen or (Shop Canada | Shop Australia)
- Scoring Blade (Optional) or (Shop Canada | Shop Australia)
- 2-Way Corner Rounder (Optional) or (Shop Canada | Shop Australia)
- 5 Photos
Your cutting guide:
Download the cutting guide here for easy access!

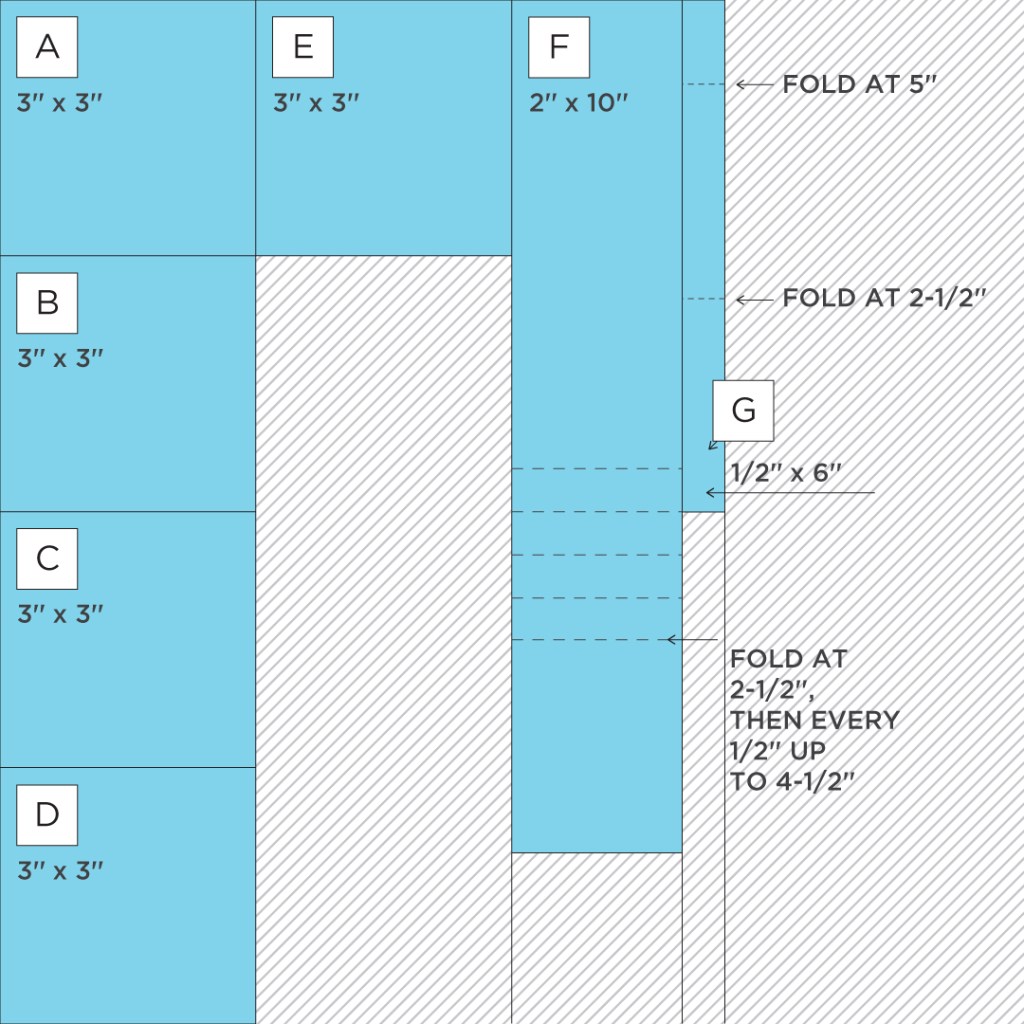
Step 1: Cut one strip of 2×10 cardstock (F) and one strip of 1/2″x6” cardstock (G).
Step 2: Score piece F at 2-1/2″, 3″, 3-1/2″, 4″, and 4-1/2″ from one end. The 2-1/2″ segment will be the “bottom.” Fold score lines back and forth to give each fold some flex.
Step 3: Score piece G at 2-1/2” and 5” from one end. Fold at the score lines to create a loop, and adhere one end inside the other.
Step 4: Cut 5 3×3 squares (A-E) to be used as photo mats for 5 2-3/4″ x 2-3/4″ photos — or substitute with 3″ x 3″ unmatted photos if you prefer.
Step 5: Insert your 3″ x 3″ photos or matted photos, into your 3″ x 3″ Peekaboo Pockets. Remove the film from the adhesive backing and adhere the flap onto itself so the pocket is a perfect square with no flap or exposed adhesive.
Step 6: Fold piece F at the 4-1/2″ score line so that the longer, unscored end wraps behind the scored folds, creating a tail.
Step 7: Using your Tape Runner, adhere your first Peekaboo Pocket to the 2-1/2” segment of piece F, by taping at the top and bottom of the 2-1/2” section. This photo will remain stationary and not flip. Make sure the side with the flap folded onto itself is the side being adhered, with the opening at the top.
Step 8: Apply a line of tape just beneath the next score line on piece F. Adhere the top edge of the Peekaboo Pocket to the tape line, again making sure the side with the flap folded onto itself is the side being adhered, with the opening at the top.
Step 9: Repeat Step 8 three more times, with the last Peekaboo Pocket adhered right beneath the top score line where piece F is folded.
Step 10: Taking piece G that has been turned into a loop, adhere one side of piece G (the loop) to the back of the first Peekaboo Pocket — just at the base of piece F. Then, thread the tail of piece A through the loop.
Step 11: Adhere the other side of the piece G loop to your page or card. Pull the tail to reveal the flip book effect.
Optional: Use the 2-Way Corner Rounder to make inverted punches on the pull tab. Journal on the pull tab as desired.
This Mother’s Day, let’s celebrate the incredible women who have shaped our lives with a gift that’s as unique and special as they are. As your mom pulls the tab and watches the memories unfold, she’ll be reminded of the love and joy you share. Happy Mother’s Day to all the wonderful mothers out there! May your day be filled with love, laughter, and cherished moments.
Let us know in the comments below how you liked creating this project and be sure to share your Pull Tab Greeting cards on social media and in the Virtual Crop Group!
P.S. Are YOU a member of the Virtual Crop Group? It’s your go-to place for MONTHLY Virtual Crops, MONTHLY Completed Album Challenges, QUARTERLY Secret Box Openings with project tutorials and so much more! We hope you’ll join our community of more than 45,000 fellow memory-keeping enthusiasts — you’ll feel right at home!

Where is a video to show how to make this? That would be super helpful.
I agree. I have tried for two days now to figure out how this is done and been unable to reproduce the card.
Piece F in the short video seems wider than 2 inches.