October 22, 2025
Trimming the Tree with Holiday Memories
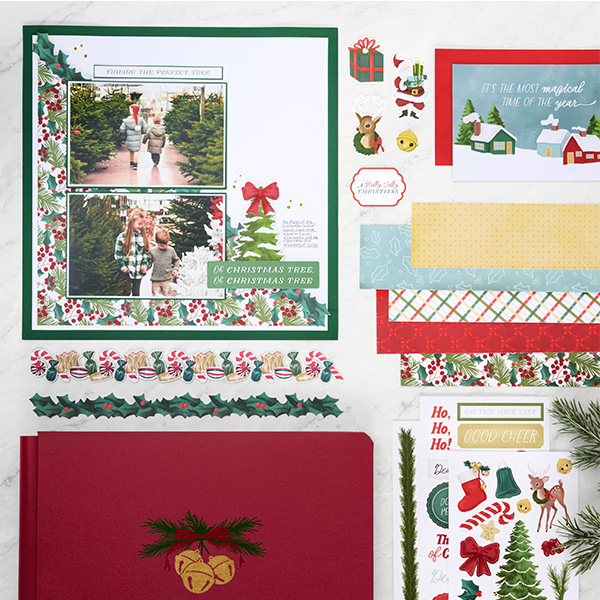
The Magic of Christmas collection beautifully captures the wonder of holiday traditions and the joy of family moments. With its elegant mix of holly, pine, and berry motifs, this layout brings a fresh, festive touch to your Christmas memories. From hunting for the perfect tree to cozy nights by the twinkle lights, it’s all about celebrating the season’s most magical moments.
To create this layout, you will need:
- Magic of Christmas Paper Pack (Shop Canada | Shop Australia)
- Magic of Christmas Laser Cut Borders (Shop Canada | Shop Australia)
- Magic of Christmas Embellishments (Shop Canada | Shop Australia)
- Magic of Christmas Stickers (Shop Canada | Shop Australia)
- Magic of Christmas Mat Cards (Shop Canada | Shop Australia)
- Dark Green Solid Cardstock (Shop Canada | Shop Australia)
- Bright White Solid Cardstock (Shop Canada | Shop Australia)
- 12-inch Trimmer (Shop Canada | Shop Australia)
- Photo Trimmer (Shop Canada | Shop Australia
- Micro-Tip Scissors (Shop Canada | Shop Australia)
- Tape Runner (Shop Canada | Shop Australia)
- Repositionable Tape Runner (Shop Canada | Shop Australia)
- Foam Squares Variety Pack (Shop Canada | Shop Australia)
- Gold Metallic Dot-Tip Pen (Shop Canada | Shop Australia)
- Black Micro-Tip Pen (Shop Canada | Shop Australia)
- Ruler (Shop Canada | Shop Australia)


Step 1: Use Green Solid Cardstock as the base of the page. Gut a 10″ square from the center and use the square to cut three additional pieces: (2) 6-1/8 x 4-1/8″ pieces for photo mats and (1) 5″ x 1/2″ piece for matting a sentiment.
Step 2: Cut a piece of Bright White Cardstock to measure 11-1/4″ x 11-1/4″. Adhere to green cardstock base. From your other piece of Bright White Cardstock, cut (2) 6″ x 4″ pieces. Layer them on your green cardstock photo mats. Cut your photos to 5-7/8″ x 3-7/8″. A narrow mat still creates depth and separation, but it doesn’t overwhelm the design.
Step 3: Cut a piece of holiday foliage designer paper to 11″ x 11″. You are going to cut this in half diagonally. This will not fit in your trimmer, but there is a way to do this without folding your paper: Flip your paper to the opposite side and find the center mark on your 11″ square using the Zero Centering Ruler and Cutting Mat. Draw a line from the center mark to the upper left corner and then draw another line from the center mark to the lower right corner. You can use your scissors to cut on the line to make your diagonal cut.
Step 4: Set one diagonal piece aside for another project (or coordinating page) and adhere one to the lower left corner of the Bright White Cardstock. Leave a 1/4″ Bright White edge on the left and bottom.
Step 5: Find your holly and berries Laser Cut Border. Cut at 4″ from the left edge so that you have two pieces. Place the 4″ cut at the top left of the diagonal and the 8″ cut at the bottom right of the diagonal. The space will be covered with photos. If desired, adhere the border with foam squares.
Step 6: Adhere the bottom photo mat 1-1/2″ from the bottom and left edges of the page. The upper mat is 1/8″ from the lower one. If you have used foam squares on the border, you will want to use foam squares on the photo mats.
Step 7: Using the Finding the Perfect Tree mat card, cut the sentiment out of the card so that it is 4-7/8″ x 3/8″. Adhere to the green cardstock you cut earlier. Place above the photos as shown.
Step 8: Add the tree and sentiment embellishments and red bow sticker using foam squares as desired. A small amount of journaling will fit to the right of the tree, but you can also journal next to the upper photo mat.
Step 9: Add dots to the page with the Gold Dot-Tip Pen.
This layout serves as a reminder of what makes holiday season truly magical: time spent with those we love. Preserve those moments of wonder, warmth, and togetherness so you can relive the joy of the holidays
P.S. Are YOU a member of the Virtual Crop Group? It’s your go-to place for MONTHLY Virtual Crops, MONTHLY Completed Album Challenges, QUARTERLY Secret Box Openings with project tutorials and so much more! We hope you’ll join our community of more than 49,000 fellow memory-keeping enthusiasts — you’ll feel right at home!


Can you please clarify step 1 , I’m confused how it works with step 2
They are photo mats. Layer the white mats from step 2 onto the larger green mats. The rest of the green is used in step 7 to back the sentiment. Hope that helps.
I love this layout for both its beauty and simplicity. Now I need ideas to make it a double page layout…