October 27, 2025
It’s Time for the October Completed Album Challenge PLUS an Oh-So-Sweet Layout Idea

Finished an album this month? Now’s the perfect time to head over to the Virtual Crop Group and show it off during the October Completed Album Challenge! If you need inspiration to get those last few pages done, check out this sweet layout to preserve your favorite memories!
Once you have completed your album (it does not need to be from start to finish in October, just completed in October), make a short video flipping through each of the pages in your newly completed album to share. Then, post your video in the Virtual Crop Group with the hashtag #CompletedOctober2025 for the chance to win!

P.S. Today is the LAST day to enter the Virtual Crop Halloween Pop-Up Challenge! You have until tonight at 11:59pm CT to share your layout inspired by the sketch from the announcement post for a chance to be included in the costume contest voting this week!
Don’t ghost us on this challenge!
Here’s an example of what your Completed Album Challenge video could look like!
Album created by Kelsey Inzerillo, CM Home Office Team Member
For ALL the details on the Completed Album Challenge, check out this blog post.

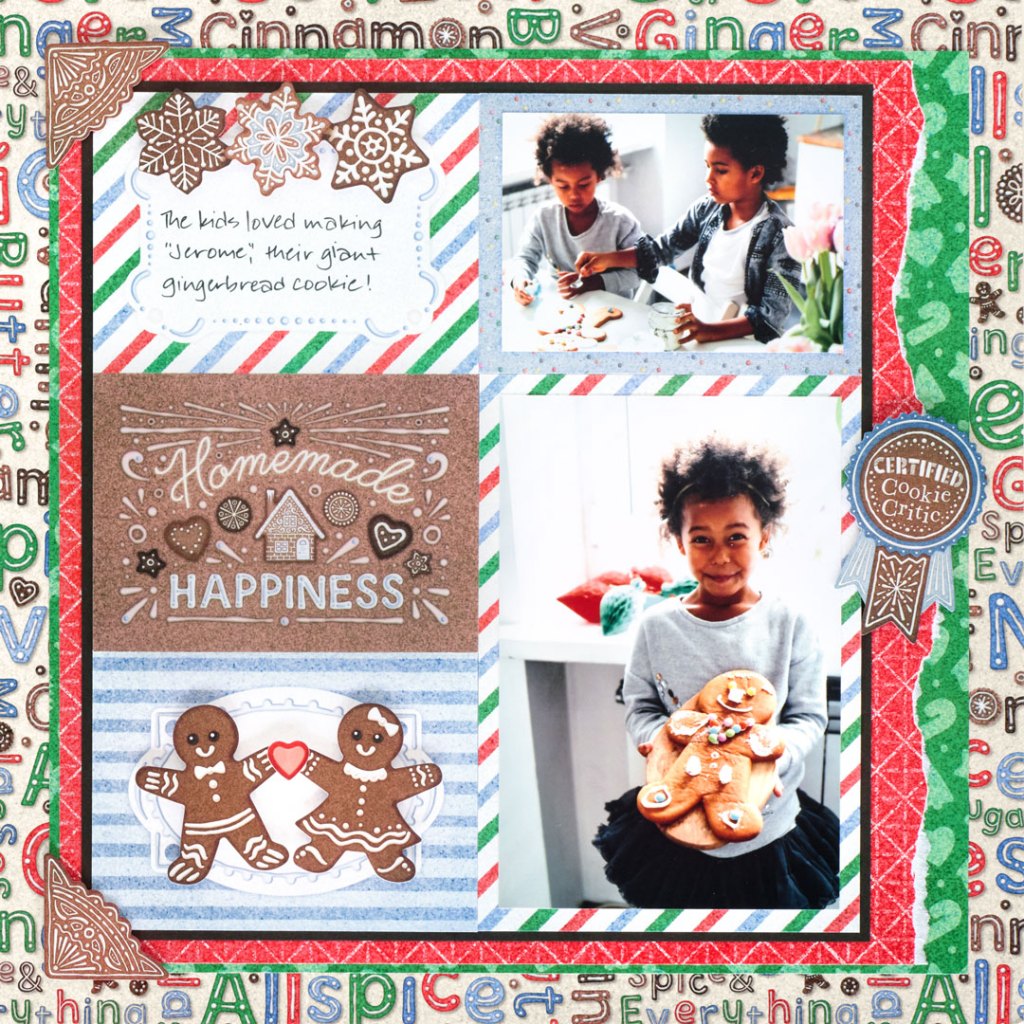
To create this layout, you will need:
- Gingerbread Fun Designer Paper (Shop Canada | Shop Australia)
- Gingerbread Fun Stickers (Shop Canada | Shop Australia)
- Gingerbread Fun Embellishments (Shop Canada | Shop Australia)
- Gingerbread Fun Mats (Shop Canada | Shop Australia)
- Hot Fudge Cardstock (Shop Canada | Shop Australia)
- Foam Squares Variety Pack (Shop Canada | Shop Australia)
- 12-inch Trimmer (Shop Canada | Shop Australia)
- Tape Runner (Shop Canada | Shop Australia)
- Photo Trimmer (Shop Canada | Shop Australia)
- Black Dual-Tip Pen (Shop Canada | Shop Australia)

Step 1: Use a sheet of baking word‑art designer paper as the base for this layout. Using the 12‑inch Trimmer, remove the inside of the paper, leaving a 3/4″ frame all around. (Set the inside 10-1/2″‑square paper aside for Step 2.)
Step 2: Cut a sheet of green cookies designer paper to 10-3/4″ × 10-3/4″ and adhere it on the base frame. (Tip: You may wish to remove the inside of this sheet as well to conserve paper.) Flip the reserved 10-1/2″‑square from Step 1 to the reverse (red) side. Rip approximately 1/2″ from one side. Adhere it on the green square as shown.
Step 3: Cut a 9-1/4″ × 9-1/4″ square of Hot Fudge Solid Cardstock. Adhere it on the red piece. Adhere the 4-1/2″ × 6″ piece that says “Homemade Happiness” on the upper‑right side of the hot fudge square. Cut apart the two mats that have the blue patterns shown and adhere them on the lower‑left and upper‑right corners of the hot‑fudge square. Finally, adhere the striped mat in the remaining space.
Step 4: Adhere a 4″ × 6″ photo on the striped mat. Crop a photo to 4″ × 2-3/4″ and adhere it on the blue mat above it.
Step 5: Adhere embellishments and heart sticker as shown, popping them up with foam squares for dimension.
Step 6: Journal in the striped journal box as desired.
We hope you love this tasty treat-of-a-layout! Have questions or an idea to make it your own? Share your thoughts in the comments — we can’t wait to see what you create!
P.S. Are YOU a member of the Virtual Crop Group? It’s your go-to place for MONTHLY Virtual Crops, MONTHLY Completed Album Challenges, QUARTERLY Secret Box Openings with project tutorials and so much more! We hope you’ll join our community of more than 49,000 fellow memory-keeping enthusiasts — you’ll feel right at home!

