November 6, 2026
A Cardinals & Spruce Winter Layout with Moonlit Pines

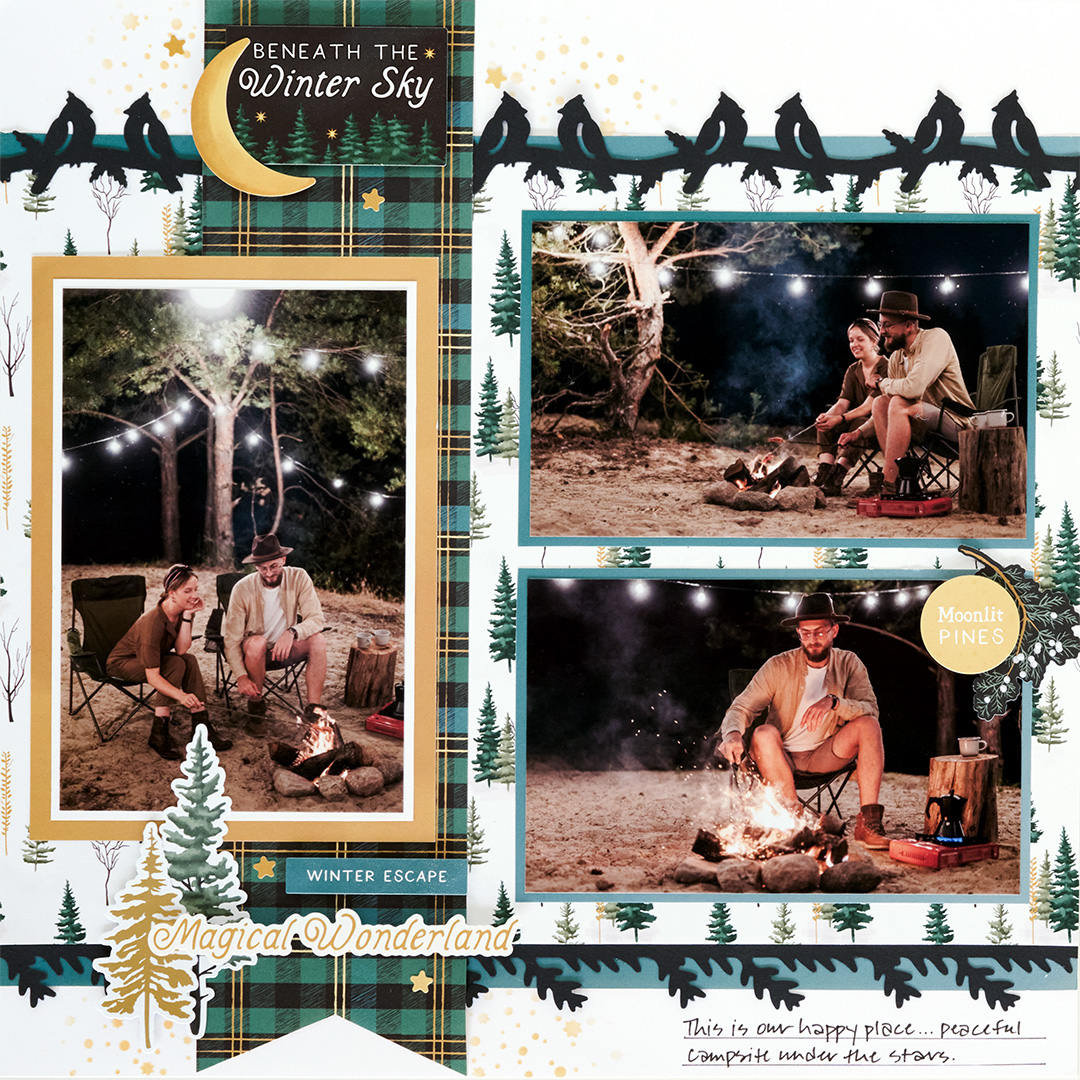
There’s something magical about a winter night under the stars. The new Moonlit Pines collection brings that cozy, night-sky feeling to your pages with deep teals, tartan plaids and warm golden accents that glow like a campfire.
This layout pairs a stenciled starry background with black punched borders from the new Spruce Bough Border Punch and the Cardinals Border Punch, creating tree and bird silhouettes that look just like a nighttime forest.
To create this layout, you will need:
- Moonlit Pines Paper Pack
- Moonlit Pines Tone-on-Tone Paper Pack
- Moonlit Pines Mat Pack
- Moonlit Pines Foiled Embellishments
- Moonlit Pines Stickers
- Bright White Solid Cardstock
- Black Solid Cardstock
- Ink Pad – Tangerine
- Craft Blending Brush – Tangerine
- 5×5 Inking Stencil – Winter Elements
- Spruce Bough Border Punch
- Cardinals Border Punch
- 12-inch Trimmer
- Photo Trimmer
- Micro-Tip Scissors
- Tape Runner
- Repositionable Tape Runner
- Foam Squares
- Black Dual-Tip Pen
- Ruler

Love this layout?

Love this layout?

Step 1: Use a sheet of Bright White Solid Cardstock as the base for this layout. Place the 5×5 Inking Stencil – Winter Elements along the top and bottom edges of the base and use the Tangerine Ink Pad and a Craft Blending Brush to lightly apply stars and dots as shown.
Step 2: Cut two strips of dark sea green tone-on-tone paper to measure 12″ x 1/2″. Cut a piece of trees designer paper to measure 12″ x 8-3/4″. Adhere the trees piece 1-3/4″ from the top of the base and tuck the two strips slightly behind it so 3/8″ of each strip shows.
Step 3: Punch borders from Black Solid Cardstock using the Cardinals Border Punch and the Spruce Bough Border Punch. Adhere the cardinals border along the top edge of the trees piece. Tuck the spruce bough border slightly behind the bottom edge of the trees piece and adhere.
Step 4: Cut a strip of plaid designer paper to measure 3″ x 12″. Using scissors, cut a “V” shape into one short end. Adhere the strip 2-1/4″ from the left edge of the layout.
Step 5: Place a 4-1/2″ x 6-1/2″ gold mat on the left side of the layout as shown. Cut a mat from Bright White Solid Cardstock to measure 4″ x 6″. Crop a photo to 3-3/4″ x 5-3/4″ and mount it on the white mat, then adhere it on the gold mat.
Step 6: Cut two mats from dark sea green tone-on-tone paper to measure 5-3/4″ x 3-3/4″. Crop two photos to 5-1/2″ x 3-1/2″ and mount them on the mats. Adhere them on the right side of the layout.
Step 7: Finish the layout by adhering stickers and embellishments, using Foam Squares on some for added dimension.
Step 8: Use a Black Dual-Tip Pen to journal as desired along the bottom (or top) of the layout.

Want to recreate this layout?
We’ve gathered all the products featured in this project in one place, making it easy to find the papers, embellishments, tools and more.
P.S. Are YOU a member of the Virtual Crop Group? It’s your go-to place for MONTHLY Virtual Crops, MONTHLY Completed Album Challenges, QUARTERLY Secret Box Openings with project tutorials and so much more! We hope you’ll join our community of more than 53,000 fellow memory-keeping enthusiasts — you’ll feel right at home!

