November 18, 2026
A Punched Spruce Wreath Layout with Moonlit Pines

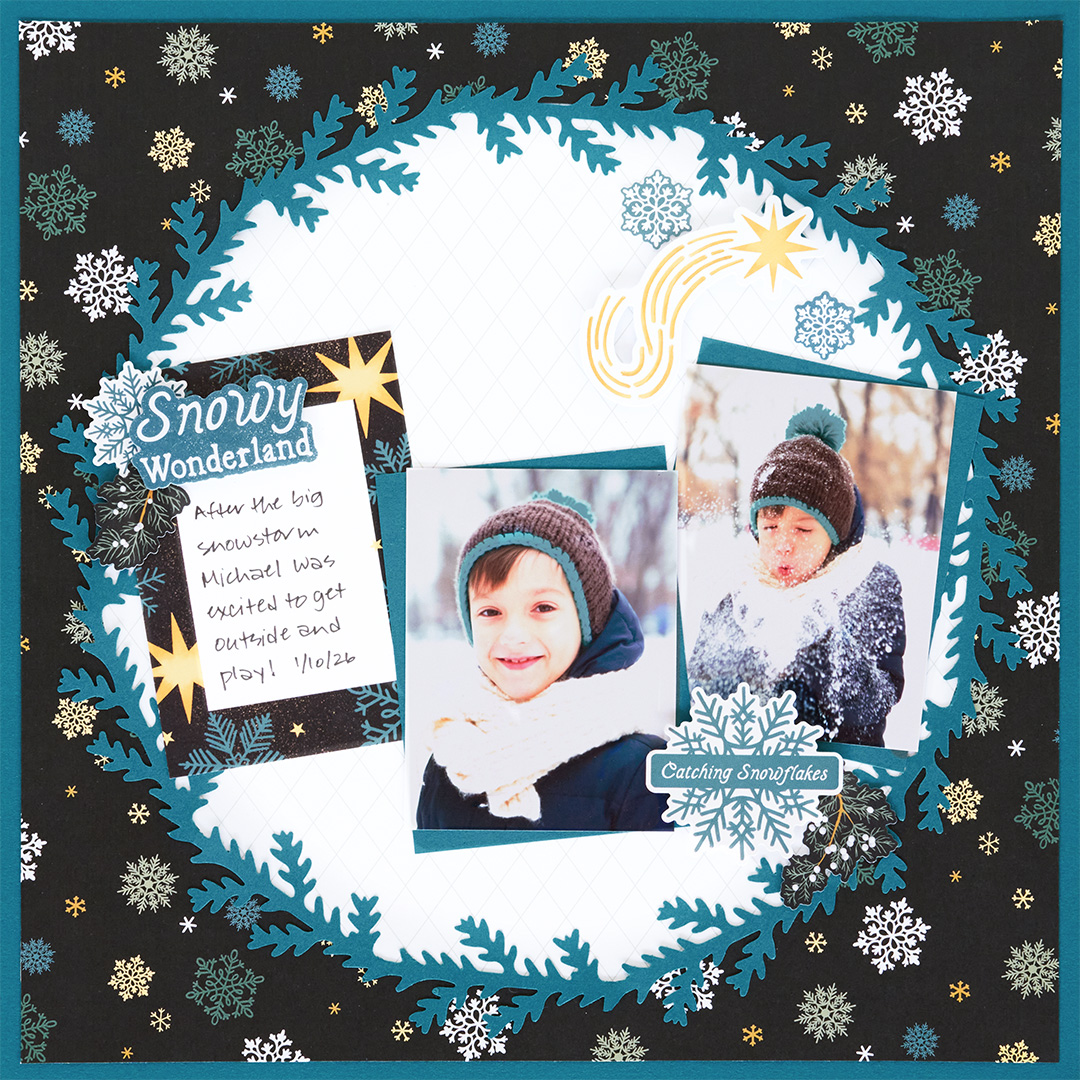
Snow days are made for memories! This Moonlit Pines layout frames two snowy photos inside a wreath of spruce boughs, set against a dark background scattered with multi-colored snowflakes.
The wreath starts with a single circle of Dark Sea Green Solid Cardstock. With a little help from the Custom Cutting System, the Circle Cutter and the new Spruce Bough Border Punch, you can turn it into a showstopping focal point.
To create this layout, you will need:
- Moonlit Pines Paper Pack
- Moonlit Pines Mat Pack
- Moonlit Pines Foiled Embellishments
- Moonlit Pines Stickers
- Dark Sea Green Solid Cardstock
- Spruce Bough Border Punch
- Jumbo Circle Custom Cutting System Pattern
- Red Custom Cutting System Blade Cartridge
- 13×13 Cutting Mat
- Circle Cutter
- 12-inch Trimmer
- Photo Trimmer
- Micro-Tip Scissors
- Tape Runner
- Repositionable Tape Runner
- Foam Squares
- Black Dual-Tip Pen

Love this layout?

Love this layout?

Step 1: Place a sheet of Dark Sea Green Solid Cardstock on the 13″ x 13″ cutting mat. Center the Jumbo Circle Custom Cutting System Pattern on top. Using the red blade on the outside track of the pattern, cut a circle out of the cardstock. Save the circle for Step 4. The remaining cardstock will be the base for this layout.
Step 2: Cut a sheet of multi-colored snowflakes designer paper to 11-1/2″ x 11-1/2″ and adhere it on the base.
Step 3: Turn the dial of the Circle Cutter to 9.8″ (one mark to the left of 10″) and cut a circle from white lined designer paper.
Step 4: Center the dark sea green circle on the cutting mat. Using a pencil, make a small mark on the outside edge of the circle every 30 degrees, using the lines on the cutting mat as a guide.
Step 5: Hold the circle with the marks facing up and turn the Spruce Bough Border Punch upside down. Place the circle inside the punch and line up a pencil mark at the very left corner of the punch area. Position the arc of the circle so it’s even on both sides, close the punch to grip the paper, then carefully turn the punch right side up and punch. Move the punch to the next pencil mark and repeat all the way around the circle.
Step 6: Use Micro-Tip Scissors to carefully trim away the small triangle shapes that remain between the punched areas. Using the Repositionable Tape Runner, adhere the wreath on the layout, covering the edges of the white circle, as shown.
Step 7: Cut a journal card from a mat to measure 3-1/4″ x 4-1/2″. Cut two mats from Dark Sea Green Solid Cardstock to measure 3-1/4″ x 4-1/4″. Crop two photos to 3″ x 4″ and mount them on the mats. Adhere the journal card and photos on the layout as shown.
Step 8: Finish the layout by adhering stickers and embellishments, using Foam Squares on some for added dimension.
Step 9: Use a Black Dual-Tip Pen to journal on the journal card as desired.

Want to recreate this layout?
We’ve gathered all the products featured in this project in one place, making it easy to find the papers, embellishments, tools and more.
P.S. Are YOU a member of the Virtual Crop Group? It’s your go-to place for MONTHLY Virtual Crops, MONTHLY Completed Album Challenges, QUARTERLY Secret Box Openings with project tutorials and so much more! We hope you’ll join our community of more than 53,000 fellow memory-keeping enthusiasts — you’ll feel right at home!

