March 21, 2016
It’s an Easter Project Ideas Blog Hop!
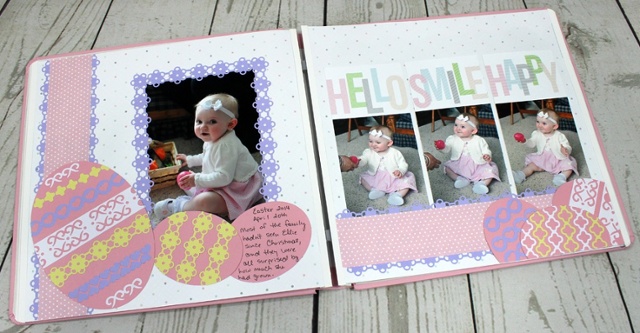
Easter is just around the corner, and that means it’s time for some totally fun and creative scrapbook page and paper craft ideas! Today, we’ll kick off our hop right here first with a 2-page spread created by Karyn McDermaid-Rolfe:
To create this 2-page layout, you’ll need:
- Pretty in Pastel Paper Pack
- Pretty in Pastel Slide-In Pack
- Cardstock – Pink, White, Yellow, Lilac
- Border Maker with Medallion Frame Chain, Flower Chain, Heart Chain and Diamond Scroll Cartridges
- Custom Cutting System with Oval Patterns
- Paper Trimmer
- Scissors
- Tape Runner and Mini Tape Runner Refill
- Black Pen
Step 1: Using your 12” Trimmer, cut two 2”x 12” borders from the pink dot paper in the Pretty in Pastel Paper Pack.
Step 2: Using your Border Maker with the Lace Flower Chain Cartridge, punch four flower borders from lilac cardstock.
Step 3: Adhere the purple flower borders to the back side of the pink dot paper to form a lace edge and adhere the borders to the white dot paper from the Pretty in Pastel paper pack.
Step 4: Using your Custom Cutting System, cut one large egg from pink cardstock pack using the 5”x7” oval pattern with the red blade on the outside edge.
Step 5: Using your Custom Cutting System, cut five smaller eggs from the same pink paper using the 3”x3 7/8” oval pattern with the red blade on the outside edge.
Step 6: Using your Border Maker, punch a variety of borders from the lilac, purple and yellow cardstock. I used the Diamond Scroll, Medallion Frame Chain, Heart Chain and Lace Flower Chain cartridges. See photos. Adhere the border pieces and punch outs to the eggs using your Mini Tape Runner or a glue pen.
Step 7: Using your Border Maker and the Lace Flower Chain Cartridge, punch a few borders to make a photo frame for the first page. My photo is a 5×7.
Step 8: Trim 1/4″ from each edge of the title cards shown, then trim three photos similarly to fit underneath the cards. See photo.
Step 9: Assemble pages as shown, and use one of the smaller eggs as a journaling box.
And next we’re tossing in a little paper crafting fun, too! Creative Team member Melissa Ullmann created these goodies to share at your Easter gatherings.
 To create the lollipop bunny, you’ll need:
- Lollipop
- Cardstock – White, Pink and Black
- Black Pen
- Custom Cutting System with Oval Patterns
- Border Maker System with Heart Chain and Bubble Cartridges
- Glue Gun/Glue Sticks
Step 1: Using the CCS-Ovals, cut out two ovals from the white cardstock with the inside of the second oval shape with the green blade. Adhere the edges, using as the “feet” of the bunny.
Step 2: Hot glue the sucker to the top of the ovals.
Step 3: Using the small CCS-circle, cut out a circle from the inside using the red blade.
Step 4: Using the Border Maker, punch once from the heart chain with the pink cardstock. Use a heart for the nose of the bunny. Adhere.
Step 5: Using the Border Maker, punch once from the bubble chain with the black cardstock. Use two small circles as the eyes of the bunny. Adhere.
Step 6: Using the Oval-CCS, cut one side of the oval. Slide the oval over, cut the other side. This will create points on the ovals. Use these for the ears of the bunny. Adhere.
Step 7: Use black pen to draw on the whiskers. Optional: draw black dashes along the outer edges of the ovals.
Step 8: Tie a ribbon, or piece of Easter grass around the neck of the bunny.
(You may need to adjust the sizes of the ovals and circle based on the size of the sucker, and what looks proportionate.)
To create the Easter treat cones shown in the pic above, you’ll need:
Step 1: Cut several pieces of paper (depending on how many cones you want to make) to measure 6″ x 6″.
Step 2: Run tape runner along one edge of the paper. Roll into a cone, adhering with the edge you ran the tape runner on. (Optional: You can fill and then fold and adhere the top flap down, and embellish the flap, or you can fill with Easter grass and candy, and leave open.)
Step 3: Display in a small basket or bowl for your guests to enjoy!
Once you’ve hopped through all of the blogs, stop back here and leave us a comment on your favorite project in the hop. On Friday, March 25, we’ll randomly choose one commenter to win a totally fab Fresh Picks prize pack! It’ll include a Fresh Picks Fast2Fab Album, Paper Pack, Slide-In Pack and new Embellishments as shown below – best of luck!


Now on to more fun ideas! Here’s the list of Creative Team members’ blogs that you’ll hop on through. Don’t worry – each of the bloggers will have a link for you to hop on to the next one once you reach theirs. Happy hopping!
Don’t forget to stop back after you’ve hopped through – it could make you a winner!

Great blog! Do you have any hints for aspiring writers?
I’m hoping to start my own website soon but I’m a little lost on everything.
Would you recommend starting with a free platform like WordPress or
go for a paid option? There are so many options out there that I’m totally overwhelmed ..
Any recommendations? Kudos!