April 12, 2016
Project Ideas for the Perfect Baby Shower: Part I
Creating sweet projects for a baby shower can be oh-so-fun with Creative Memories Hello Baby Collections. I love to create some fun little handcrafted projects for any event that I am hosting. In this case–a baby shower!
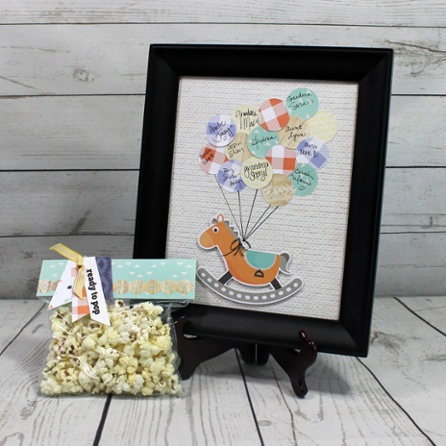
Welcoming a precious little one into this world is exciting! In lieu of setting out a traditional guest book at the shower, I created this fun framed signature art piece and placed it into a frame for the day of the event. Each attendee signed a balloon – so fun!
This treasured piece can be kept in the frame for the little one to look at as they grow up to see all the people who have loved and supported them from the beginning. Or, you can remove the signed piece from the frame and add it to their scrapbook to look back at when they page through their memories of childhood. It will definitely be a cherished treasure.
To create the fun guestbook frame, you’ll need:
- Hello Baby Boy Paper Pack
- Hello Baby Embellishment Pack
- 12-Inch Straight Trimmer
- Custom Cutting System with Circles
- Foam Squares
- Brown Pen
Step 1: Cut out the cream paper to measure 8” x 10”.
Step 2: Adhere the rocking horse embellishment to the lower portion of the paper using foam squares.
Step 3: Cut out numerous circles using the CCS-Circles. Adhere in a cluster towards the top of the paper.
Step 4: Using a brown pen draw the lines from the “balloons” to the rocking horse.
Step 5: Have guests sign the circles/”balloons”.

To create the Ready To Pop Bag Topper, you will need:
- Hello Baby Boy Paper Pack
- Original Border Maker System with Button Chain Cartridge
- 12-Inch Straight Trimmer
- White Cardstock
- Paper Clip
- Sandwhich Bag
- Ribbon
Step 1: Measure the length of the sandwich bag. Cut the green paper to measure that length by 3”. Fold in half length-wise.
Step 2: Cut several strips of paper at varying lengths, cluster together, folding over the top on the left side of the topper.
Step 3: Print “ready to pop” on white cardstock on your personal printer. Cut into strip, add to the other ribbons.
Step 4: Add paper clip to the top of the topper, tying a ribbon onto the clip.
Step 5: Fill the bag with popcorn.
Step 6: Add topper to the bag.
All events need an invitation! Your guests will be giddy to recieve a hand-made invitation in the mail!


To create this fun card, you’ll need:
- Hello Baby Boy Paper Pack
- Original Border Maker System with Button Chain Border Cartridge
- Custom Cutting System with Circle Patterns
- Font used: Eacologica
Step 1: Cut a piece of white cardstock to measure 8-1/2” x 5-1/2”. Fold in half.
Step 2: Cut a piece of the blue patterned paper to measure 4” x 5-1/4”. Adhere to the front of the card.
Step 3: Cut out a circle using the inside of the medium circle using the red blade.
Step 4: Cut out ¼ of the circle. Use the brown pen to draw faux “stitches” along the outer edge of the circle. Adhere to the front of the card.
Step 5: Using the button chain cartridge, punch a strip using the wood paper. Cut out a section of two buttons. Adhere to the baby buggy on the front of the card as the “wheels”.
Step 6: Print out “You’re Invited” onto white paper using your personal printer. Mat onto a mint green paper. Adhere to the front of the card using foam squares.
Love these projects? Just wait until you see what we’ve got in store for you in Part Ii! Thoughts on what you think we’ll be sharing?

Cute, Cute, Cute!