April 15, 2016
Fun Border Ideas for Baby Scrapbook Layouts
Waiting for a new baby to arrive can sometimes seem like an eternity, even with all that needs to be done before your due date. And when your little one does arrive, the time you have to do anything other than caring for your baby will simply disappear. While you’re waiting, and still have time, wouldn’t it be a great idea to create baby borders for your baby’s scrapbook album? Then when the time is right, you’ll have borders available to quickly and easily complete your baby scrapbook layouts. Today I’m going to share a few baby boy and baby girl border ideas to help get you started.
Here’s what you’ll need to create the baby boy scrapbook borders shown:
- Hello Baby Boy Paper Pack
- Hello Baby Boy Stickers
- Red pattern paper from the Hello Baby Girl Paper Pack or red cardstock
- Mint ABC/123 Stickers
- Border Maker and Button Chain Cartridge
- Shape Maker System with Square Cartridge
- Custom Cutting System with Oval Patterns
- 12-inch Straight Trimmer
- Brown Dual-tip Pen
- Tape Runner
- Mini tape runner refill
- Foam Squares
Instructions:
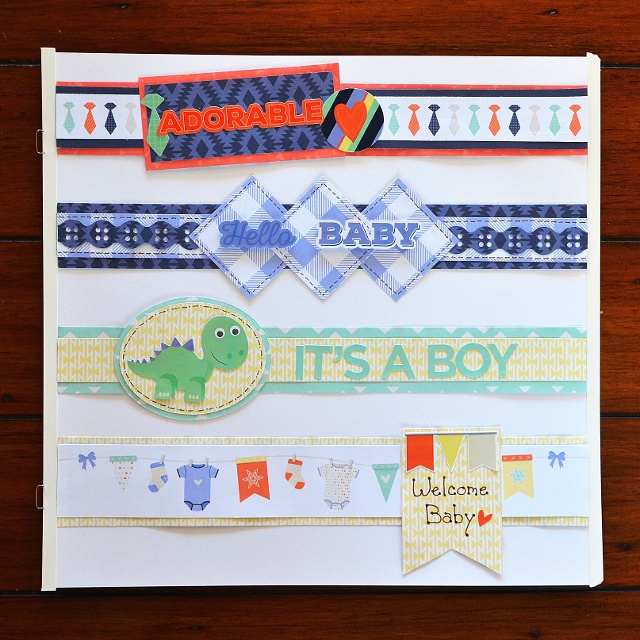
Adorable Border
- Using the straight trimmer, cut bow ties border from the pre-designed border strip paper. Cut two navy strips from the multi-colored stripes paper and one 1 ¾” by 12” strip from red cardstock or red pattern paper found in the Hello Baby Girl Paper Pack.
- To assemble border strip, adhere navy strips to the underside of the bow ties border as shown. Adhere to red strip as shown.
- Cut one 2 ?” x 4 ½” rectangle from red cardstock or red pattern paper. Cut one 1 ¾” x 4 ¼” rectangle from navy pattern paper and adhere to red rectangle as shown. Adhere rectangle to border strip and add stickers shown.
Hello Baby Border
- Using the straight trimmer, cut one 1 ½” x 12” strip from the navy pattern paper and one 1” x 12” strip from blue gingham paper. Using the Border Maker and Button Chain Cartridge punch one 12 inch button border from navy pattern paper. Use Brown Dual-tip pen to create faux stitching along the edge of the blue gingham strip. Assemble and adhere border strip as shown.
- Using the Shape Maker and Square Cartridge, punch three squares from blue gingham paper. Use the brown dual-tip pen to create faux stitching along the edge of squares. Adhere squares to border strip as shown. Use foam squares to adhere stickers shown.
It’s a Boy Border
- Using the straight trimmer, cut one 1 ½” x 12” strip from mint green print and one 1” x 12” strip from yellow pattern paper. Adhere as shown.
- Using the inside track of the large oval CCS pattern, cut an oval from mint pattern paper with the red blade and another oval from the yellow pattern paper with the green blade. Stack and adhere ovals as shown. Adhere ovals to border strip.
- Use the brown dual-tip pen to create faux stitching around the edge of the oval and adhere dinosaur sticker. Create title as shown with Mint ABC/123 Stickers.
Welcome Baby Border
- Using the straight trimmer, cut border strip shown from border strip paper. Cut one 2” x 12” strip from yellow pattern paper. Stack and adhere as shown.
- Using the straight trimmer, cut one 2 ¼” x 3 ¼” rectangle. Use scissors to clip a “v” in one end of flag as shown. Use brown dual-tip pen and dot lettering to create title as shown. Use scissors to cut three flag stickers shown from sticker borders sheet and adhere to yellow flag as shown. Adhere heart sticker shown. Adhere flag to border strip as shown.

Here’s what you’ll need to create the baby girl scrapbook borders shown:
- Hello Baby Girl Paper Pack
- Hello Baby Girl Stickers
- Mint ABC/123 Stickers
- Pastel Pink ABC/123 Stickers
- White Cardstock
- Border Maker with the Button Chain Cartridge
- Shape Maker System with the Square Cartridge
- Decorative Arcs Border Punch
- Two Way Corner Rounder
- 12-inch Straight Trimmer
- Silver Metallic Pen
- Tape Runner
- Mini Tape Runner refill
- Foam Squares
Nighty Night Border
- Using the straight trimmer, cut a 1 ½” x 12” strip from green pattern paper. Tear a strip from white knit pattern paper to measure about 1 ?” x 12 inches. Cut green water color border from border strip paper. Stack and adhere strips as shown.
- Using the Border Maker and the Button Chain Cartridge, punch a 12 inch border strip from pink polka dot paper. Use scissors to cut the button chain border in half lengthwise. Use the mini tape runner to adhere each half to the underside of border strip as shown.
- Use the straight trimmer to cut the green water color accent card from the pre-designed accent paper. Use the two way corner rounder to round corners and adhere to border strip as shown. Create title with Pastel Pink ABC/123 Stickers. Use foam squares to adhere sticker shown to accent card.
Cute as a Button Border
- Using the straight trimmer, cut one 1 ¼” x 12” strip from pink polka dot paper and one 1” x 12” strip from green pattern paper. Using the Border Maker and the Button Chain Cartridge punch a 12” button chain border from pink polka dot paper. Stack and adhere as shown. Use the silver metallic pen to create faux stitching along the edge of the green strip as shown.
- Using the Shape Maker and the Square Cartridge, punch a square from white cardstock. Use the straight trimmer to cut a 2 ¼” square from green pattern paper. Adhere squares together as shown. Use the silver metallic pen to create faux stitching around the edge of white square as shown. Use the silver metallic pen and dot lettering to create title as shown
- Use the Border Maker and Button Chain cartridge without the guide to punch one short, 3 button border from green pattern paper and one short border from pink polka dot paper. Cut one green button and two pink buttons from each. Adhere buttons and yellow bow to square as shown. Adhere square to border strip.
Snuggles Border
- Using the straight trimmer, cut a 1 ¼” x 12” strip from red pattern paper. Cut the multi-colored border strip from border strip paper. Use scissors to cut the multi-colored border strip in half lengthwise. Adhere multi-colored strips to underside of red pattern strip as shown.
- Use foam squares to adhere teddy bear to border strip as shown and adhere Snuggles sticker.
Baby Girl Border
- Use the Decorative Arcs Border Punch to punch a decorative edge from pink polka dot paper. Trim to 2 ¼” x 12 inches. Use the straight trimmer to cut bow border from border strips paper. Adhere to pink polka dot border strip as shown. Use silver metallic pen to create faux stitching along the edge of border as shown.
- Use the straight trimmer to cut one 3” x 4” rectangle from green pattern paper and one 2 ½” x 3 ½” rectangle from bow pattern paper. Use the two way corner rounder to round the corners of each rectangle. Stack rectangles and adhere as shown. Use the silver metallic pen to create faux stitching around the edge of rectangle as shown.
- Adhere mint “baby” sticker. Use Mint ABC/123 Stickers to form the word girl and add pink bow.
There you have it – quick and easy page border ideas for creating baby scrapbook layouts on the fly once baby has arrived. Which border design is your favorite? :)
