May 20, 2016
Title Borders For Your Graduation Scrapbook Pages
Ever run out of title ideas for your scrapbook pages? I often get scrapper’s block when trying to think of a title for a scrapbooking layout that I’m working on. The good news is that with the Achievements Embellishments and the word art sheet that’s included in the Achievements Paper Pack, you’ll have lots of title ideas for your graduation scrapbook pages. They would also be great as titles for your Achievements Fast2Fab album pages. To illustrate, I’ve created two sets of title borders using the word art sheet from the Achievements paper pack and titles from the Achievements Embellishments. For even more ideas, I’ve added a few hand printed titles. You’ll also find title ideas for your graduation scrapbook pages on Creative Memories Scrapbooking Page Title Ideas board on Pinterest.
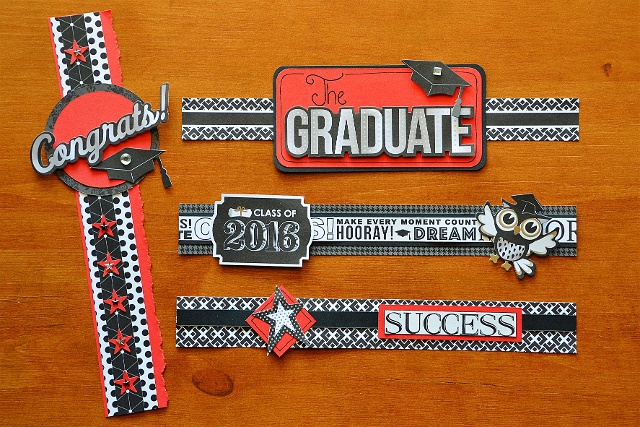
Here’s what you’ll need to create the first set of title borders above:
- Achievements Paper Pack
- Achievements Embellishments
- Red and Black cardstock
- Star Border Maker Cartridge
- Custom Cutting System and Circle Patterns
- Two Way Corner Rounder
- 12-Inch Trimmer
- Personal Trimmer
- Black Dual-tip pen
- Tape Runner and Foam Squares
Congrats! Title Border
- Tear one side of a 3” x 12” strip of red cardstock
- Using the 12-Inch Trimmer, cut one strip of black on white pattern paper to 1 ½” x 12” and one strip of white on black pattern paper to ¾” x 12 inches. Layer and adhere strips as shown.
- Using the inside track of the circle pattern, cut one red circle with the blue blade and one circle from black pattern paper with the red blade. Layer and adhere circles to border as shown.
- Using the Star Border Maker Cartridge without the Border Maker guide punch 6 stars from red cardstock. Adhere stars to border as shown.
- Use foam squares to adhere Congrats title and graduation cap to border as shown.
- Finish border with bling from the Achievements Embellishment pack as shown.
The Graduate Title Border
- Using the 12-Inch Trimmer cut the pre-designed border strip shown to 1 ¼” x 12 inches.
- Cut one 3” x 6 ¼” rectangle from red cardstock and one 4 ¼” x 6 ½” rectangle from black cardstock. Use Two Way Corner Rounder to round corners of both rectangles.
- On the red rectangle, use a ruler and pencil to mark a place above the Graduate title for the word “The” in the title. Use a black dual-tip pen to print “The” as shown. Use the black dual-tip pen to draw a line around the edge of the rectangle as shown.
- Adhere the red rectangle to black rectangle. Use foam squares to adhere the Graduate title and the graduation cap to the red rectangle as shown.
- Add bling to graduation cap and adhere rectangle to pre-designed border strip as shown.
Class of 2016 Title Border
- Using the 12-Inch Trimmer, cut a ¾” x 12” word strip from word art sheet as shown.
- Use the 12-Inch Trimmer to cut a 1” x 12” strip from black cardstock and a 1 ½” x 12” strip from houndstooth pattern paper.
- Layer and adhere strips as shown.
- Use foam squares to adhere owl embellishment and Class of 2016 title to border strip.
Success Title Border
- Using the 12-Inch Trimmer, cut a 1 ½” x 12” strip from black pattern paper and a ½” x 12” strip from black cardstock. Adhere black strip to black pattern strip as shown.
- Using the 12-Inch Trimmer, carefully remove the area around the word “Success” from the word art sheet. Use the personal trimmer to finish. Use the black dual-tip pen to ink edges.
- Use the personal trimmer to cut a 1 ½” square and a 1” x 4 ¼” rectangle from red cardstock. Use a black dual-tip pen to draw a line around the edge of the square as shown. Adhere Success title to rectangle.
- Adhere red square and rectangle to border strip as shown. Adhere star embellishment to square as shown.

Here’s what you’ll need to create the second set of title borders:
- Achievements Paper Pack
- Achievements Embellishments
- Yellow, Black and White cardstock
- Border Maker System, Film Strip Border Maker Cartridge and Music Notes Border Maker Cartridge
- Custom Cutting System and Oval patterns
- 12-Inch Trimmer
- Personal Trimmer
- Black Dual-tip Pen
- Tape Runner and Foam Squares
So Proud of You!! Title Border
- Using 12-Inch trimmer, cut a 1 ½” x 12” strip from yellow cardstock
- Use the Border Maker guide and Film Strip Cartridge to punch film strip border from black cardstock. Trim to 1 ¼” x 12” and adhere to yellow strip as shown.
- Using the 12-Inch trimmer, cut two 1 ¾” squares from yellow cardstock, two 2 inch squares from black cardstock, one 2 ¾” x 3 ¼” rectangle from yellow cardstock and one 3” x 3 ½” rectangle from black cardstock.
- Use black dual-tip pen to draw lines around the edge of both yellow squares and the yellow rectangle. Adhere squares and rectangles to border as shown.
- Use black dual-tip pen to print So Proud of You!! title on Achievements Embellishment shown. Adhere to rectangle as shown.
- Use foam squares to adhere Achievements Embellishments shown.
Congratulations! Title Border
- Use the 12-Inch Trimmer to cut on 2 ¼” x 12” strip from yellow cardstock, one 2” x 12” strip from black & white pattern paper, and one 1 ½” x 12” strip from black & grey pattern paper. Layer and adhere border strips as shown.
- Use the 12-Inch Trimmer to cut one 1 ¼” x 7 ½” strip from yellow cardstock and one ¼” x 12” strip from black & white pattern paper shown. Cut a “V” into both ends of yellow strip and use black dual-tip pen to add faux stitching to edge. Use a paper punch to punch a hole into both ends and thread ¼” strip through holes as shown. Adhere to border.
- Use the 12-Inch Trimmer or personal trimmer to cut one 1 ¼” x 2” rectangle from black pattern paper, one 1 ¼” x 2 ¾” rectangle from black & white pattern paper and one 1” x 3” rectangle from yellow cardstock. Use scissors to cut a “V” into one end of each rectangle and adhere to border as shown.
- Use foam squares to adhere Congratulations title to border as shown. Adhere star bling to flag shown.
Pomp and Circumstance Title Border
- Using the Border Maker and Music Notes Border Maker Cartridge punch a music notes strip from black & white pattern paper shown. Trim to 1” x 12 inches. Use black dual-tip pen and ruler to draw lines as shown.
- Using 12-Inch Trimmer, cut a 1 ¼” x 12” strip from black cardstock. Adhere music notes strip to black strip as shown.
- Using the outside of the small oval custom cutting system pattern as a template and the black dual-tip pen, draw an oval on white cardstock. Without moving pattern, use the green blade and outside track to cut oval. Use the blue blade and outside track of small oval to cut an oval from black pattern paper.
- Use black dual-tip pen to print Pomp and Circumstance title on white oval. Adhere to black oval and adhere to border strip as shown.
- Use foam squares to adhere graduation cap to oval. Adhere bling to graduation cap as shown.
You Did It! Title Border
- Using 12-Inch Trimmer, cut one 1 1/2 “ x 12” strip from black cardstock, one 1 ¼” x 12” strip from black & white pattern paper and one 1” x 12” strip from yellow cardstock. Layer and adhere as shown.
- Using the 12-Inch Trimmer, carefully remove the area around the phrase “You Did It!” from the word art sheet. Use the personal trimmer to finish. Use the black dual-tip pen to ink edges. Adhere to border as shown.
- Adhere balloons to border as shown, using foam squares to adhere top balloon. Adhere black bling as shown.
There you go! Hope you have fun creating title borders for your own scrapbook pages!
Diana
