July 16, 2016
Virtual Crop: Challenge 4

Hey!
Oh my gosh–I love that I get to spend my day in my jammies! But, even more than that I love that I am getting to spend the day with all of YOU! it is YOU that inspires ME! The wheels are always turning! Chocolate always helps too! I have my bag of M&M’s right here! What is your chocolate treat of choice?
CHALLENGE 4: Create Monthly Borders–which can be used on any layout throughout the year! If you don’t have the A Year To Remember Collection—no worries! You can use any other product to create a monthly border, and then submit to the Virtual Crop Event Page to make sure that your name goes in the hat for door prizes! Also, make sure to use the hashtag #cmjulyvirtualcrop !!!
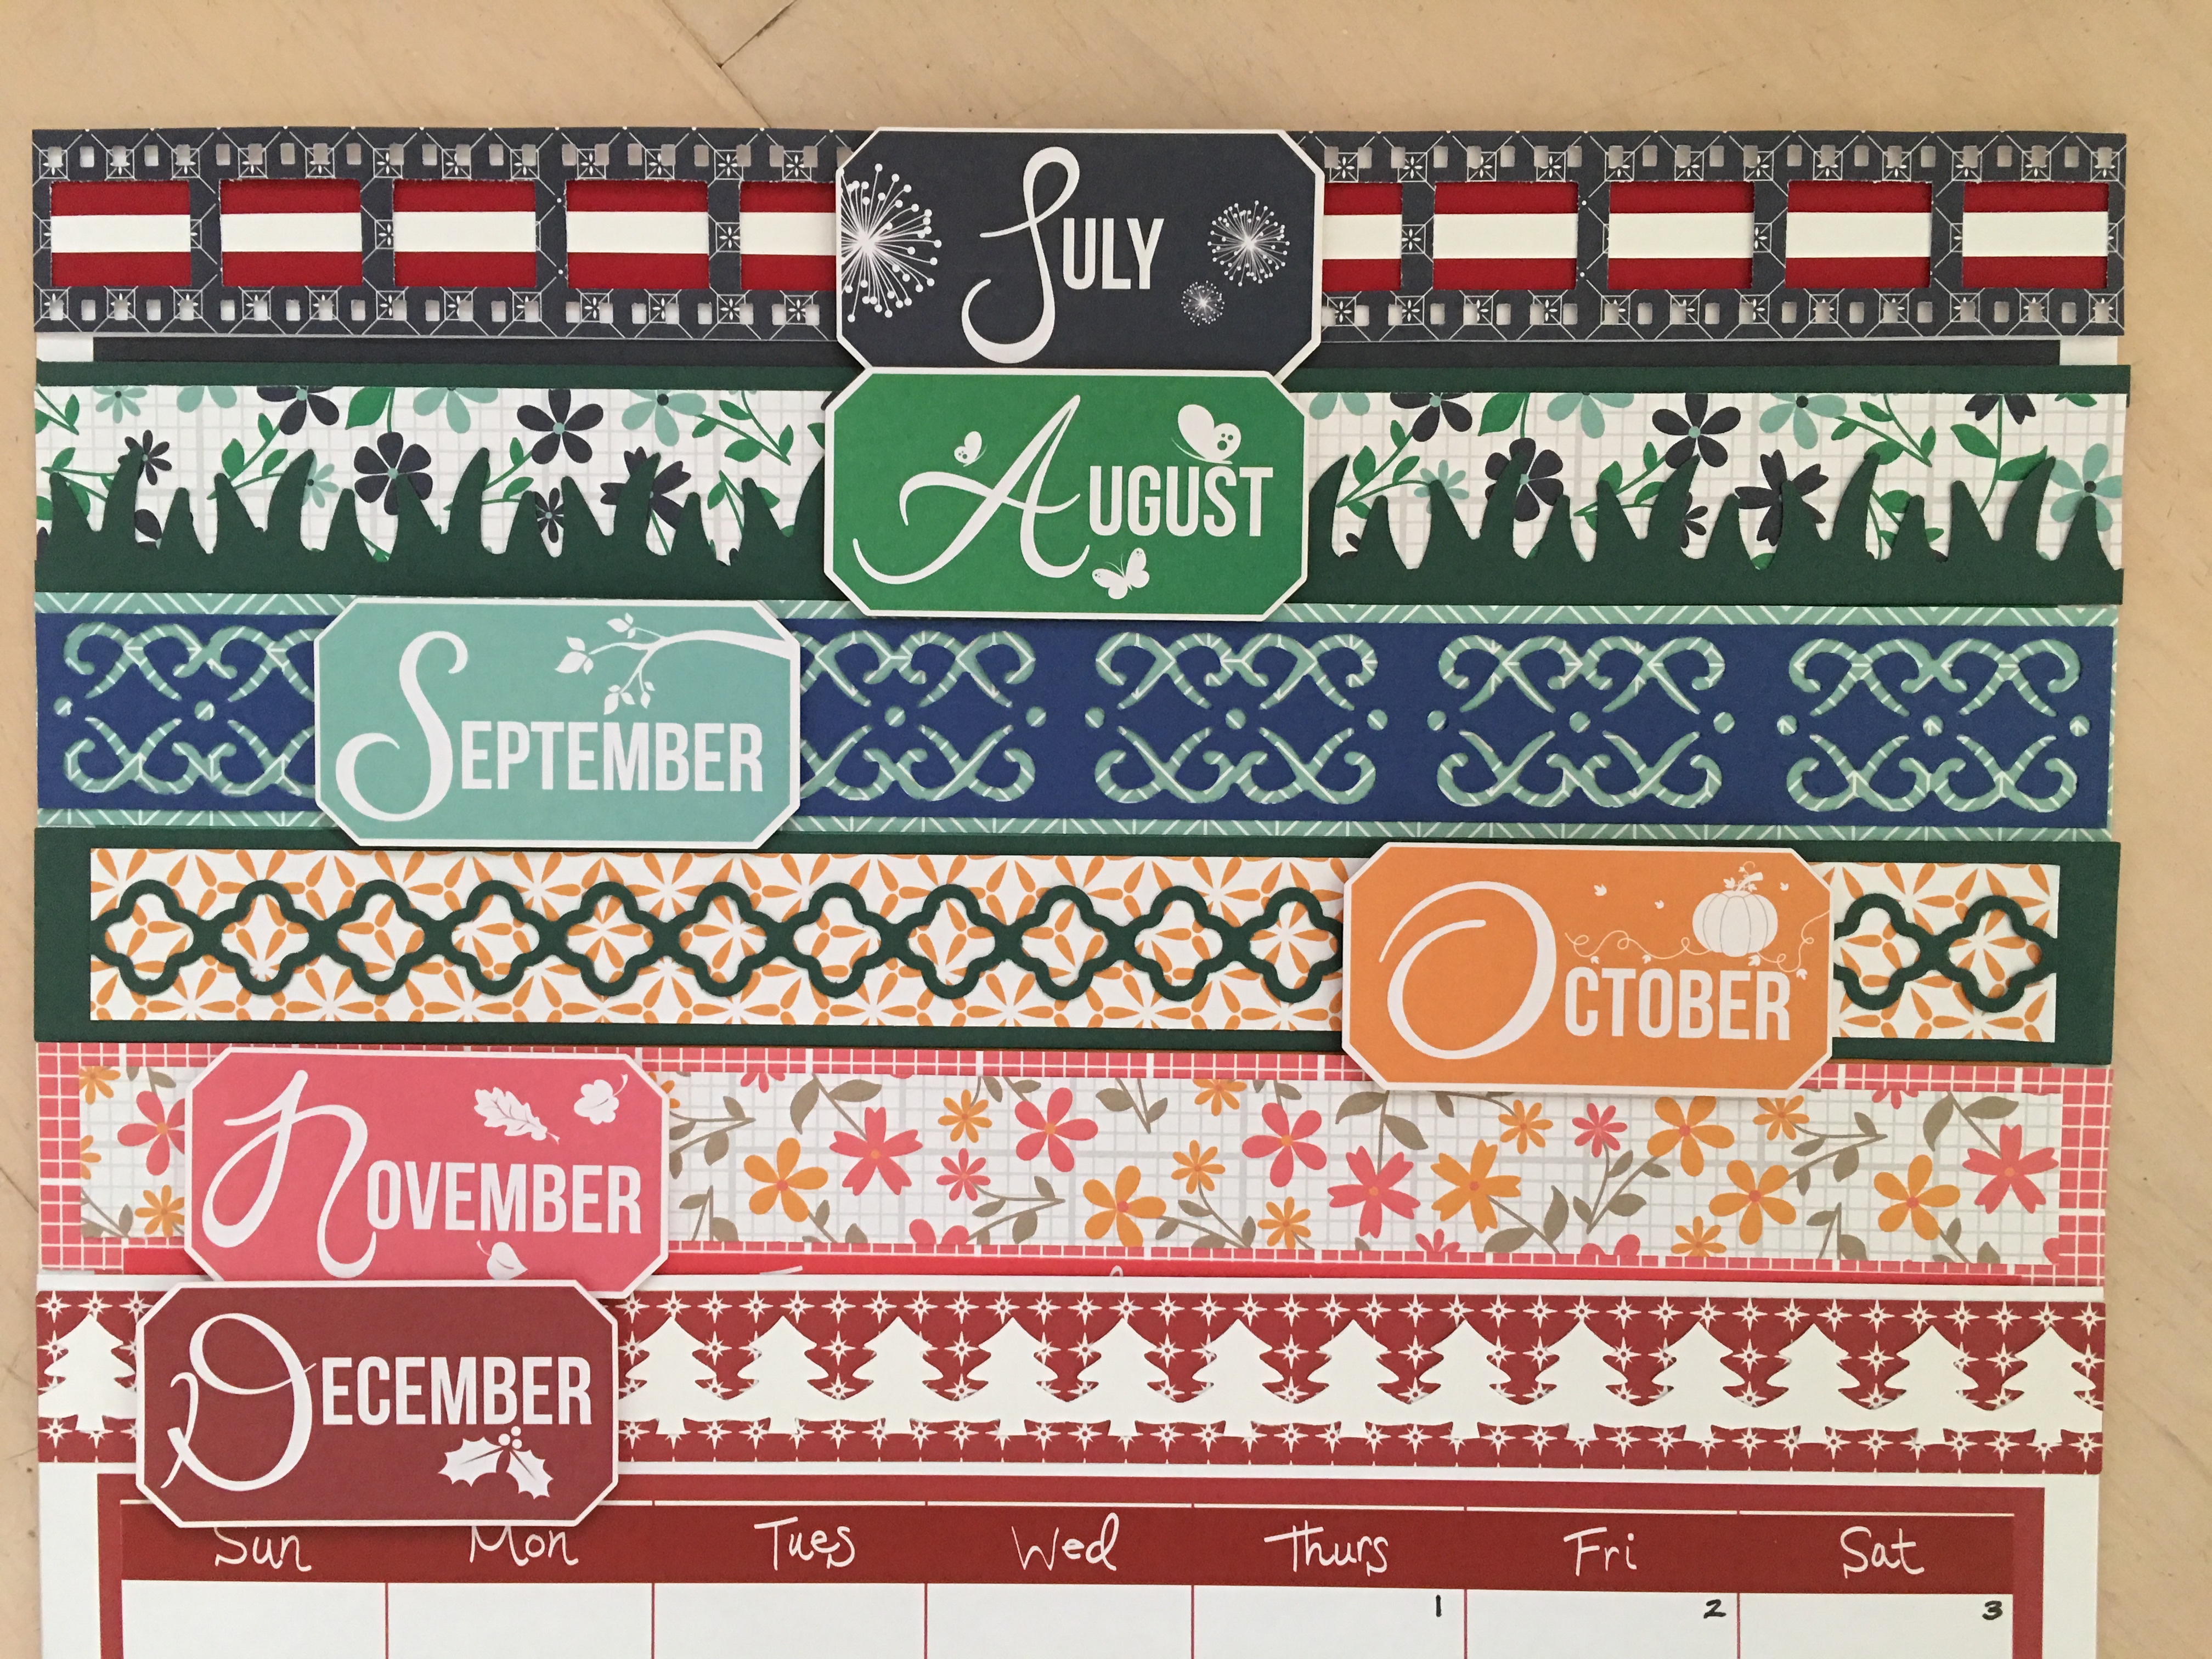
Borders created by Krislyn Mattei- US:
July:
Using Decorative Arcs Punch, cut border out of teal patterned paper. Trim to 2.5”x12”. -Cut a strip out of red paper to 1.5”x12”. Adhere to above. Using Star cartridge, punch a border out of navy paper and trim out. Adhere to red paper. Adhere border to top of red/white calendar page. Add July embellishments.
August:
Using Grass Cartridge, punch a border out of navy paper. Trim to 2.5”x12”. Using Ocean Wave cartridge, punch 2 borders out of green dot paper. Cut a 1.25”x12” strip out of green/navy floral paper. Adhere ocean waves “scallops” behind and mount on grass border. Adhere border to top of green/white calendar page. Add August embellishments.
September:
Using Picket Fence cartridge, punch a border out of orange/pink floral paper. Trim to 2.5”x12”. Cut a 1.25”x12” strip of striped paper and adhere to above. Using Lace Flower Chain cartridge, punch a border out of pink paper. Adhere to striped border. Adhere border to top of orange/white calendar page. Add September embellishments.
October:
Using Evergreen cartridge, punch a border out of teal paper. Trim to 2.5”x12”. Cut a 1.25”x12” strip of striped paper and adhere to above. Using Chevron cartridge, punch a border out of orange/white paper. Trim out and adhere to striped border. Adhere border to top of teal/white calendar page. Add October embellishments.
Borders created by Dayna Nelson- AUS:
Ingredients:
- A Year To Remember paper pack – Part 2
- A Year To Remember Embellishments – Part 2
- 1 sheet evergreen cardstock
- 1 sheet cranberry cardstock
- 1 sheet royal blue cardstock
- 1 sheet white cardstock
- 12-inch trimmer
- Border Maker System
- Border Maker Cartridges: Film, Grass, Tree, Medallion Frame Chain, Diamond Scroll
- Tape Runner
- Mini Tape Runner
- Creative Memories Scissors
JULY Border:
1. Using the Film Strip Border Maker Cartridge, cut a 12-inch strip from the navy paper (found in the ‘AYTR – Part 2’ paper pack.)
2. Cut one 12-inch strip of cranberry cardstock approx. 1.75cm in width.
3. Cut one 12-inch strip of white cardstock 1/2cm in width.
4. Adhere white strip on top of cranberry strip (centered), with Mini Tape Runner.
5. Adhere the navy film strip on top of the cranberry/white strip with Mini Tape Runner.
6. Finally, adhere the ‘July’ title (from the ‘AYTR2 Embellishments’ pack) with Foam Squares.
AUGUST Border:
1. Cut a 1.25” x 12” strip of evergreen cardstock.
2. Cut a 1” x 12” strip from the blue/green floral paper (found in the ‘AYTR – Part 2’ paper pack), and adhere to the evergreen strip, allowing for 1/2cm strip of green to show.
3. Using the Grass Border Maker Cartridge, cut a 12-inch strip from evergreen cardstock and adhere to the bottom of the floral border creating a border strip 3.5cm in width.
4. Adhere the ‘August’ title (from the ‘AYTR2 Embellishments’ pack) with Foam Squares.
SEPTEMBER Border:
1. Using the Diamond Scroll Border Maker Cartridge, cut a 12-inch strip from royal blue cardstock.
2. Cut a 3.5cm x 12-inch strip form the pastel green paper (found in the ‘AYTR – Part 2’ paper pack.)
3. Center and adhere the blue strip on top of the green strip with Tape Runner.
4. Adhere the ‘September’ title (from the ‘AYTR2 Embellishments’ pack) with Foam Squares.
OCTOBER Border:
1. Cut a 12-inch x 1.25” strip from evergreen cardstock.
2. Cut a strip 1” x 11.25” from the gold/white paper (found in the ‘AYTR – Part 2’ paper pack.) Center and adhere to the evergreen strip with Tape Runner.
3. Using the Medallion Frame Chain Border Maker Cartridge, cut a 12-inch strip from evergreen cardstock.
4. With your Creative Memories scissors, cut off one of the medallion shapes. Center and adhere to the gold/white strip with Mini Tape Runner. (Ends should line up with each other.)
5. Adhere the ‘October’ title (from the ‘AYTR2 Embellishments’ pack) with Foam Squares.
NOVEMBER Border:
1. Cut a 12-inch x 1.5” strip from the salmon-colored paper (found in the ‘AYTR – Part 2’ paper pack.)
2. Cut a strip 1” x 11.5” from the salmon/orange floral paper (found in the ‘AYTR – Part 2’ paper pack) and adhere to the salmon strip with Tape Runner.
3. Adhere the ‘November’ title (from the ‘AYTR2 Embellishments’ pack) with Foam Squares.
DECEMBER Border:
1. Cut one 12-inch strip from the cranberry paper (found in the ‘A Year To Remember Part 2’ Paper Pack.)
2. Using the Tree Border Maker Cartridge, cut a 12-inch strip from white cardstock. With your Creative Memories scissors, you will fiddly cut off the bottom of the tree border, leaving only the trees and tree trunks. Affix to your cranberry strip with Tape Runner.
3. Adhere the ‘December’ title (from the ‘A Year To Remember 2 Embellishments’ pack) with Foam Squares.

Border Created by Melissa Ullmann-US Home Office:
Ingredients:
- Soiree Paper Pack
- Soiree Embellishments
- Soiree Stickers
- Foam Squares
- Tape Runner
- Navy ABC/123 Stickers
- Raspberry Cardstock
- 12″ Straight Trimmer
May Border:
Step 1: Cut a piece of the striped paper to measure 2″ x 12″.
Step 2: Cut a piece of the Raspberry Cardstock to measure 12″ x 1-1/2″.
Step 3: Cut a piece of the half circles paper to measure 3/4″ x 12″.
Step 4: Cut a piece of the navy paper to measure 1/2″ x 12″.
Step 5: Layer pieces together as shown.
Step 6: Adhere the die cut embellishment to the border using Foam Squares.
Step 7: Add gems to the die cut.
Step 8: Add Navy ABC/123 Stickers to the die cut.
June Border:
Step 1: Cut a piece of Raspberry Cardstock to measure 12″ x 2″.
Step 2: Cut a piece of the half circle patterned paper to measure 12″ x 1-3/4″. Adhere to Cardstock.
Step 3: Cut a piece of the green paper to measure 3-1/2″ x 4″. Adhere behind the photo die cut frame. Adhere to the border.
Step 4: Adhere the balloon and ribbon die cuts using foam squares.
Step 5: Apply the Navy ABC/123 Stickers.
July Border:
Step 1: Cut a piece of the green paper to measure 12″ x 2-1/2″.
Step 2: Cut a piece of Raspberry Cardstock to measure 12″ x 2″
Step 3: Cut a piece of the blue paper to measure 2-3/4″.
Step 4: Layer pieces together.
Step 5: Apply the arrow sticker and ABC/123 Stickers to the border.
Step 6: Cut the banner die cut in two pieces. Adhere to the border.
Step 7: Apply gems to the ends of the banner die cut.
We are anxious to see what you create! Think outside of the box! (or, in it, whichever makes you most comfortable!)
See you in a couple of hours!
Happy Creating!
Melissa

[…] July Virtual Crop: Challenge 4 […]