November 5, 2016
Virtual Holiday Crop: Welcome and Challenge-Shaker Card

Welcome!
We are SOOOO glad that you joined us for the Holiday Virtual Crop!
We have so many ideas that we hope will inspire you today!
Welcome back to those of you who have virtually cropped with us before, and a BIG warm welcome to all you newbies!
If you are new, you might be asking yourself “What is a Virtual Crop, and WHY am I here?” Yesterday’s blog post helps describe the event.
First and foremost—no need to get out of your jammies! Just make yourself a cup of tea/coffee, grab a few photos, along with some scrappy supplies! (Oh, and you will DEFINITELY need some chocolate!)
We will be hosting several challenges right here on the blog, and posting to the events page on Facebook!
(Please SAVE all of your scraps—you will need those for the final challenge!)
Please post your completed pages on the Facebook Events Page to qualify for the door prizes that will be given away at the end of each challenge. Use the hashtag #CMVirtualHolidayCrop. If you have any questions, just ask in the comments section of each post either here on the blog or on the Facebook Page.
So, let’s get started!
CHALLENGE #1: Shaker Card
Complete a Holiday shaker card using the following examples as inspiration. Post a photo of your completed project to the Facebook Event Page before the start of the next challenge (11am CST) once you have it completed to be eligible for the prizes!
Card created by Melissa Ullmann- CM Home Office US
Ingredients:
Christmas Past Paper Pack US CAN
Christmas Past Stickers US CAN
Sticker Packaging or Ziplock bag
Christmas Quartet Punch US CAN
Border Maker with Midnight Star Cartridge US CAN
Step 1: Cut a piece (top and bottom) from the packaging to measure 4-1/2″ x 3-1/2″.


Step 2: Cut your Silver Shimmer Cardstock to measure 8-1/2″ x 5-1/2″. Fold in half.
Step 3: Using the trimmer, cut out a piece from the center of one side of the card, leaving a 1″ border.
Step 4: Punch the pieces from the Midnight Star Border Maker Cartridge and the Christmas Quartet Punch. Place in between the plastic pieces. Adhere the outer edges of the plastic with the tape runner.
Step 5: Adhere the plastic piece behind the opening of the card.


Step 6: Cut a piece of red paper to measure 5-1/4″ x 4″. Adhere behind the window/plastic piece of the card.
Step 7: Cut a piece of green paper to measure 5-1/4″ x 4″. Cut out the center of the piece leaving a 1″ frame. Adhere to the front of the card.
Step 8: Cut a piece of gold paper to measure 5″ x 3-3/4″. Cut out the center with your trimmer, leaving a 1/2″ frame.


Step 9: Adhere the sticker to the card using foam squares.
Step 10: Use the black pen to outline the gold frame.
The great thing is, this card design can be adapted to baby, birthday card themes and more!
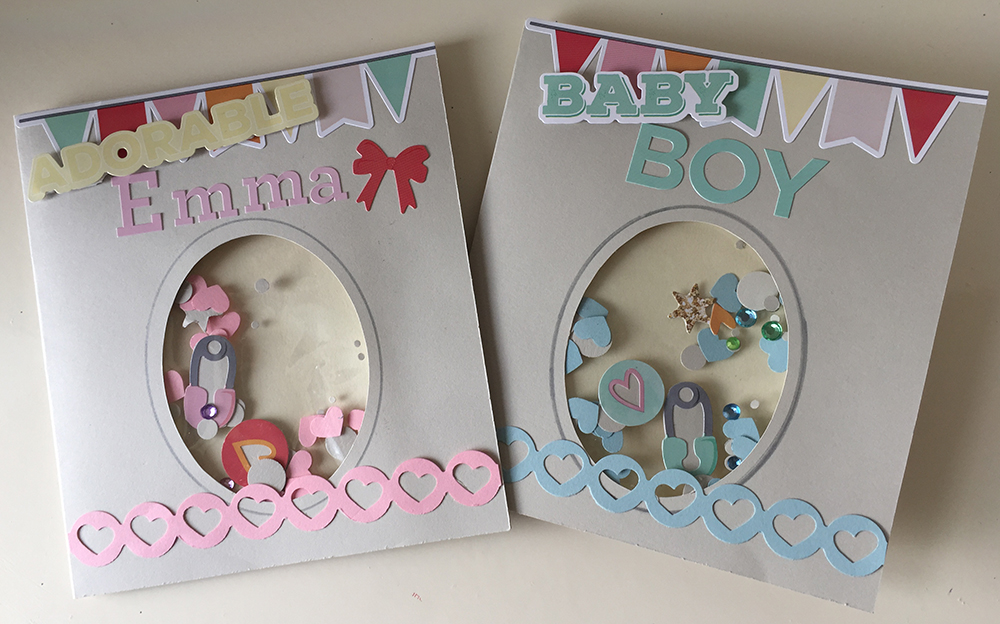
Cards created by Kelly Batten- CM Home Office AUS
Ingredients:
Hello Baby Girl Stickers US CAN
Pastel 2 Embellishments US CAN
Pastel Pink & Mint ABC/123 Stickers US CAN
Border Maker System with Heart Chain & Bubble Border Maker Cartridges US CAN
CCS Oval Patterns & Green Blade US CAN
Repositionable Adhesive US CAN
Plastic packaging from 2 CM embellishment packs
The following instructions will help you create 2 cards at the same time:
Step 1: Punch 1 Bubble border along a sheet of Beige Cardstock, 1 Heart Chain Border from a sheet of pink Hello Baby Cardstock and a 2nd Heart Chain Border from blue Hello Baby Cardstock. Keep the 2 Heart Chain Borders, “bubble” circles and love heart scraps.
Step 2: Cut the Bubble border off the sheet of Beige Cardstock (to measure 11″ wide) and trim into 2 pieces measuring 11″ x 6″. Find the center of the long edge of the cardstock pieces and score with the Multipurpose Tool. Tip: position the cardstock in your Trimmer to measure and use the cutting guide to score along.
Step 3: Cut an oval with CCS Oval pattern (inside 2nd largest pattern) and Green Blade on the front of each card, centered across the middle of the front and approx 3/4″ from the bottom edge of the card. Keep one oval cut out.
Step 4: Center the CCS Oval Pattern as a guide over the oval hole and draw a border using the Silver Pen, repeat on the second card.
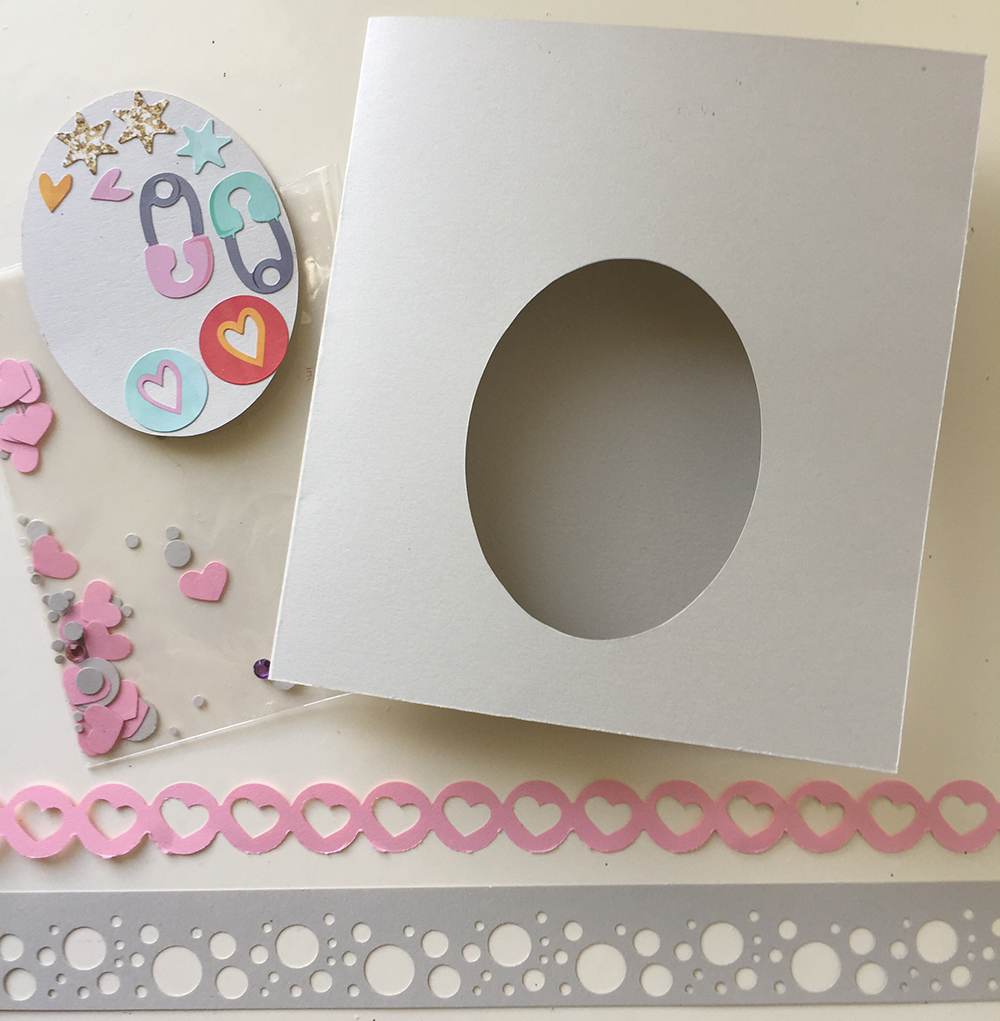
Step 5: Adhere a selection of smaller stickers (stars, love hearts, safety pins etc) to the oval cut out saved in step #3. Carefully hand cut around each sticker with Scissors. Adhere a few of the small gem stickers from Pastel 2 Embellishments to “bubble” circle scraps saved in step #1.
Step 5: Carefully remove the plastic packaging from 2 packs of embellishments. Using the 12-inch Trimmer, cut the top (open end), bottom and one side off so each measures 4″ x 4 1/2″ for your shaker window. Note: one side should still be sealed. Tip: place the blade in the middle of the plastic bag to start cutting. Divide the stickers, gems, “bubble” circle and love heart scraps between the 2 shaker window bags. Carefully fold the plastic back and place Tape Runner on the edge of the plastic, then carefully seal it up.
Step 7: Open one card, run the Tape Runner around the bottom and right edge of the hole (nice and close). Position the shaker window bag on the adhesive.


Step 8: To hide the mess around your shaker window and create a nice layered look inside your card, trim a yellow sheet of Hello Baby Cardstock into 2 pieces measuring 10 1/4″ x 5 1/4″. Score down the middle of each and adhere to the inside of each card, centering the yellow cardstock to create a border around the outside edge.
Step 9: The fun part! Decorate the front of your card with the left over Heart Chain strip (Tip: use the Repositionable Adhesive), ABC/123 lettering and stickers. For extra oomph, I used Foam Squares to adhere the “Adorable” and “Baby” stickers to the card.
On the inside of each card I added an extra sticker and my message of congratulations in Silver Pen.


Card created by Marja Deeth- CM Home Office Canada
Ingredients:
Cloud 12X12 Solid Cardstock US CAN
Christmas Past Stickers US CAN
Silver Shimmer Cardstock US CAN
Midnight Star Border Cartridge US CAN
Snowflake Chain Border Cartridge US CAN
Repositionable Adhesive US CAN
Packaging from embellishments for shaker pocket
To create this card:
Step 1: Cut your Cloud Cardstock to 8-1/2″ X 5-1/2″ and score it at 4-1/4
Step 2: Cut a piece of Denim Designer Paper to 4″ X 5-1/4″
Step 3: Use Repositional Adhesive to adhere the Denim layer to the front of the card base (making sure to have an even border all around.
Step 4: Use the Oval Pattern CCS to cut an oval through both layers at the same time – this ensures that your window will line up perfectly. Once the oval is cut through both layers remove the Denim layer from the card front.
Step 5: Cut an empty packaging bag from an embellishment package to 3-3/4″ and use the pocket to hold all of your little shaker bits. You can use anything at all that is small – I used the cut outs from the Snowflake Chain Border and the Midnight Star Border. Once the pocket has your shaker bits in make sure to seal the bag with a piece of tape so that there is no opening at all for your bits to escape through.
Step 6: Take a border created using Royal Blue Cardstock and the Snowflake Border Cartridge and adhere the border to the backside of you Denim Layer — I adhered mine just below the center line. Next, use you Tape Runner to adhere the pocket of shaker bits to the back side of your Denim layer. Make sure that no adhesive shows through the window section.
Step 7: Adhere the Denim/Pocket layer the card front – making sure to line up the oval and keep equal borders around the Denim layer.
Step 8: Decorate! I used the Christmas Past Stickers as well as the Snowflake Chain Border to jazz up the outside and inside of this card – the possibilities are endless!
** Note: With the peek-a-boo window you’ll want to keep in mind where you write on the inside as anything directly behind the window will show through to the front of the card when it is closed.
These look BEAUTIFUL as photo cards – just adhere your photo to the inside of the card and the image will peek through the window!

Don’t forget: With an order of $80 US/$95 CAN you qualify for FREE ground shipping! Plus, you will might also get a GOLDEN TICKET in your package! Details can be found here.

AND


So if in understand well, we can create the Christmas CAD or adapt it and make a baby card?
Or any theme you would like! :)
I love the idea!
Really cute ideas!
How do I post the pictures???
Hi Leslie! Follow the link in the blog post, and then upload your photo to the Event Page! :)
I never knew how easy a shaker card was to make!! love it!
How do I post a picture to the virtual crop
Hi Catherine—Follow the link it the blog post, and then insert your photos! :)
Great inspiration!
I wish there was a way that we could print out these challenges and put them in a notebook. I know at some point, they will get taken down for newer materials.
HI Caroline! These will stay on our blog! We have no intent to take them down! Enjoy! -Melissa
I have tried emailed these blog posts to my email & that was 3 days ago & they still didn’t land in my email. I guess I will need to resort to the old copying & paste method instead.