January 20, 2017
What is a Virtual Crop? with Bonus Challenge Sketch Included

Tomorrow is the day! Virtual Crop DAY!
Join us right on our Facebook Event Page! If you have not RSVP’d saying that you will join us — you can do so now!
However, before then, here are some tips to best prepare for the event:
Gather some photos and scrappy supplies, stay comfy in your jammies, and crop the day away with us from the comfort of your home.
We will host several challenges throughout the day from our Facebook Event Page to inspire you at (all Central Time): 9am, 11am, 1pm, 3pm and 5pm.
After you complete each challenge, we encourage you to take a photo (nothing fancy, just a snapshot) and post it to the Facebook Event Page. By doing that, you will qualify for the prizes that will be given away every 2 hours-at the end of each challenge.
The link to each challenge will be posted on the event page (the challenges will remain on our blog for easy access later). A bonus to challenges being on the blog is that when you subscribe you’ll get an email with each new challenge. Enter your email on the blog to subscribe: https://blog.creativememories.com/
All of the ideas and inspiration will help you get projects completed – and it’s a ton of fun to connect with fellow scrappers across North America..
You won’t want to miss it!
Stop in for one challenge or stay for all of them. We look forward to spending time with you!
We decided to give you a bonus sketch to get your creative juices flowing before tomorrow morning.
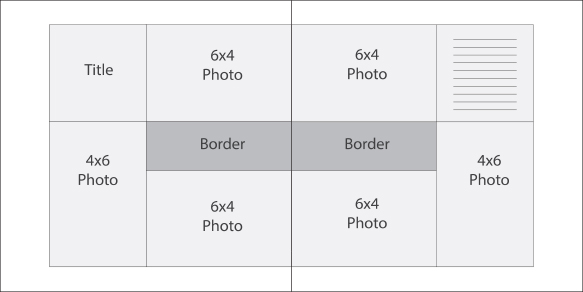
***Create a scrapbook spread using this very basic sketch layout. When you are done, make sure to post on the event page for everyone to see, and to qualify for the first door prize-which will be given away at 9:00 AM CST at the start of the Virtual Crop!
Please use hashtag: #CMVirtualCrop
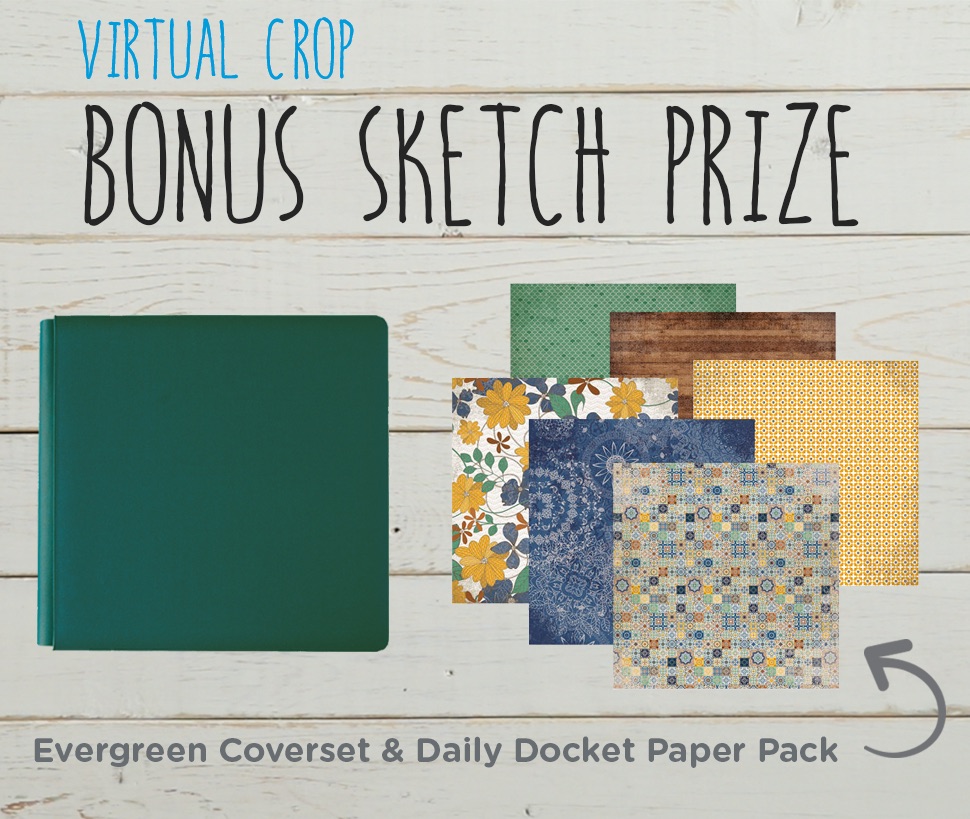
The prize for the Bonus Sketch is a 12″ x 12″ Evergreen Coverset and a Daily Docket Paper Pack.
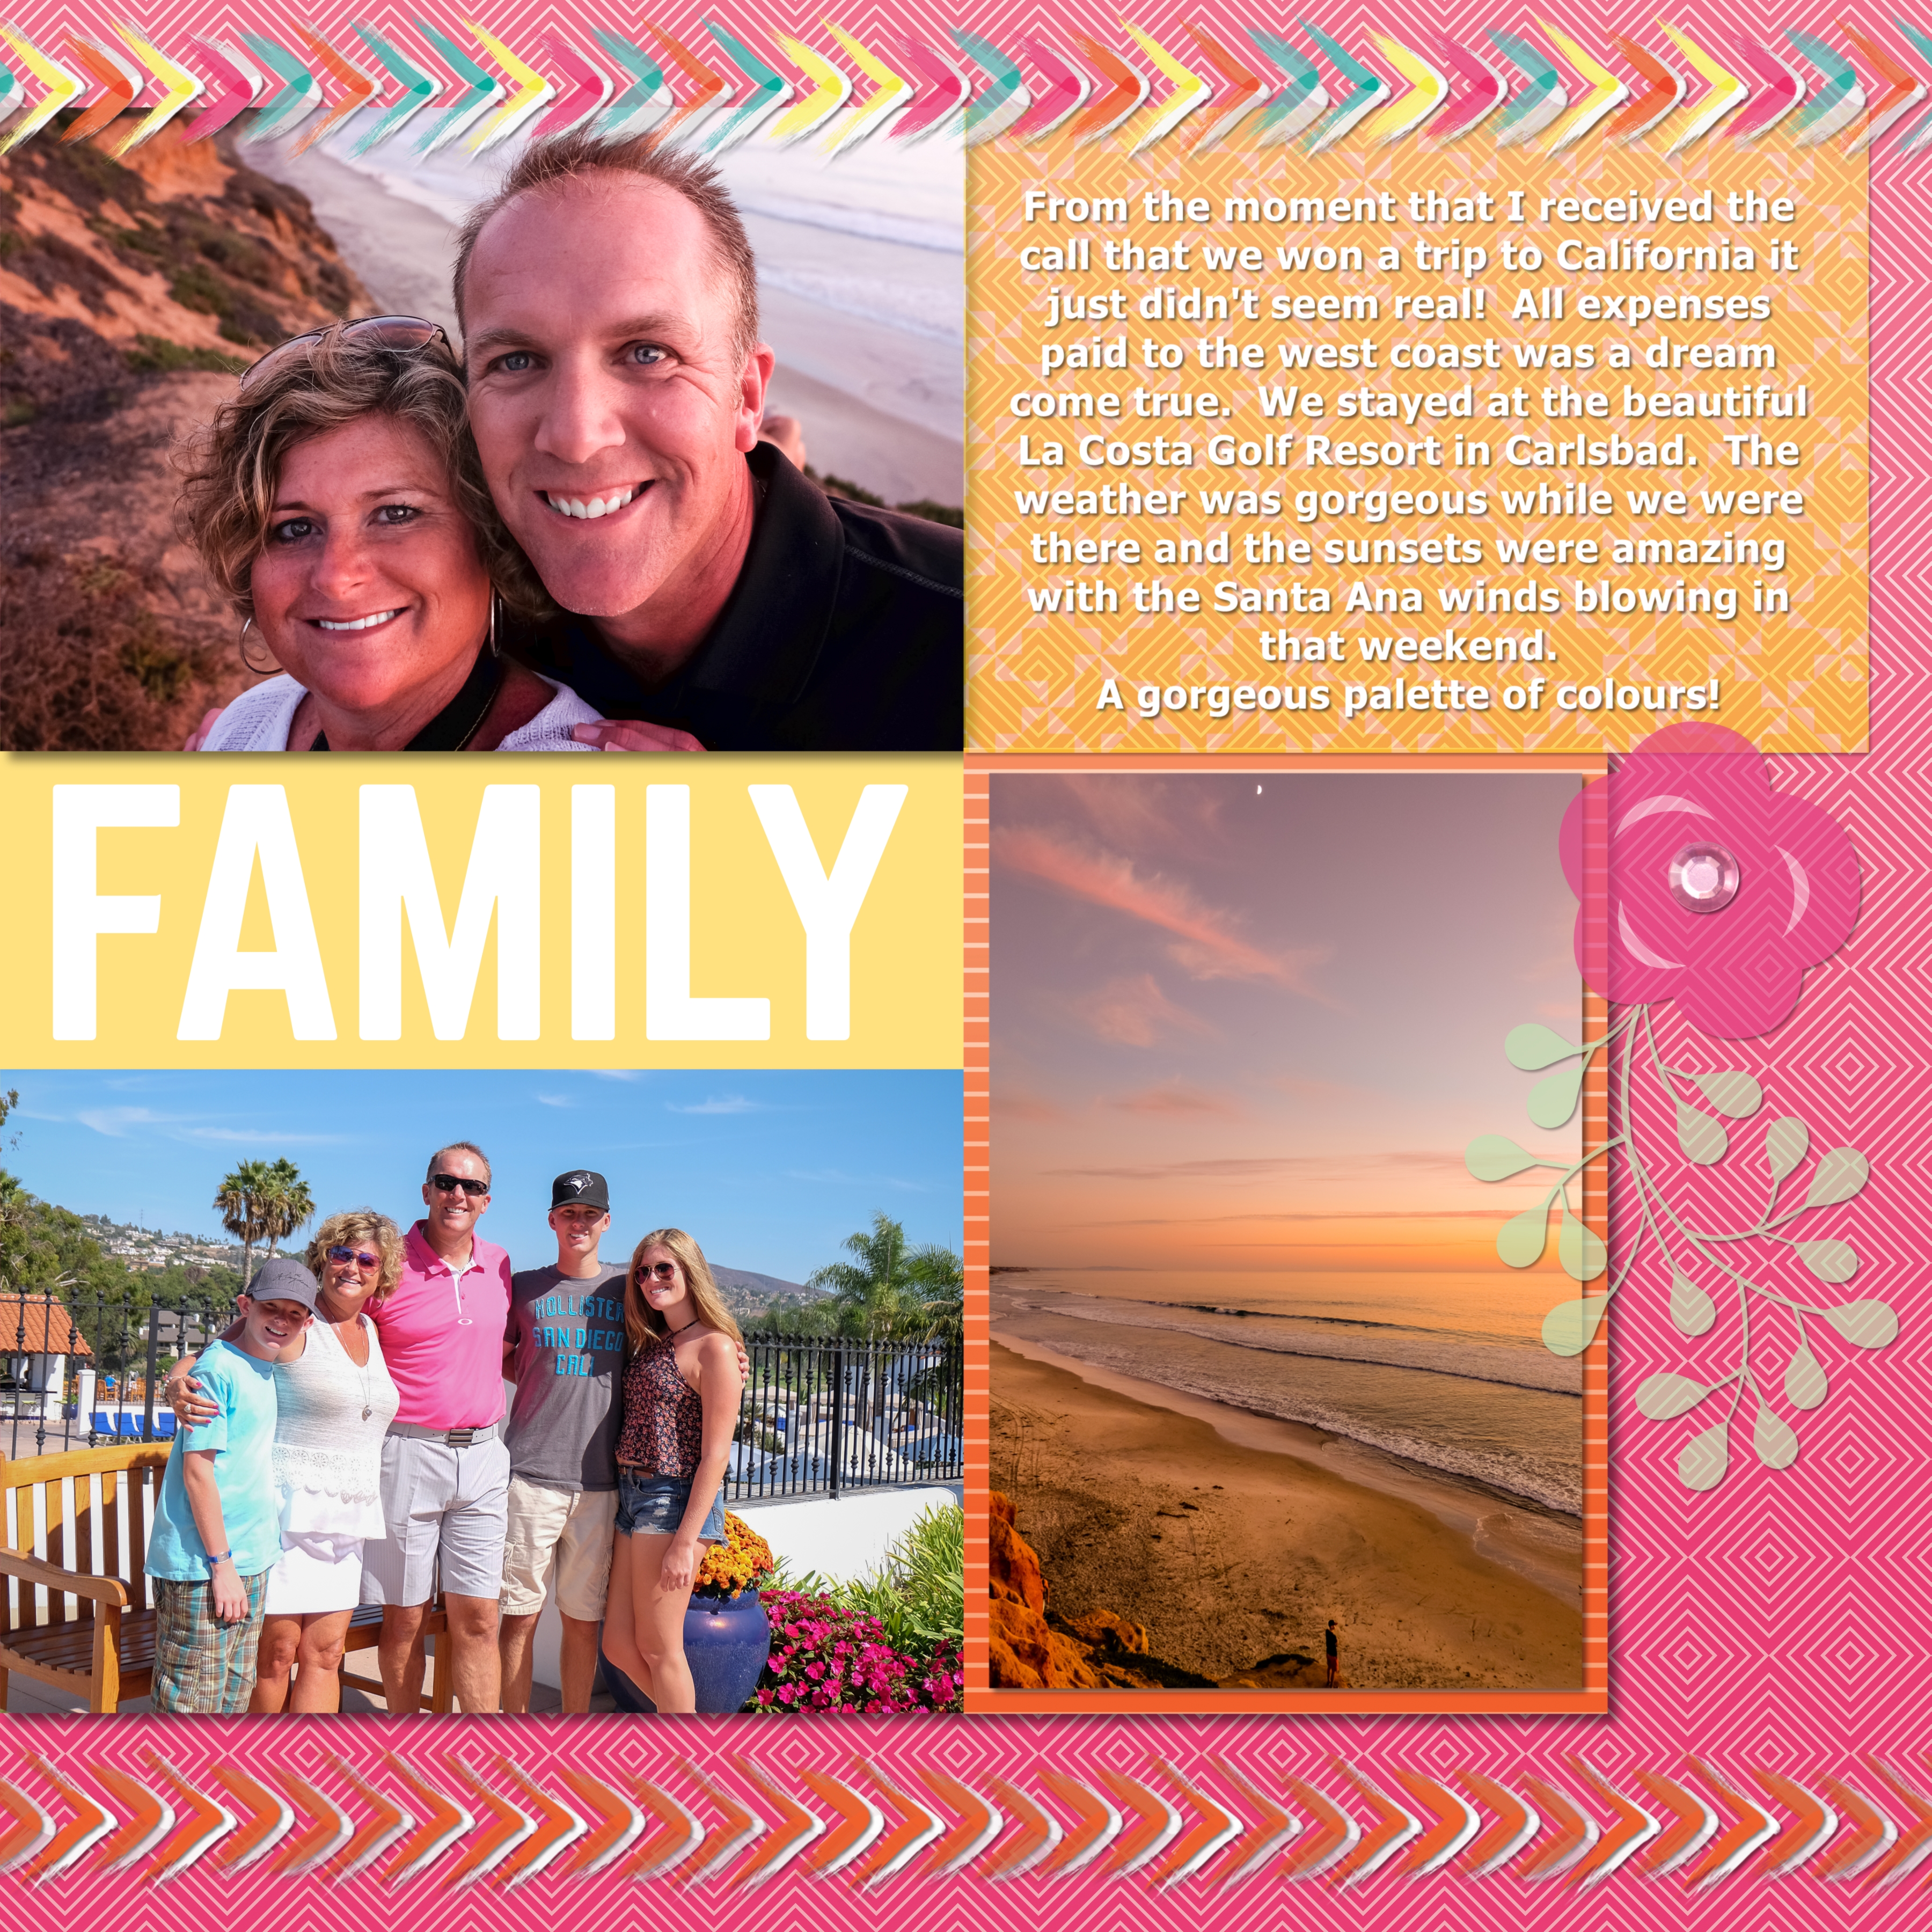
Here are some spreads to help inspire you…….

To create this spread, you will need:
Painted Harvest Embellishments US CAN
Painted Harvest Variety Mat Pack US CAN
Painted Harvest Paper Pack US CAN
Border Maker System with Circle Weave Cartridge US CAN
Tape Runner & Repositionable Refill US CAN
Choose the 2 leafy papers for the backgrounds and 2 light coloured papers from the Painted Harvest pack. Trim the each light coloured paper to 10 1/2″ x 10 1/4″ (keep all the trimmed scraps.) Adhere the light coloured papers to the backgrounds, centred vertically positioned at the inside edge of the pages.
Choose your photos and adhere on the light coloured paper as per the sketch, leaving a border at the top, bottom and outside edges (as per show in the layout.)
Using the wider scrap strips from the light coloured paper, trim these to 6 inches long, flip them over and adhere in the centre of the layouts (the border area on the sketch.)
Adhere one of the thin scrap strips from the light coloured paper to the edge of any cardstock sheet with Respositionable Tape Runner (hint: it must be repositionable so you can remove it afterward.) Place it into your Border Maker System with the scrap strip positioned as the paper to be trimmed. Punch with the Circle Weave Cartridge. Repeat with the other thin scrap strip of light coloured paper. Trim both borders to 6 inches long and adhere in the border area of the sketch, slightly overlapping the borders.
Select a light coloured and a mat with blue from the Variety Mat Pack. Trim the light coloured mat to 4″ x 4″ and adhere to the layout above the right hand photo. Punch the 4″ edge of the blue mat using the Circle Weave Cartridge and adhere this strip to the other mat as shown.
Add journaling, a title and embellishments to the layout as shown.

This layout demonstrates a simplified version of the sketch, it uses fewer photos and makes the paper design the hero of the layout.
Painted Harvest Paper Pack US CAN
Painted Harvest Embellishments US CAN
Painted Harvest Variety Mat Pack US CAN
Choose the brick and spotty paper designs and trim in half. Using pages or cardstock as your base, adhere the halves of paper to each page as shown. Adhere 4 landscape photos as per the sketch.
From the Variety Mat Pack, choose the vertical “love” mat and “scroll” mat. Trim the “love” mat to 4″ x 4″ and round the corners, then adhere on the left page as per the title are on the sketch. Using the scissors, cut around the “scroll” shape and adhere to the right page as shown. Add journalling to this mat.
Punch a blue sheet of paper with the Argyle Border Punch and trim in half, adhering in the border area as per the sketch. Add embellishments!

Digital Two-Page Spread created by Beth Thomander- CAN
Digital Spread created using:
Cake My Day Digital Artwork US CAN
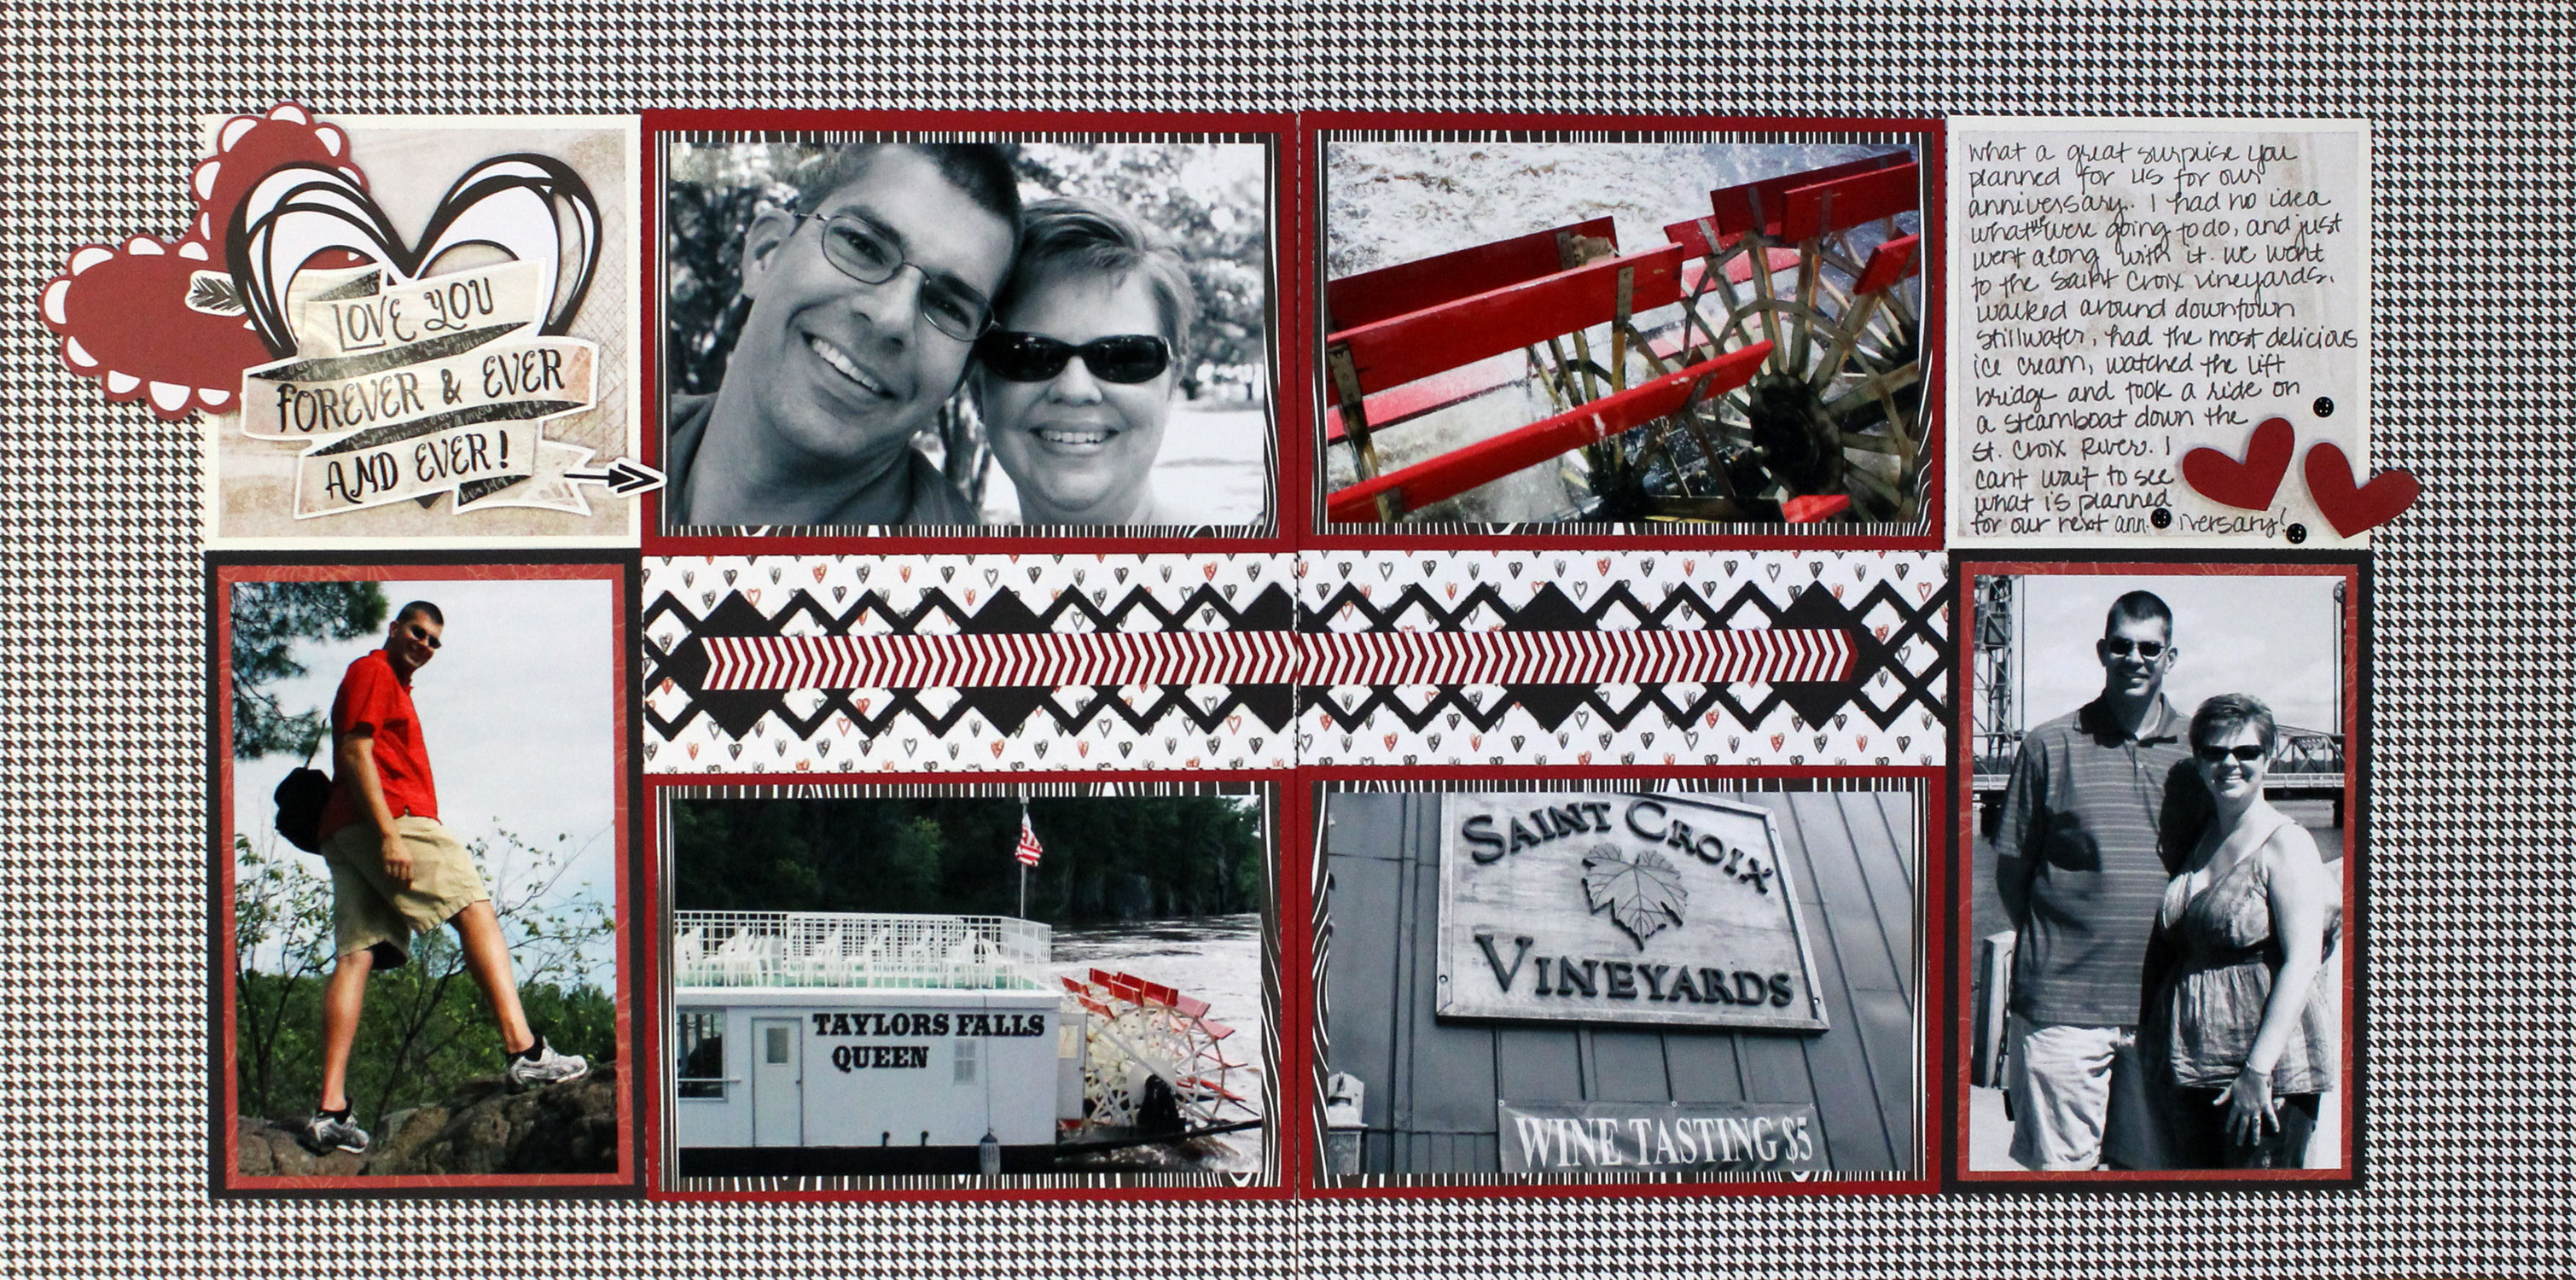
This spread demonstrates that you can mat your photos before adhering to the spread.
To create this spread, you will need:
Use the black and white patterned paper as the base for this spread.
Cut four pieces of Cranberry Cardstock to measure 4″ x 6″. Cut two pieces of White Cardstock to measure 4″ x 4″. Cut two pieces of Black Cardstock to measure 4″ x 6″ Adhere these pieces to the base of the spread.
Cut four pieces of black and white wood-grain paper to measure 5-3/4″ x 3-3/4″. Adhere to the top of the Cranberry Cardstock.
Cut two pieces of red patterned paper to measure 3-3/4″ x 5-3/4″. Adhere to the top of the Black Cardstock.
Cut two pieces of light colored paper to measure 3-3/4″ x 3-3/4″. Adhere to the top of the White Cardstock.
Cut two pieces from the heart patterned paper to measure 6″ x 2″. Adhere to the middle of the spread, between the photos.
Using the Argyle Border Punch, punch a 12″ border from Black Cardstock. Cut in half. Adhere each piece to the top of the heart patterned paper.
Adhere embellishments and stickers, using Foam Squares for dimension.
Adhere photos.
(I used a combination of black and whites, and colored to keep the spread less “busy”)
Journal using Dual Tip Pen.
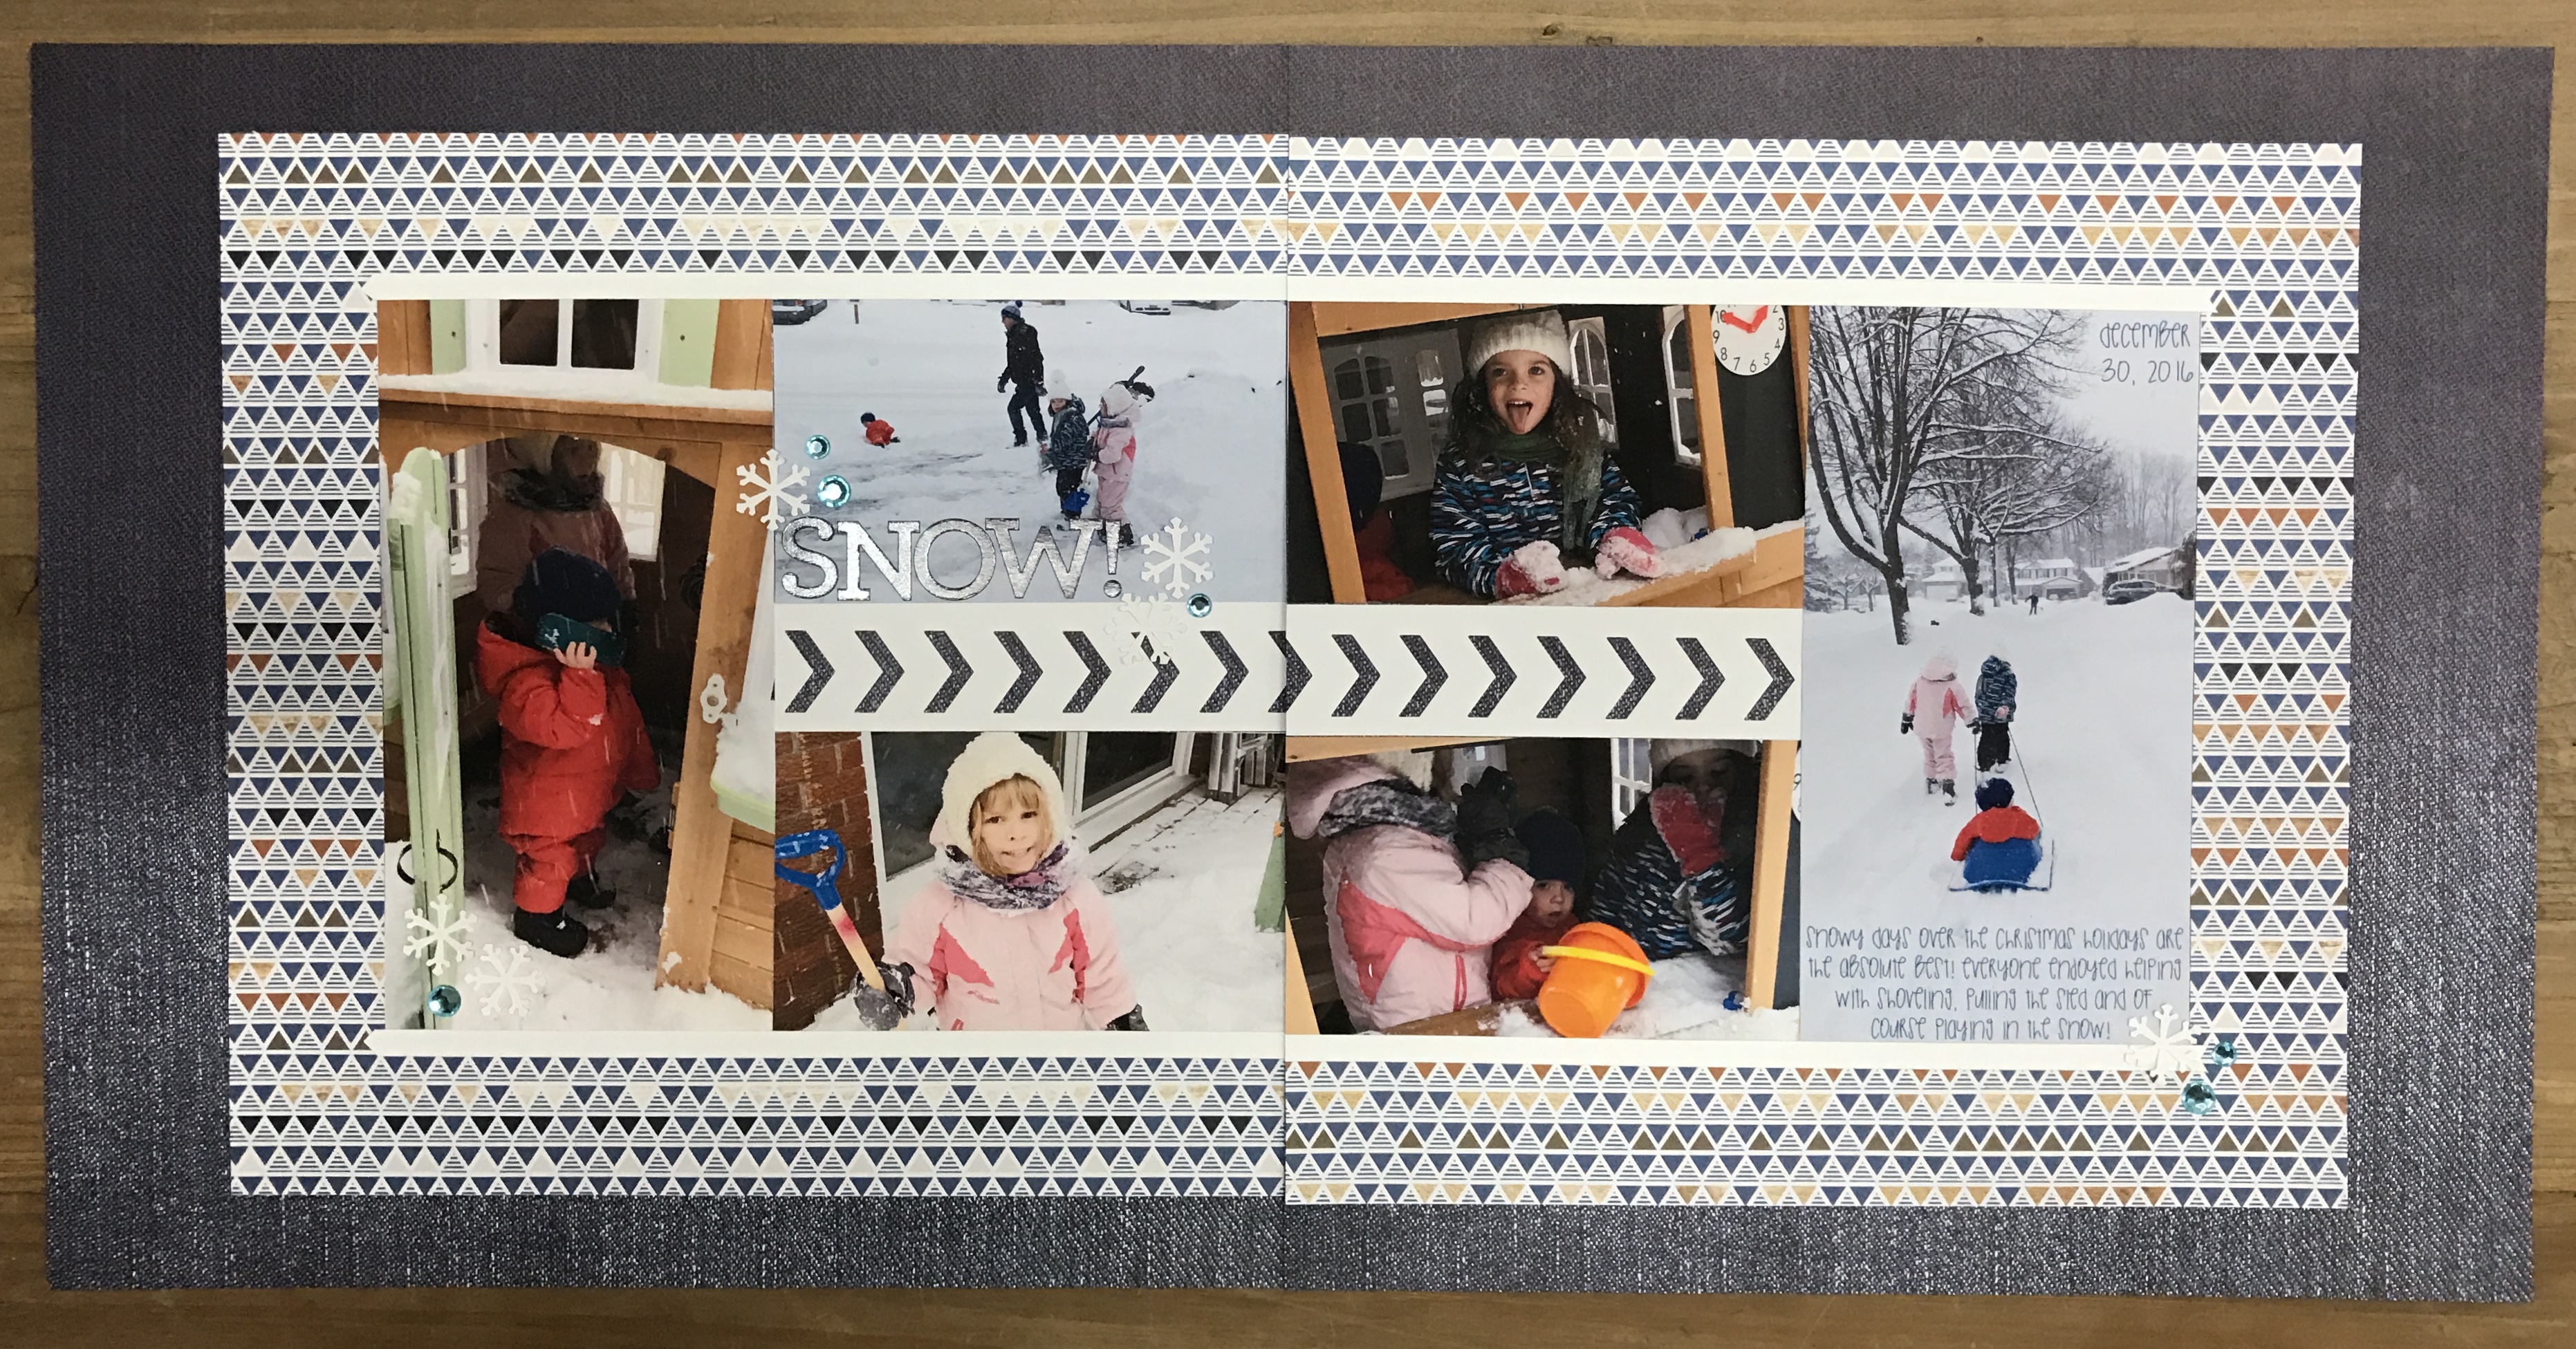
To create this spread you’ll need:
Daily Docket Paper Pack US CAN
Denim Blues Embellishments US CAN
Christmas Quartet Punch US CAN
Chevron Border Maker Cartridge US CAN
Start by using the 12-Inch Trimmer to cut the frame our of Daily Docket patterned paper with each edge measuring 1-1/2”
Next, adhere photos to the spread (I adjusted the size of the photos to be 7-1/4” X 3-3/4” for the left and right vertical photos and 3” X 5” for the four horizontal photos in the centre of the spread).
Create a border strip using white cardstock and the Chevron Border Cartridge for the Border Maker System. Next add a 1/2” strip of White Cardstock to the top and bottom of the photos, adding an arrow end in one side and a flag end in the other.
Use Navy ABC/123s for the title and then add snowflakes made using the Christmas Quartet Punch and White Cardstock. Finally add some gems and the spread is complete!
* For journalling on this spread I chose to add text on my photo on the computer before printing instead of handwriting.
- NOTE: You could choose to choose to cut a 10-1/2” X 10-1/2” square for each side and layer your photos on top – but there are 12 unique patterns in this collection so you would need two packages of paper if you wanted the frames to match on both sides if you choose to do it this way). Here’s a diagram of how I cut my frames:


Mark Your Calendars!
2017 Virtual Crops
Saturday January 21st 9:00 am – 6:00 pm CST
Saturday March 25th 9:00 am – 6:00 pm CST
Saturday May 6th 9:00 am – 6:00 pm CST
Saturday September 16th 9:00 am – 6:00 pm CST
Saturday November 11th 9:00 am 0 6:00 pm CST
***Make sure to check back with us tomorrow as we might have a GREAT offer for you during the crop.
Happy Creating!

Excited to crop tomorrow!!!?
This is a great layout! going to start on it now.
Ok. Being from N. E. Indiana when I first seen the layout with the wording, A Wish come true, I thought it said Amish come true!! Maybe it was the drinks I had at dinner? Lol. I decided I need some sleep before I scrapbook in the morning! Lol.
I thought the same thing at first and I didn’t have any drinks at dinner. lol I must not be awake yet,
Sounds like fun