June 7, 2017
Say “I Do” to Beautiful Scrapbook Borders
My beautiful niece recently married, and I offered (I would’ve begged) to make her wedding album for her! The new Forever Yours Wedding Collection with its elegant, timeless pieces, along with the lovely photos taken, are all I need to create the perfect keepsake of her special day.
Here are a few borders I’ve created to personalize the Forever Yours Fast2Fab Album I’m using. Something I love about making borders to decorate my pages is that they are so versatile: they work well on any style of page, from Fast2Fab to black to white.
To make these borders you’ll need:
- Forever Yours Paper Pack, Variety Mat Pack, Stickers, Embellishments, Vellum Paper Pack & Laser Cut Embellishments
- Forever Yours Fast2Fab Album (optional)
- White and Gray Cardstock
- Original Border Maker System with Scallop Dot, Medallion Frame Chain and Lace Scallop Cartridges
- 12-inch Straight Trimmer
- 12-inch Decorative Trimmer
- Custom Cutting System with Circle Patterns
- Scissors
- 4-Way Corner and Hole Punch
- Doily Border Punch
- Leaf Trio Punch
- Tape Runner with Vellum and Repositionable Tape Runner Refills
- Foam Squares

Gold Floral Border
- Cut a 2-1/2″ x 12″ strip of gold designer paper for the base. Cut a 1-1/2″ x 12″ strip of light pink floral designer paper and a 1-1/4″ x 12″ strip of white cardstock. Layer these on top of the base.
- Using the scallop dot cartridge, punch two borders with gray vellum paper. Add vellum adhesive and tuck behind pink border layer so just the first row of dots peeks out, as shown.
- Using foam squares, adhere gold floral sticker strip down the center of border. Add floral sticker embellishments and finally a white die cut flower shape with foam squares to the bottom of the border.

“US” Border
- Cut a 2″ x 12″ strip of vellum paper. Cut a 1-1/2″ x 12″ strip of pink rose paper and adhere to center of vellum base.
- Using the scallop dot cartridge, punch two borders with light pink medallion paper. Apply adhesive and tuck behind rose paper layer so just the scallops peek out, as shown.
- Using the swell edge of the decorative trimmer, cut two ribbons with vellum paper and one with light pink medallion paper. Adhere to border as shown.
- Cut a 2″ vellum circle and add “US” sticker. Apply to center of border with foam squares. Add floral and punched leaf embellishments as desired.

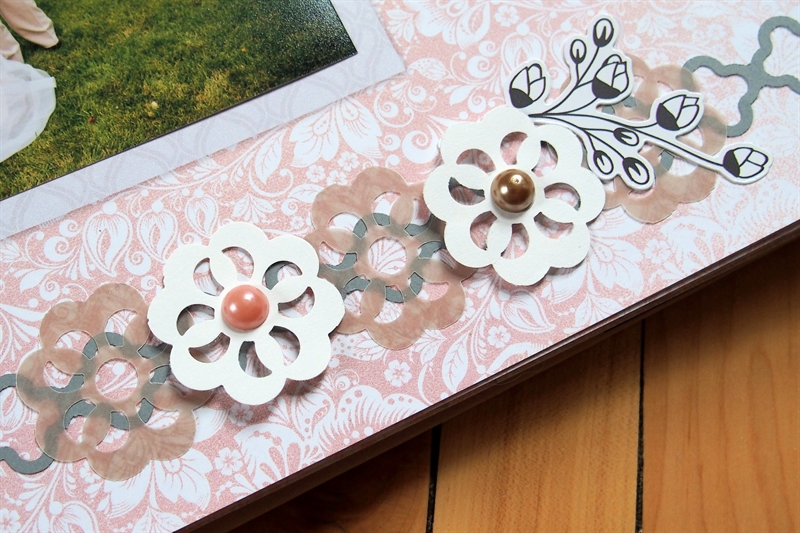
Medallion-Doily Border
- Using the medallion frame chain cartridge punch a border with gray cardstock.
- Punch one doily border with vellum paper and one with white cardstock. Trim out three vellum and two white doily shapes. Adhere vellum shapes first, centering them along the righthand side of the medallions; then adhere the white shapes in between using foam squares. Top with pearl embellisments and add buds sticker.

White Doily Border
- Using the scallop dots cartridge, punch a border with light pink medallion paper. Trim to 2-3/4″ x 12″ to make the base.
- Cut a 2-1/4″ x 12″ strip of white cardstock and a 2″ x 12″ strip of mosaic squares paper. Adhere to base.
- Using the lace scallop cartridge, punch a border with vellum paper. Apply adhesive and tuck behind the left edge of white strip, just overlapping the scallop dots as shown.
- Cut a 1-1/2″ x 11-1/4″ strip of vellum paper. Clip corners with the scallop edge of the 4-way hole and corner punch. Adhere to center of border. Add rhinestones on each end.
- Punch one doily border with white cardstock. Trim to 10″ and add to center of vellum strip.

“Forever in Love” Border
- Cut a 2-1/2″ x 12″ strip of navy paper. Cut a 2-1/4″ x 11-3/4″ strip of white distressed paper. Punch all corners of both pieces using the angled edge of the 4-way hold and corner punch. Apply white piece on top of navy piece.
- Cut a 3″ x 1-3/4″ piece of navy paper. Adhere “Forever in Love” sticker on top and add to middle of border with foam squares.
- Cut the floral ring sticker in half; apply one half to top right edge and one half to bottom left edge of border as shown. Add floral die cuts and branch stickers with foam squares as shown; finish with gray pearl floral centers.


P5221398

P5221394

P5221389

P5221385

P5221381

Just beautiful!
Liking these!
How so you get a 12 inch boarder from the border maker? They are lovely.
Beautiful border. Love the idea
Nice work!!!
Absolutely love the mixing of vellum and standard papers, beautifully done
Lovely pages! Your layered borders are so creative. What a treasure for your niece.
Still loving it, Krislyn! You do such a nice job and are so inspiring!