November 12, 2018
Use Frost to Create Gorgeous Winter Scrapbook Borders
The Frost collection is all about bringing the visuals and beauty of winter to the page. It’s inspired by trendy winter designs and winter floral patterns, which gives it a unique and visually stunning take on the season. Not only can you use the papers to create layouts, but you can also create beautiful winter themed scrapbook borders! Read on to learn how!
To create these scrapbook borders, you will need:
- Frost Paper Pack
- Frost Accent Paper Pack
- Frost Stickers
- Evergreen & White Cardstock
- Winter Vine Border Punch
- Custom Cutting System with Circle Patterns
- 12-inch Straight Trimmer
- Tape Runner with Repositionable Tape Runner Refill
- Foam Squares

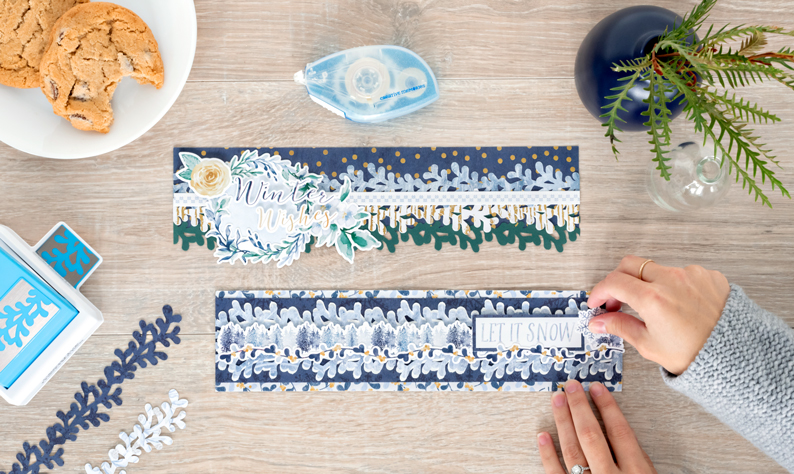
Border 1: Winter Wishes

Step 1: Cut a 2-1/2″ x 12″ strip of foil accent navy dot patterned paper for the base.

Step 2: Using the Winter Vine Border Punch, punch a border with Evergreen Cardstock, blue swirl patterned paper and foiled wood grain patterned paper. Mount the evergreen border first, with the lower vines draping over the lower edge of the base. Top with the wood grain foiled border aligned so that it fits completely on the base. Finally, add the blue swirl border, oriented with the boughs facing the other direction and overlapping the wood grain border.
Step 2:Add a sweater pattern border sticker over the spot where the blue and white vine borders overlap.
Step 3: Using the inside of the largest Custom Cutting System circle pattern and the blue blade, cut a circle with light blue patterned paper. Mount the wreath sticker on top and adhere to the left side of the border, 1″ in from the edge.
Step 4: Add the “Winter Wishes”, yellow rose, blue flower cluster and leaf cluster stickers, popping some up with Foam Squares.
Border 2: Let it Snow

Step 1: Cut a 3-1/2″ x 12″ strip of multi-colored vine patterned paper for the base. Cut a 2-1/2″ x 12″ strip of navy snowflake accent patterned paper and mount on top of the base.
Step 2: Using the Winter Vine Border Punch, punch two borders each with White Cardstock and blue swirl patterned paper. Apply Repositionable Adhesive to the backs, adhere blue on top of white, overlapping a little and add to the top and bottom edges of the navy strip as shown. Apply Foam Squares to the back of a trees border sticker and mount to the middle of the border.
Step 3: Cut a 3-5/8″ x 1-1/8″ piece of navy paper. Mount the “Let it Snow” sticker on top and adhere to the right side of the border. Adhere a vine border sticker along the bottom edge of the trees sticker. Add a snowflake sticker as shown.
These winter scrapbook borders can add all the beauty and serenity of the season to your layouts and projects. They use all the themes of winter that are aesthetically pleasing and combines them to make something truly elegant. What’s your favorite part of these borders? Let us know in the comments below!

These are so elegant. I love all of your borders and make almost all of them. In fact, I am making some as we speak! Please don’t ever stop.
yippee – more border ideas – thanks!!
I love that the punched border of Border 2 looks like icicles, because of the paper used!
muy bonitas las ideas
[…] Want to create the Frost border shown above? Get instructions now! […]