June 1, 2019
Keep Your Memories Close with this DIY Mini Album Project
Scrapbooking is not an art form with limitations. You shouldn’t feel bound by the confines of a 12×12 album. There are so many other ways you can create layouts — even perfectly petite ones! After all, isn’t there a saying about good things coming in small packages? Mini scrapbook albums are becoming more and more popular due to the ease, accessibility and overall cuteness. If you’re looking for a fun way to create a DIY mini album, you’re in luck! This blog post is filled with step-by-step instructions on how you can create your own miniature masterpiece using cardstock, cardboard, paper and a little imagination!

To create this mini album, you will need the products below. To see the original post, visit BeccysPlace.BlogSpot.com.
- Simply Sunshine Paper Pack or (Shop Canada | Shop Australia)
- Simply Sunshine Variety Mat Pack or (Shop Canada | Shop Australia)
- Simply Sunshine Stickers or (Shop Canada | Shop Australia)
- Simply Sunshine Embellishments or (Shop Canada | Shop Australia)
- Moments to Memories Laser Cut Word Embellishments or (Shop Canada | Shop Australia)
- White and Evergreen Cardstock or (Shop Canada | Shop Australia)
- 12-inch Trimmer or (Shop Canada | Shop Australia)
- Essentials 4-Way Punch or (Shop Canada | Shop Australia)
- Tape Runner or (Shop Canada | Shop Australia)
- Repositionable Tape Runner Refill or (Shop Canada | Shop Australia)
- Multi-Purpose Tool or (Shop Canada | Shop Australia)
- Cardboard (for the cover)

- Use three pieces of firm chipboard or cardboard for the cover. Cut one piece measuring 6″ x 1-1/2″ for the spine and two pieces measuring 6″ x 6-1/2″.
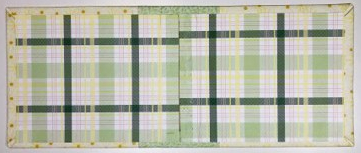
- Cut two pieces of paper to measure 7-1/2” x 7-1/2” (this will be your album cover paper). Cut another piece of contrasting paper to measure 3-1/2” x 7-1/2” (this will be your spine cover).
- Carefully adhere your cover papers to your spine paper so only the center 1” of your spine paper shows through the middle. Make sure everything is straight, so you don’t end up with a crooked cover. The length of the combines papers will be 16-1/2”.


Papers for the interior cover shown on the left and the flip side of the papers for the exterior of the album shown on the right.
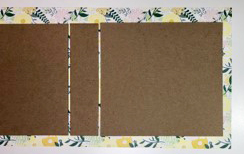 4. To ensure enough flexibility in your cover, you must leave at least the width of two pieces of chipboard between each piece. You can create a shim by adhering two pieces of cardboard or chipboard together. This prevents your patterned paper from tearing when you close the album.
 5. Use a Multi-Purpose Tool to score around the edges of the cardboard (to make folding easier).
6. Starting with the corners, fold and crease all of the paper in. Using the Tape Runner liberally, press down on the paper firmly and cover the cardboard. (It is recommended to use the Tape Runner adhesive and not the Repositionable Tape Runner Refill here.)
7.  Cut two pieces of paper to measure 5-1/2” x 7” and join them so they meet in the middle of the interior of the album, covering the bare chipboard. Make sure to crease the paper where it hits the fold of the spine, being careful not to tear it. Open and close the album a few times to work in and soften the paper. Using the Tape Runner generously, adhere the paper to the cover.
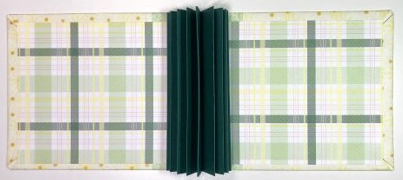
 8. To create the binding, begin with one sheet of 12″ x 12″ cardstock and cut it in half. Score both pieces at 1/2”, 1-1/2”, 2-1/2”, 3-1/2”, 4-1/2”, 5-1/2”, 6-1/2”, 7-1/2”, 8-1/2”, 9-1/2”, 10-1/2” and 11-1/2”. Fold both pieces along each score line, alternating between valley and mountain folds like a fan.
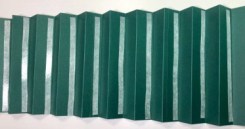 9. Add adhesive to the 1/2” ends and join the two pieces together by overlapping them. The middle of the binding will be where the pieces are joined. Turn the binding over and apply Tape Runner adhesive between each fold. Secure each of the folds together so the cardstock doesn’t spring apart.
 10. Apply lots of Tape Runner adhesive to the little wings of the spine, hold it tight and adhere it to the middle of the spine, pressing firmly. (Tip: You may want to wait several hours before continuing to the next step to ensure a strong hold.)
11. To create your pages, select two pieces of paper to be the front and back. Apply adhesive to them and sandwich them over a binding piece. Adhere them to each side of the binding. (Important: Be sure to leave a slight gap between the edge of each page and the base of the binding so the page will turn.)
12. Continue adding pages. The binding will open to about a 90-degree angle. If it won’t stay in place, apply more adhesive and allow to settle.
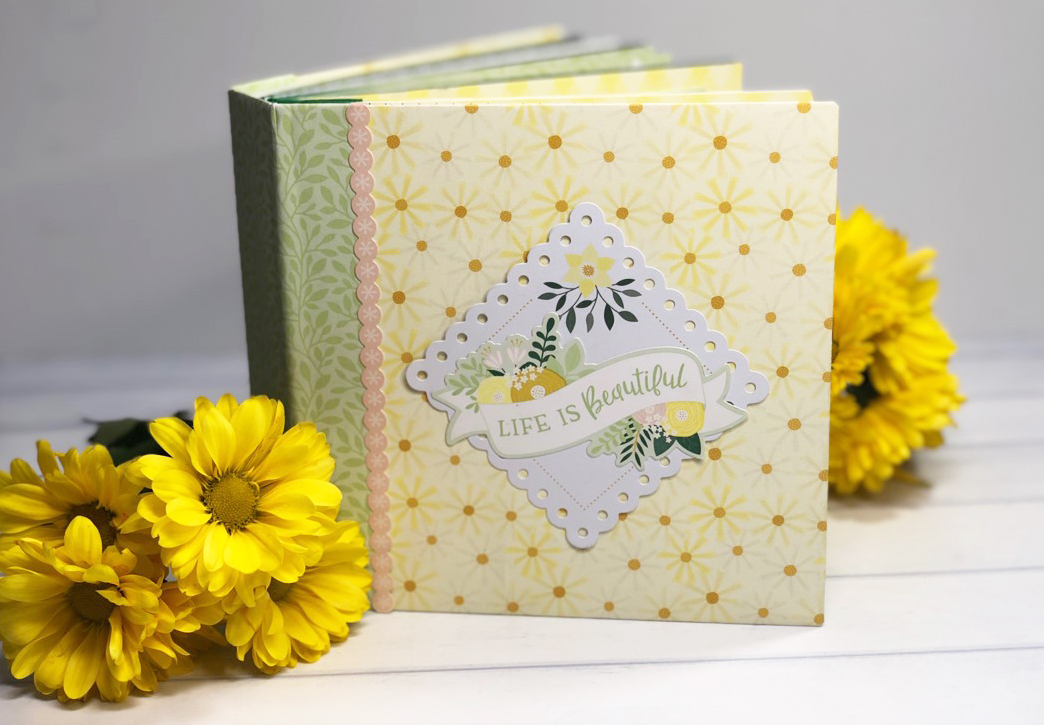
Take a look at the adorable 6×6 mini album below:


This DIY mini album opens up a whole new world of scrapbooking and crafting possibilities! How do you see yourself using an album like this? Let us know in the comments below!

Beautiful Mati!!! Love it!!!
Love it
Really stupid question, but how do you add your pages of photos.
#10 & 11 in the instructions.
Thanks. Guess I need to actually be shown how to do that as I can’t fully understand the instructions. Takes me a while to figure things out. haha. Will try it eventually. Appreciate your help.
Beautiful, looks awesome
Very nice.
Do we now carry chipboard/cardboard that is lignin-free, acid-free and buffered?
I now have a new email address as I have changed internet providers. Please update your files: maggycharles77@gmail.com
Thanks so much,
Maggy
Love it!
Great idea! I make a different style mini album but like this new idea.
Adorable and soo pretty! These ideas are perfect for 8×8 page layouts. Mini albums are really great for a quick book commemorating a friend or family member or event.
I’m going to sound stupid, but what is a “shim”i step 4? And are the pages 6×6? I think this is so cute!
I’m busy creating this beautiful little album but I am really confused with the binding. How do the pages lay flat? I would love an end or top view of the binding on the spine.