October 18, 2019
Think Outside the Punch with these Fun DIY Scrapbook Border Projects
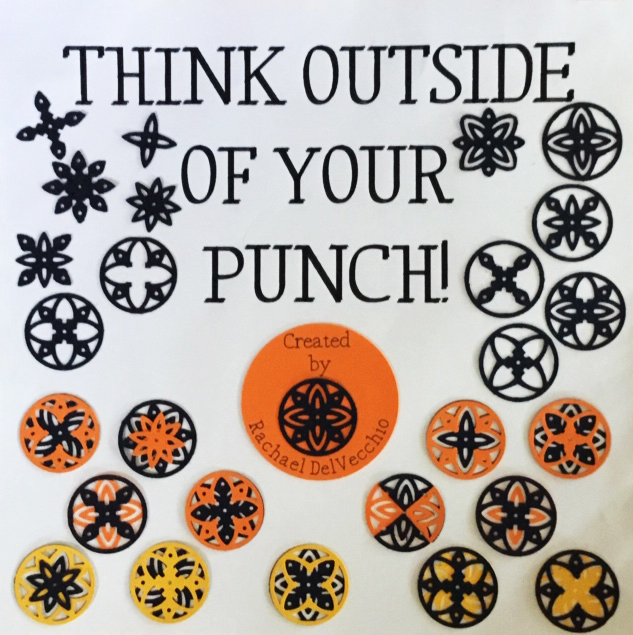
The beauty of scrapbooking is that you’re only limited by your imagination. When you look at papers, stickers, embellishments and tools on the surface, it may feel like you can only create simple projects in a cookie-cutter fashion. However, when you add a dash of imagination and a pinch of creativity, there’s no limit to what you can do! Blog contributor Rachael DelVecchio recently got her hands on the Medallion Punch and was able to create SO much more than just some medallions. Take a look at what she was able to put together!
To create these borders, you will need:
- Cardstock or (Shop Canada | Shop Australia)
- Medallion Punch or (Shop Canada | Shop Australia)
- All-Purpose Scissors or (Shop Canada | Shop Australia)
- Tape Runner or (Shop Canada | Shop Australia)
- Repositionable Tape Runner Refill or (Shop Canada | Shop Australia)
- Precision Point Adhesive Pen or (Shop Canada | Shop Australia)
- 12-inch Trimmer or (Shop Canada | Shop Australia)
- Pencil
- Ruler
Follow along with the written instructions below or see it in action with this video!
Medallion Border #1
Step 1: Using the Medallion Punch, punch 13 medallions from a piece of cardstock. Cut each medallion in half.
Step 2: Cut out one corner of each medallion half with All-Purpose Scissors, as shown below.
Step 3: Cut a strip of cardstock that measures 2″ x 12″. Using a pencil and ruler, lightly draw a line lengthwise across the middle of the strip. Run three lines of Repositionable adhesive across the middle of the strip.
Step 4: Assemble using the pencil line, as shown below. Start by centering the middle circles, as indicated by the arrows below. Slide the remaining pieces into place. Cut the pieces that overlap the edges.
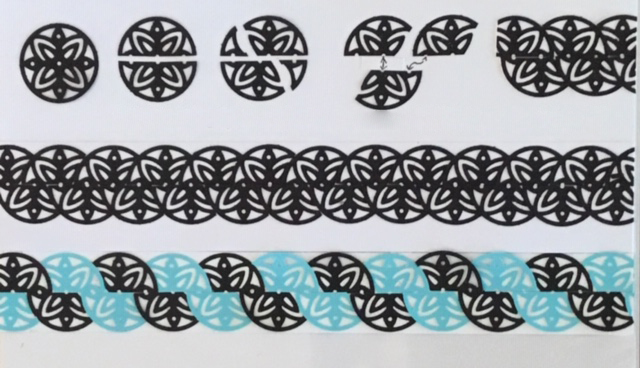
For another idea, you can punch a different shade of cardstock and alternate the medallions, as shown above!
Medallion Border #2
Step 1: Using the Medallion Punch, punch 18 medallions (nine of each shade) from two pieces of cardstock.
Step 2: Cut the outside of each medallion by making a curve around each petal and leaf. (HINT: This is just cutting the outside ring off.)
Step 3: Take four medallions (the ones cut in the previous step) of each shade and make a slit just above the tip of the left petal, as shown below. You will have one piece that you did not cut, which will be used for the left side of the border.
Step 4: Use Repositionable adhesive on the cut petals and “hook” them onto a contrasting medallion. Work across the row right to left, ending with the piece that was not cut.
Step 5: With the remaining medallions, cut the middles out, as shown below, and adhere them to the previous medallions.

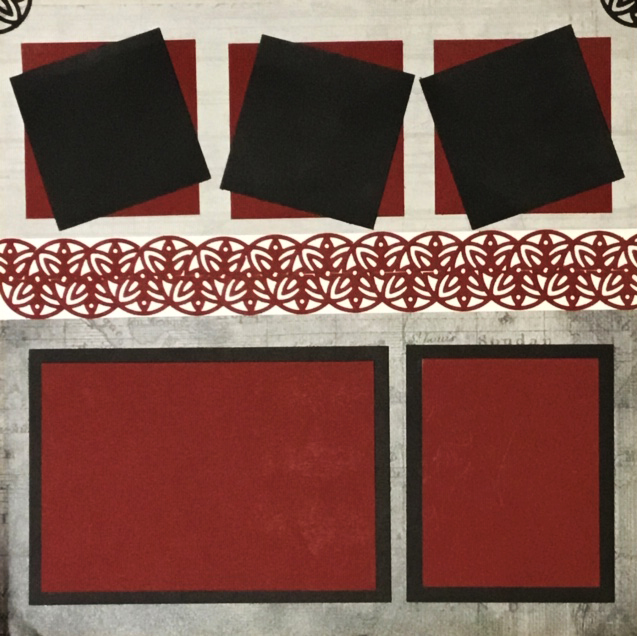
Medallion Border #3
TIP: Until you are done punching, just set the leftover pieces to the side from the stamped punch.
Step 1: Cut out seven medallions from one shade of cardstock.
Step 2: Cut out four medallions from a different shade of cardstock.
Step 3: Cut one medallion of the first piece of cardstock in half.
Step 4: Cut all four of the medallions of the second piece of cardstock in half (you will have a total of 10 halves).
Step 5: Using Repositionable adhesive, layer the halves on top of the whole medallions. (Note: You will have four halves left to embellish the opposite side of the page layout.)
Step 6: Collect 10 “wishbones” from your leftover punch pieces. Using Repositionable adhesive, adhere a medallion at one end of the page so that the half medallion is upright. Hook two “wishbones” together and adhere them above the previously-adhered medallion.
Step 7: Repeat the previous step until you have a full border.

Medallion Border #4

Step 1: Using the Medallion Punch, punch seven medallions from a piece of Leaf Green Cardstock.

Step 2: Cut the top four sections of the outer circle on all seven medallions.
Step 3: Make a cut a “V” cut, as shown above. These will be the stems of your flowers.
Step 4: Using the Medallion Punch, punch 14 medallions from a piece of cardstock. (Note: You can do all the same shade or mix it up and do two different ones.)
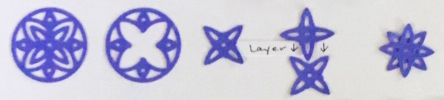
Step 5: Using All-Purpose Scissors, cut the middle star shape out, as shown above. Repeat this step for all remaining medallions.
Step 6: Assemble the flowers by layering two star pieces from step five and adhering the green stem on top. (Note: You can use leftover punched circle pieces or gems for the middle of the flower.)

Step 7: Using the 12 pieces leftover from the medallions you cut the middles out of, make a border by carefully linking the tabs. Do this by hooking underneath and pulling through. (Note: You can also use leftover punched circle pieces or gems for the middle if desired.)
Step 8: Adhere all of the pieces to the layout, as shown.
There are so many different ways you can use a seemingly simple punch or tool and create a multitude of mesmerizing projects. Will you be trying out this border combination? Let us know in the comments below!

Awesome!
These ideas are truly amazing! Wish we all had imagination like that!
Great work Rachael. . I’ll be using your ideas at our White Eagle Retreat next weekend. Thank you.
Thank you for these wonderful, creative ideas! I especially like the wishbone shaped piece idea! That idea can be used on Thanksgiving pages!
Love this! Would never have thought of all that myself.
Rachael, your creativity astounds me! Each piece is so elegant, imaginative, and super tiny. I really like the example where you alternated the medallions in two different colors. So pretty.
These are great ideas . I,m thinking of using on my Christmas cards. Thanks
So smart! Clever uses for a single punch, your imagination astounds me!
I just bought it and thought maybe I shouldn’t have due to my limited imagination. Now, I see all the potential it has.
Those are cre8ive.