October 23, 2019
Go Fir It with Three Pine Tree Craft Ideas
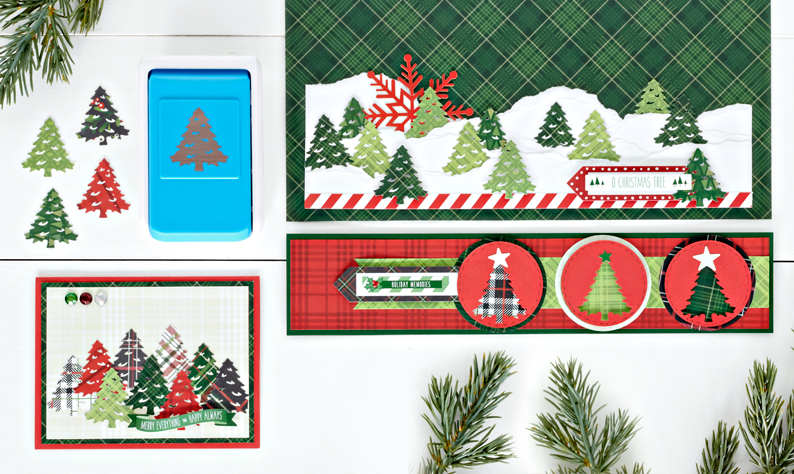
Ready to get coniferous with your crafts? The Pine Tree Punch inspires you to go fir it on spreads, cards and more with its sharp, forest-y pine tree shape. Whether you use it for Christmas cards or outdoor layouts, it’s the perfect way to add character to projects big and small! Take a look at these pine tree craft ideas and keep your inspiration growing!

To create these borders and card, you will need:
- Merry Little Christmas Paper Pack or (Shop Canada | Shop Australia)
- Festive Plaid Paper Pack or (Shop Canada | Shop Australia)
- Merry Little Christmas Embellishments or (Shop Canada | Shop Australia)
- Merry Little Christmas Laser Cut Embellishments or (Shop Canada | Shop Australia)
- Merry Little Christmas Stickers or (Shop Canada | Shop Australia)
- Dark Green, Red and White Cardstock or (Shop Canada | Shop Australia)
- Pine Tree Punch or (Shop Canada | Shop Australia)
- Custom Cutting System with Circle Patterns or (Shop Canada | Shop Australia)
- 12-inch Trimmer or (Shop Canada | Shop Australia)
- All-Purpose Scissors or (Shop Canada | Shop Australia)
- Tape Runner or (Shop Canada | Shop Australia)
- Repositionable Tape Runner Refill or (Shop Canada | Shop Australia)
- Foam Squares or (Shop Canada | Shop Australia)
- Black Dual-Tip Pen or (Shop Canada | Shop Australia)
Get a closer look at the Pine Tree Punch in the video below!
O Christmas Tree Border

Step 1: Tear several strips of White Cardstock. Layer them on top of each other, adhering them with Repositionable adhesive.
Step 2: Using the Pine Tree Punch, punch out several trees from various green patterned papers. Adhere them between the White Cardstock layers. Adhere a few of the trees using Foam Squares for added dimension.
Step 3: Adhere the snowflake laser-cut embellishment to the border.
Step 4: Adhere the red and white striped border sticker along the bottom edge of the border. Adhere embellishments and the “O Christmas Tree” title sticker.
Holiday Memories Border

Step 1: Cut a piece of Dark Green Cardstock to measure 12″ x 2-1/2″.
Step 2: Cut a piece of the red plaid patterned paper to measure 11-3/4″ x 2-1/4″ and adhere it to the cardstock.
Step 3: Cut a piece of the light green plaid patterned paper to measure 10-1/2″ x 1-1/4″. Cut a “v” into one end of the strip and adhere it to the border.
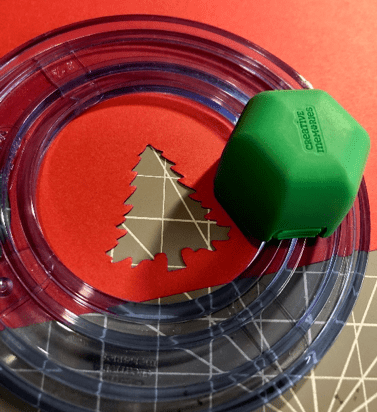
Step 4: Using the medium Custom Cutting System Circle Pattern with the Red Blade, cut three circles from random patterned papers.
Step 5: Using the Pine Tree Punch, punch three times along the edge of a piece of Red Cardstock. Using the medium Custom Cutting System Circle Pattern with the Green Blade, cut circles around the tree shapes.
Step 6: Using the inside of the medium Custom Cutting System Circle Pattern with the Green Blade, cut three circles from random patterned papers. Adhere the Red Cardstock circles on top of the smaller circles using Foam Squares. Place these pieces on top of the larger patterned circles with repositionable adhesive. Adhere them to the right side of the border, as shown.
Step 7: Adhere stickers and embellishments to the border.
Step 8: Using the fine tip of the Black Dual Tip Pen, draw “stitch” marks along the outer edges of the Red Cardstock circles.
Merry Everything Card
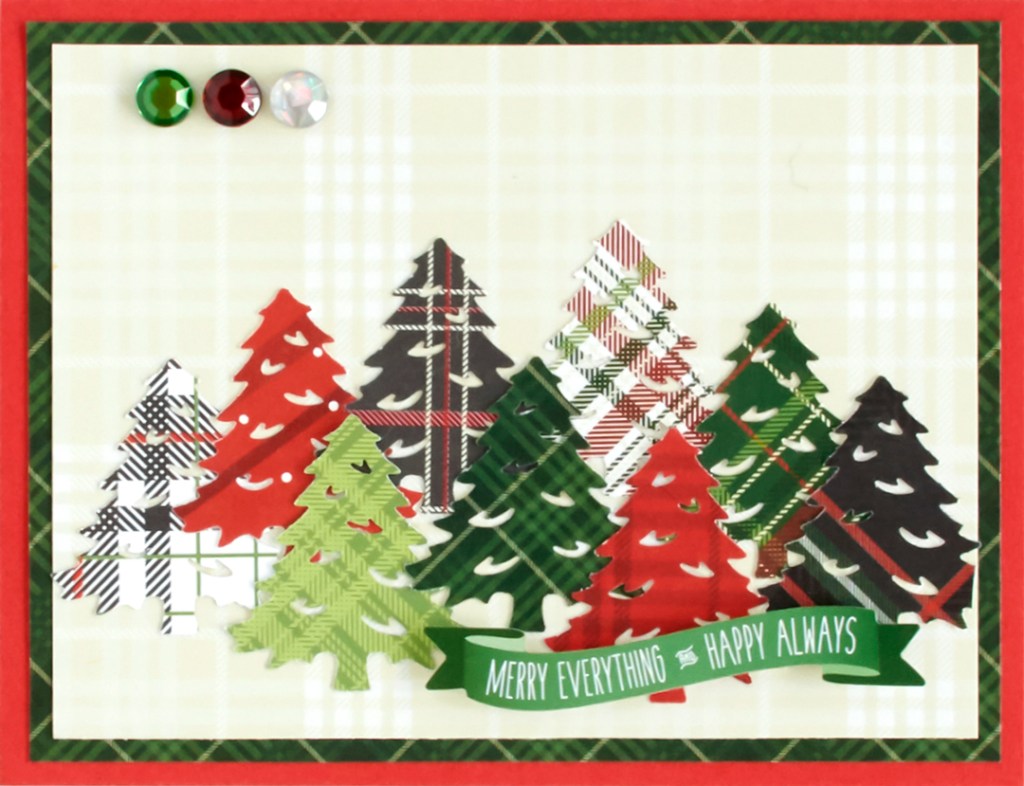
Step 1: Cut a piece of Red Cardstock to measure 8-1/2″ x 5-1/2″. Fold it in half to create a card.
Step 2: Cut a piece of green patterned paper to measure 5-1/4″ x 4″. Adhere it to the front of the card.
Step 3: Cut a piece of cream plaid patterned paper to measure 5″ x 3-3/4″ and adhere it to the front of the card.
Step 4: Using the Pine Tree Punch, punch nine trees from a variety of papers. Adhere them to the front of the card, layering them, as shown.
Step 5: Adhere the “Merry Everything and Happy Always” title sticker using Foam Squares. Adhere gems in the upper left corner of the card.
These pine tree crafts are the perfect way to add a taste of the great outdoors to your scrapbook layouts and cards. Which one of these ideas will you put into practice first? Comment below and let us know!

LOVE the Christmas Tree border and card. I’m plagiarizing as soon as I get to my scrapbook room. ;)
I love all of these ideas, and think the tree punch is great. I too will be making these great items for my pages.
I love it that you are including more ideas for cards. I also use border ideas and modify them slightly to use for cards, since most of my customers are into making cards rather than scrapbooking. Thanks for these GREAT ideas!!
[…] Want to create this Christmas card for yourself? Get into the spirit of the season with directions in this blog post! […]
[…] In awe of this merry and bright border? Follow the simple directions in this blog post to make it! […]
I’m having trouble with the border. I can’t seem to get the circle to fit around the punched out tree without destroying the edge of the tree or ending up with not quite a circle. Any tips?