November 12, 2019
Be Bold in the Cold with this Winter Scrapbook Spread
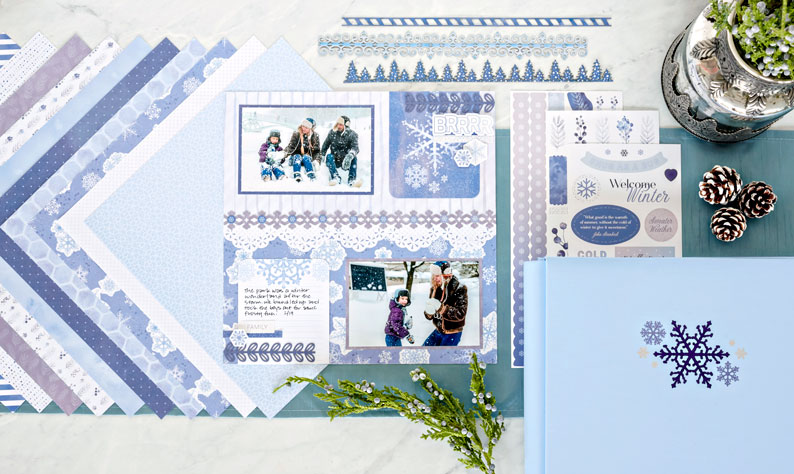
Winter’s so much more fun when we embrace it rather than endure it. The brisk air and sparkling snow, pretty icicles and chunky sweaters should be enjoyed! Those few months can be tough, but if you shift your mindset just a little bit, you’ll see everything it has to offer! Tons of cold-weather memories can be made and this two-page winter scrapbook layout is a great way to remember those moments long after the snow has melted. Take a look!


To create this layout, you will need:
- Winterberry Paper Pack or (Shop Canada | Shop Australia)
- Winterberry Variety Mat Pack or (Shop Canada | Shop Australia)
- Winterberry Laser Cut Border Embellishments or (Shop Canada | Shop Australia)
- Winterberry Stickers or (Shop Canada | Shop Australia)
- White Cardstock or (Shop Canada | Shop Australia)
- Dazzle Border Punch or (Shop Canada | Shop Australia)
- 2-Way Corner Rounder or (Shop Canada | Shop Australia)
- Original Border Maker System with Crystal Chain Border Maker Cartridge or (Shop Canada | Shop Australia)
- 12-inch Trimmer or (Shop Canada | Shop Australia)
- Tape Runner or (Shop Canada | Shop Australia)
- Repositionable Tape Runner Refill or (Shop Canada | Shop Australia)
- Foam Squares or (Shop Canada | Shop Australia)
- Black Dual-Tip Pen or (Shop Canada | Shop Australia)
Take a look at the Winterberry collection in the video below!
Step 1: Use the White Cardstock or Refill Pages as your base.
Step 2: Using the 12-inch Trimmer, cut one sheet of each of the striped lavender and snowflake patterned papers in half. Adhere the striped lavender pieces to the top of both pages and the snowflake pieces to the bottoms of both pages.
Step 3: Punch two borders using the Dazzle Border Punch with white grid patterned paper. Trim each border to measure 1-1/2″ x 12″ and adhere them to the middle of both pages, covering the seams.
Step 4: Punch two borders using the Crystal Chain Border Maker Cartridge with purple patterned paper. Adhere them to the top edges of the white grid patterned borders.

Step 5: Cut three mats to measure 4-1/2″ x 5-3/4″. Round the two bottom corners of the snowflake and “One kind word…” mats and adhere them to the top of the pages. Round the two top corners of the ruled mat and adhere it to the bottom left of the layout. Optionally, replace any of the mats with photos.
Step 6: Crop four photos to measure 5-3/4″ x 3-3/4″ and one photo to measure 3-3/4″ x 5-3/4″. Mat each photo with a 6″ x 4″ mat cut from navy blue, light blue or purple patterned papers. Adhere them to the layout, as shown.
Step 7: Add stickers and trimmed laser cut borders, as shown. Journal as desired.
This winter scrapbook spread is the perfect way to add flurries of fun to your albums and may just inspire you to take advantage of those blustery, beautiful days! Comment below and let us know what photos you’ll fill this layout with!

[…] Make the most of your snow days and put together this winter scrapbook spread with directions in this blog post! […]