June 24, 2020
Tips for Creating Photographic Scrapbook Paper Layouts

The Planes, Trains and Automobiles Paper Packs feature striking papers with photographic scenes on the reverse side. For some scrapbookers, these photographic backgrounds can be tricky to work with — you don’t want to cover up the featured image on the paper, you aren’t sure what size of photos will work on them or maybe you don’t know how to embellish without making them look too busy. But fear not — once you know a few tricks, they can be one of the easiest and fastest ways to create a layout! Check out these tips and examples on how to create stellar photographic scrapbook paper layouts!
Take a look at the three layouts below (each is made with photographic papers from the Planes, Trains or Automobiles Paper Packs) and then watch the video for three easy tips that will make you reach for this type of paper more often!
To make the Planes Layout you will need:
- Green/Gray photographic papers from the Planes Paper Pack or (Shop Canada | Shop Australia)
- Planes Stickers or (Shop Canada | Shop Australia)
- Planes Laser Cut Embellishment Accents or (Shop Canada | Shop Australia)
- Gray Cardstock or (Shop Canada | Shop Australia) for matting photos
- Scrap of Beige Cardstock or (Shop Canada | Shop Australia) to journal on
- 12-inch Trimmer or (Shop Canada | Shop Australia)
- All-Purpose Scissors or (Shop Canada | Shop Australia)
- Tape Runner or (Shop Canada | Shop Australia)
- Foam Squares or (Shop Canada | Shop Australia)
- Black Dual-Tip Pen or (Shop Canada | Shop Australia)
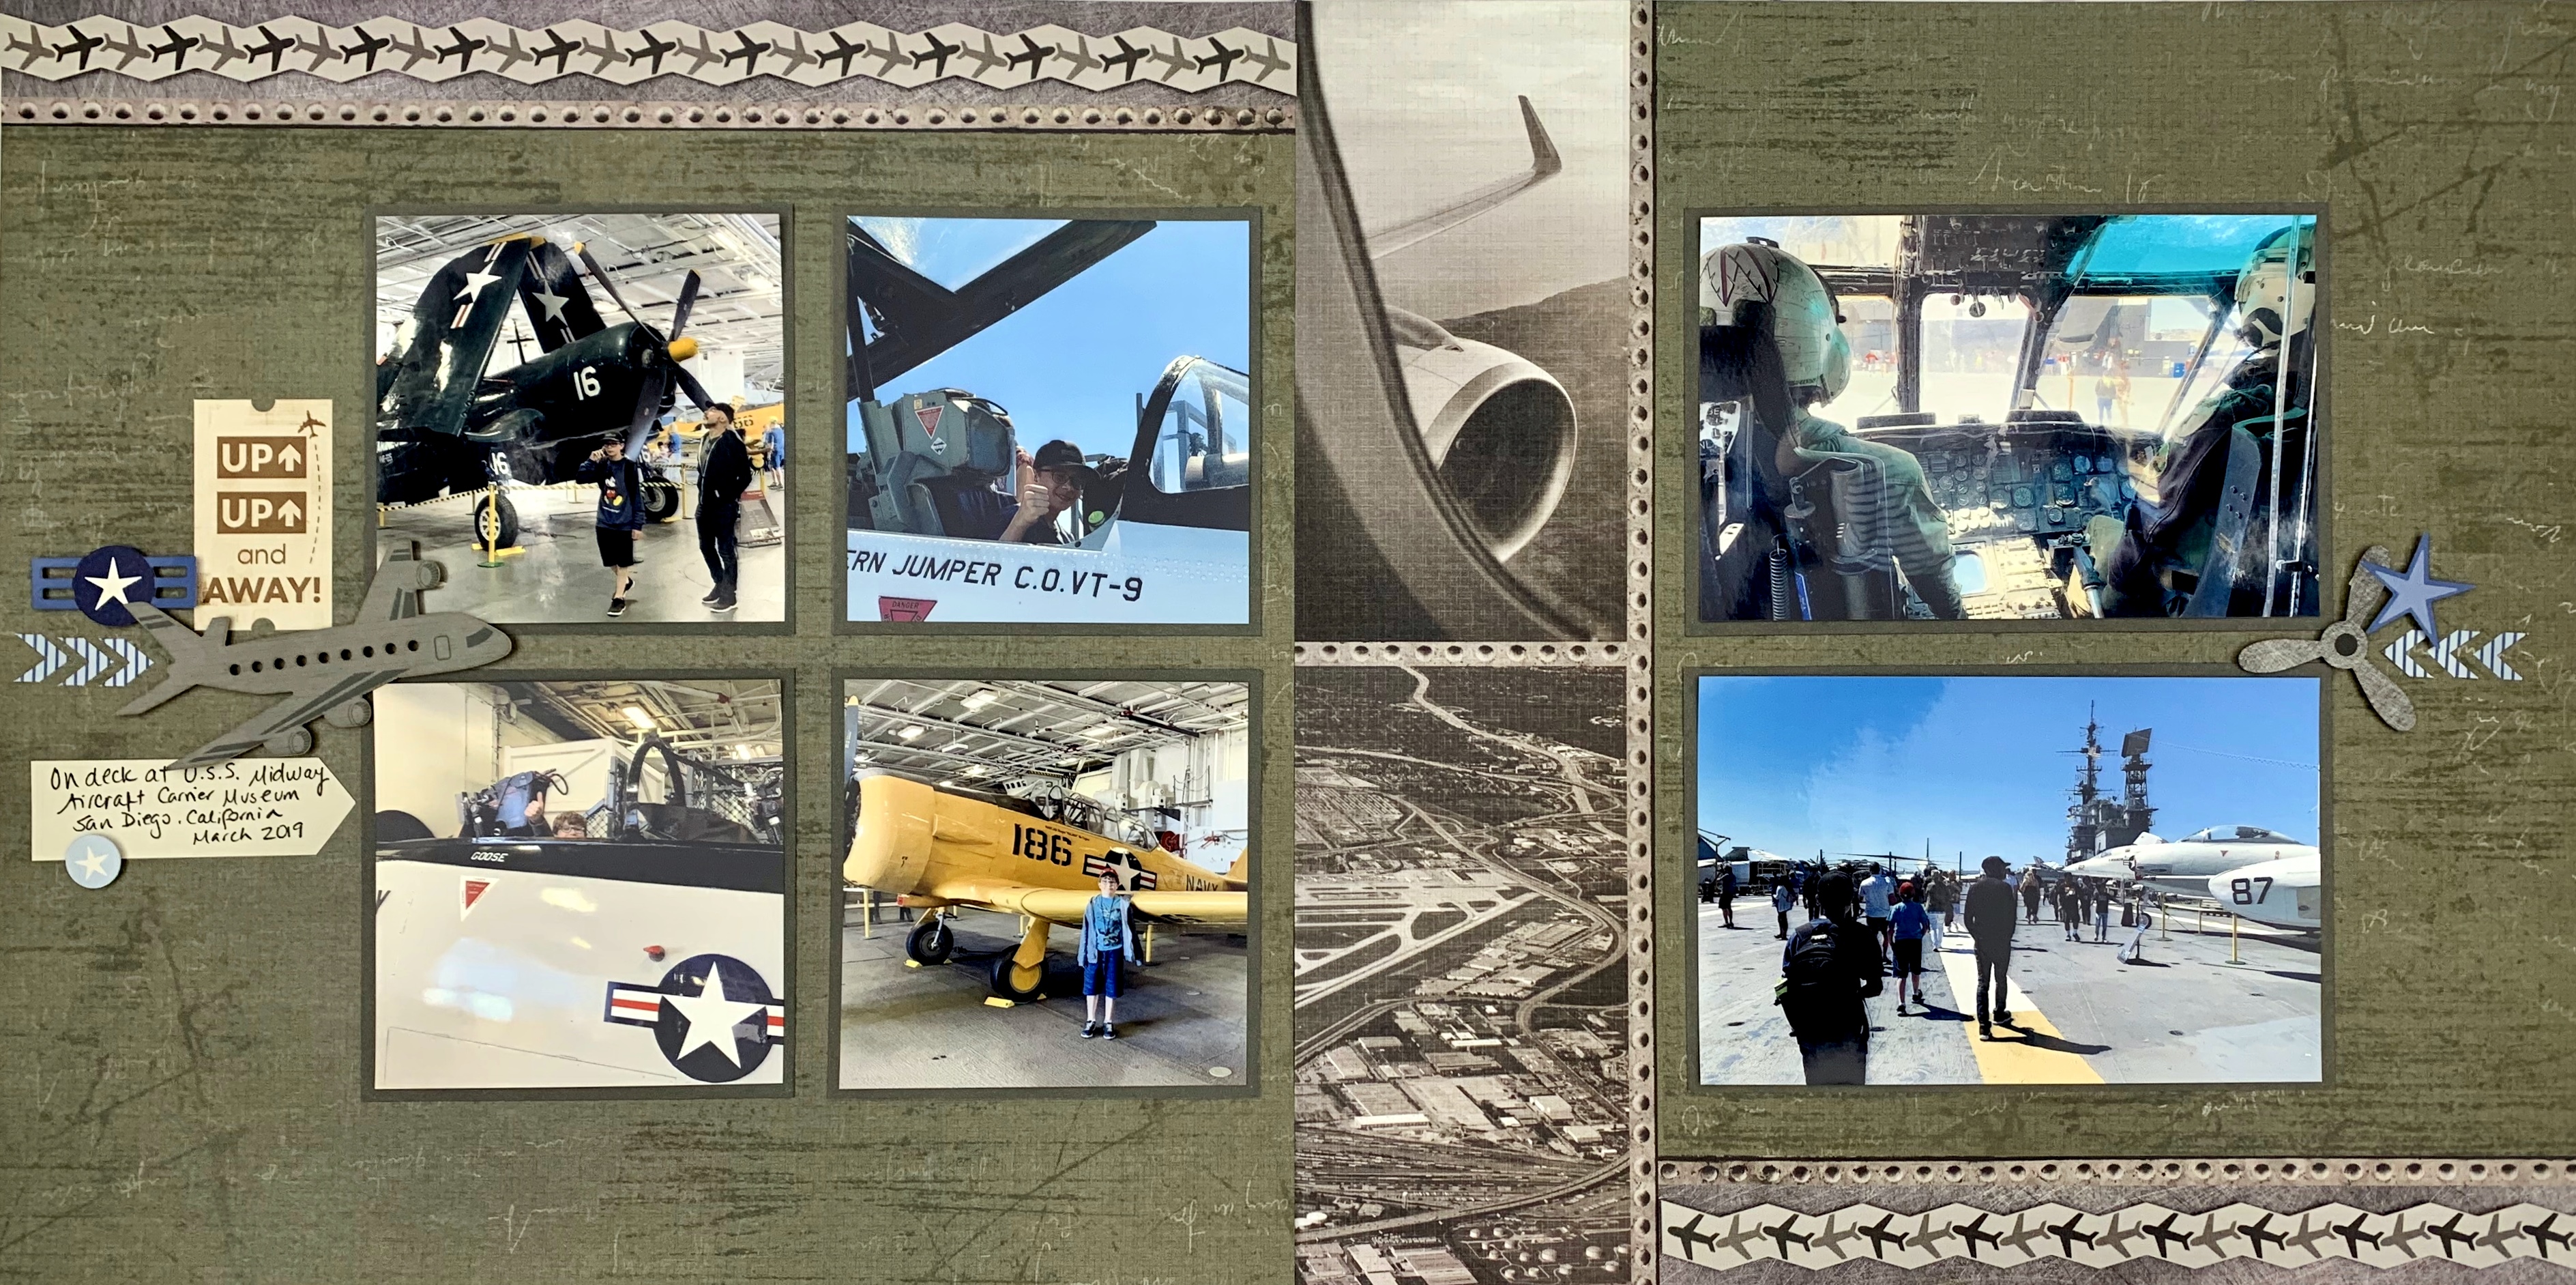
Step 1: Arrange the papers as shown to use as base pages for the layout. Trim four 4″ x 4″ squares and two 6″ x 4″ rectangles from Gray Cardstock to use as photo mats. Crop four photos to measure 3-3/4″ x 3-3/4″ and mount on the 4″ x 4″ squares. Arrange in a grid on left-hand page and adhere with a Tape Runner. Crop two photos to measure 5-3/4″ x 3-3/4″ and mount on the 6″ x 4″ rectangles. Arrange and adhere on right-hand page.
Step 2: Use Foam Squares to mount the plane sticker borders onto the pre-printed borders on the papers. You will need to trim the border with All-Purpose Scissors to fit the pre-printed border on the right-hand page.
Step 3: Embellish the layout with stickers on either side of the photos as shown. Journal on a small piece of Beige Cardstock and attach below the title on left-hand page.

To make the Automobiles Layout you will need:
- Scenic road photographic paper from the Automobiles Paper Pack or (Shop Canada | Shop Australia)
- Automobiles Stickers or (Shop Canada | Shop Australia)
- Automobiles Laser Cut Embellishment Accents or (Shop Canada | Shop Australia)
- Rich Brown Cardstock or (Shop Canada | Shop Australia) for matting photos
- 12-inch Trimmer or (Shop Canada | Shop Australia)
- Tape Runner or (Shop Canada | Shop Australia)
- Foam Squares or (Shop Canada | Shop Australia)
- Brown Dual-Tip Pen or (Shop Canada | Shop Australia)
Step 1: Use the scenic road paper as the base page for the layout. Trim two 4″ x 4″ squares and one 3″ x 3″ square from Rich Brown Cardstock to use as photo mats. Crop two photos to measure 3-3/4″ x 3-3/4″ and mount on the 4″ x 4″ squares. Crop one photo to measure 2-3/4″ x 2-3/4″ and mount on the 3″ x 3″ square. Arrange photos in a block towards the upper right-hand corner of paper, overlapping as shown. Adhere to base page.
Step 2: Use Repositionable Adhesive to adhere the laser cut title beside the photo block. Use Foam Squares to adhere the “Nothing behind me…” quote sticker to the lower left-hand corner of the layout.
Step 3: Use the Brown Dual-Tip Pen to journal under the photo block.

To make the Trains Layout you will need:
- Beige/Brown corner tracks paper from the Trains Paper Pack or (Shop Canada | Shop Australia)
- Trains Stickers or (Shop Canada | Shop Australia)
- Trains Laser Cut Embellishment Accents or (Shop Canada | Shop Australia)
- Black Cardstock or (Shop Canada | Shop Australia) for matting photos and the train tracks border
- Train Tracks Border Punch or (Shop Canada | Shop Australia)
- 12-inch Trimmer or (Shop Canada | Shop Australia)
- All-Purpose Scissors or (Shop Canada | Shop Australia)
- Tape Runner or (Shop Canada | Shop Australia)
- Foam Squares or (Shop Canada | Shop Australia)
- Black Dual-Tip Pen or (Shop Canada | Shop Australia)
Step 1: Arrange the papers as shown to use as the base for the layout. Trim four 4″ x 6″ rectangles and three 3″ x 3″ squares from the Black Cardstock to use as photo mats. Crop three photos to measure 5-3/4″ x 3-3/4″ and mount on the 6″ x 4″ rectangles. Crop one photo to measure 3-3/4″ x 5-3/4″ and mount on the other 4″ x 6″ rectangle. Trim three photos to measure 2-3/4″ x 2-3/4″ and mount on the 3″ x 3″ squares. Arrange photos as shown in photos. Adhere to base page. Tip: Mount the two 3″ x 3″ matted photos that overlap the other photos using Foam Squares to make them stand out from the photos behind them!
Step 2: Punch two borders from Black Cardstock with the Train Tracks Border Punch. Arrange them along the diagonal lines on the photographic background papers and adhere with Repositionable Adhesive. Trim border pieces that overhang the edges of the layout with All-Purpose Scissors.
Step 3: Add the laser cut train engine and boxcar to the train track on the right-hand page using Foam Squares. Tip: Use the open circle in the boxcar cut out as a frame for another small photo!
Step 5: Add title sticker and embellishment cluster to the solid band on the upper left-hand page. Add a couple of other sticker embellishments at the corners of the photo blocks.
Step 6: Use the Black Dual-Tip Pen to journal on the solid band on the lower right-hand page.
What other tips for using photographic papers help your layouts come to life? What types of photographic scrapbook paper layouts will you create with these tips? Let us know in the comments below!

Thanks! Very helpful.
These are great. Watch the video, its’ so helpful. Love your layouts.
Thanks a million, Noreen, for this explanation and demonstration of what to do with photographic papers! This kind of paper is beautiful, but I’ve never bought the packs with these papers because I had no idea how to use them. Thanks to you, now I know!
I love these ideas! Thanks for the good suggestions.
Those layouts look fantastic!
Love the tracks going between the 2 pages – genius!
Love the tips you gave, Great video Noreen! TY
Love your layouts with the CM papers. Great tips on how to use them.
Noreen, you are simply a genius. These tips are so very helpful, and especially to see how you apply the finishing touches with embellishments. Thank you!!
Thanks for the tips, now I won’t struggle with those papers.
Fabulous job Noreen!
Love the layout ideas!!!
Really great ideas and wonderful layouts. Thank you so much!
This is just what I needed – thanks, Noreen! I’ll probably use the Road Trip layout for my title page.
Love easy pages!