June 25, 2020
Dream Up Doting Designs With These Baby Scrapbook Borders and Card
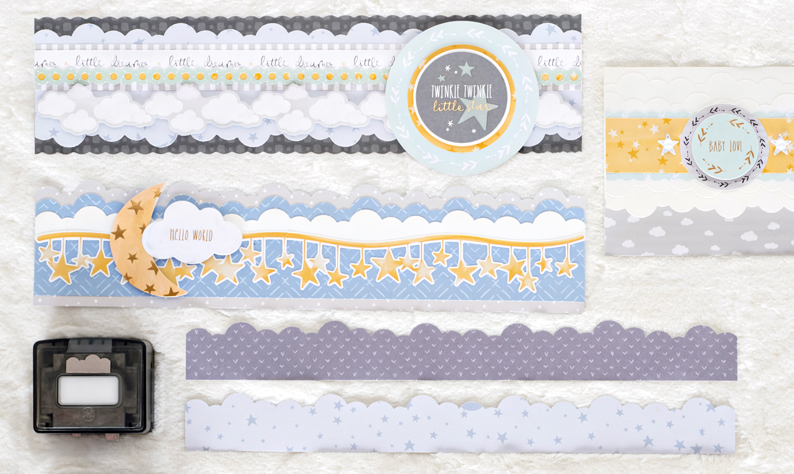
The Little Dreamer collection is all about taking the cute milestones of baby’s first year of life and proudly showcasing them in your crafts and projects. There is so much magic in that first year — and these baby scrapbook borders and DIY baby card can help capture those wonderful moments! Take a look at these aww-dorable craft ideas — all made with the Little Dreamer collection!

To create these borders and card, you will need:
- Little Dreamer Paper Pack or (Shop Canada | Shop Australia)
- Little Dreamer Tone-on-Tone Paper Pack or (Shop Canada | Shop Australia)
- Little Dreamer Variety Mat Pack or (Shop Canada | Shop Australia)
- Little Dreamer Foiled Embellishments or (Shop Canada | Shop Australia)
- Little Dreamer Stickers or (Shop Canada | Shop Australia)
- Little Dreamer Border Stickers or (Shop Canada | Shop Australia)
- White Cardstock or (Shop Canada | Shop Australia)
- Custom Cutting System with Circle Patterns or (Shop Canada | Shop Australia)
- Original Border Maker System with the Clouds Border Maker Cartridge or (Shop Canada | Shop Australia)
- 12-inch Trimmer with Straight, Scoring & Scallop Blades or (Shop Canada | Shop Australia)
- Tape Runner or (Shop Canada | Shop Australia)
- Repositionable Tape Runner or (Shop Canada | Shop Australia)
- Foam Squares or (Shop Canada | Shop Australia)
- Black Dual-Tip Pen or (Shop Canada | Shop Australia)
Get a closer look at the Clouds Border Maker Cartridge in the video below!
Hello, World Border

Step 1: Using the Clouds Border Maker Cartridge, punch a border from a piece of gray dot tone-on-tone paper. Trim to measure 12″ x 2-3/4″ to create your base.
Step 2: Punch a border using the Clouds Border Maker Cartridge from blue designer paper. Trim to measure 12″ x 2-1/8″ and mount on the base. Punch a border using the Clouds Border Maker Cartridge from White Cardstock. Trim to measure 12″ x 3/4″ and mount on the blue piece.
Step 3: Place a stars border sticker along the lower edge of the white piece. Top with moon and cloud foiled embellishments, popping them up with Foam Squares.
Twinkle Twinkle Little Star Border

Step 1: Using the 12-inch Trimmer with the Scallop Blade, cut a 12″ x 3″ strip of slate gray tone-on-tone paper for the base.
Step 2: Punch a border using the Clouds Border Maker Cartridge with light blue moon/stars tone-on-tone paper. Trim to measure 12″ x 2-3/4″ and punch the other side. Mount on the base.
Step 3: Cut a 12″ x 1″ strip of gray striped designer paper. Cut a 12″ x 1/2″ strip of “Little dreamer” designer paper and mount on the striped strip, about 1/8″ from the top edge. Cut a 12″ x 3/16″ strip of gold designer paper. Top with a mint green circles border sticker and adhere underneath the “Little dreamer” piece. Mount this strip on the border as shown. Add a clouds border sticker with Foam Squares.
Step 4: Using the inside of the largest Custom Cutting System Circle Pattern and the Red Blade, cut a circle from a mint green mat. Using the inside of the medium Custom Cutting System Circle Pattern and the Red Blade, cut a circle from gold designer paper. With the same pattern and the Green Blade, cut a circle from White Cardstock. Mount the “Twinkle twinkle little star” sticker on top of the white circle, then layer on the gold and mint green circles. Mount on the border as shown.
Baby Love Card

Step 1: Cut a 5-1/2″ x 8-1/2″ piece of White Cardstock. Score and fold in half to create a card. Punch the front of the card using the Clouds Border Maker Cartridge.
Step 2: Cut a 12″ x 3-1/8″ piece of White Cardstock. Punch both sides with the Clouds Border Maker Cartridge. Cut the piece to measure 5-1/2″ wide and mount that piece on the front of the card. Cut the remaining piece to measure 5-1/2″ x 2″ (trimming off the lower clouds section) and mount on top, creating a layer of clouds.
Step 3: Using the 12-inch Trimmer with the Scallop Blade, cut a 5-1/2″ x 1-5/8″ strip of mint green designer paper. Place on the middle of the card. Top with a 5-1/2″ x 1-1/4″ strip of gold stars designer paper.
Step 4: Add a gray circular sticker in the center, topped with a “Baby love” foiled embellishment. Add star stickers and gemstones.
Step 5: Cut a 5-1/2” x 1-14” strip of gray clouds designer paper. Adhere to the inside bottom of the card.
Will you be creating these baby scrapbook borders for yourself? Or perhaps you have a recipient in mind for the DIY baby card? Let us know in the comments below!
