November 6, 2020
Spruce Up Your Spreads With These Pine Tree Scrapbook Borders
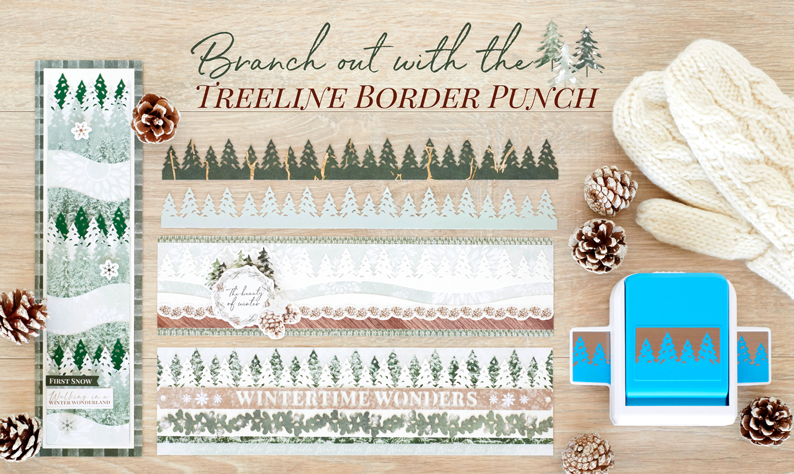
The serenity of the woods in wintertime is something that can feel a little surreal. The snow blankets and silences all footsteps. A crisp, blowing breeze whooshes in a calming atmosphere. A deeper connection to nature can be developed… and all of these can go on for miles. With the new Treeline Border Punch, you can replicate this awe-inspiring feeling by creating beautiful pine tree scrapbook borders that add a peaceful, wondrous look to any project — see for yourself!
To create these borders, you will need:
- Winter Woods Paper Pack or (Shop Canada | Shop Australia)
- Winter Woods Foiled Embellishments or (Shop Canada | Shop Australia)
- Winter Woods Laser Cut Borders or (Shop Canada | Shop Australia)
- Winter Woods Stickers or (Shop Canada | Shop Australia)
- Dark Green & White Solid Cardstocks or (Shop Canada | Shop Australia)
- Treeline Border Punch or (Shop Canada | Shop Australia)
- 12-inch Trimmer or (Shop Canada | Shop Australia)
- 12-inch Decorative Trimmer or (Shop Canada | Shop Australia)
- Micro-Tip Scissors or (Shop Canada | Shop Australia)
- Tape Runner or (Shop Canada | Shop Australia)
- Repositionable Tape Runner or (Shop Canada | Shop Australia)
- Foam Squares or (Shop Canada | Shop Australia)
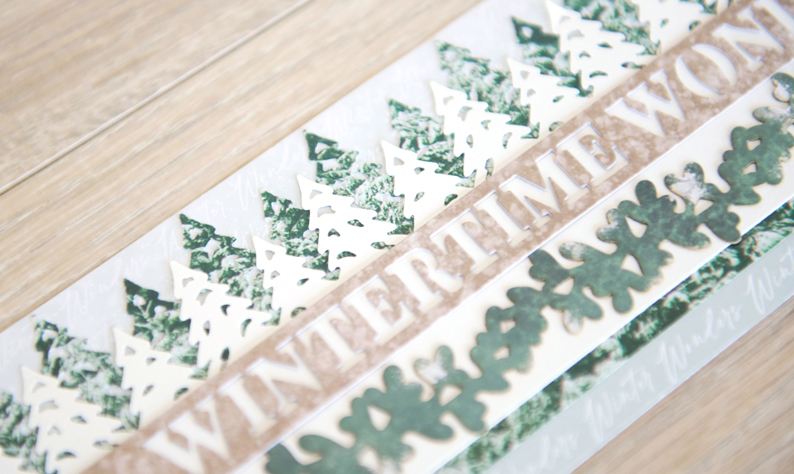
Wintertime Wonders Border

Step 1: Cut a 12″ x 3-1/4″ strip of “Winter wonders” patterned paper for the base.
Step 2: Place a piece of snowy pines patterned paper in the Treeline Border Punch approximately 1/4″ to either side of the black alignment mark. Punch a border and trim to measure 12” x 2-7/8″. Adhere to the base. Punch another tree border with White Solid Cardstock and trim to measure 12″ x 2-3/8″. Mount on top.
Step 3: Adhere the “Wintertime wonders” and pine boughs laser cut borders.
The Beauty of Winter Border

Step 1: Cut a 12″ x 3″ strip of green knit patterned paper for the base. Cut a 12″ x 2-1/2″ strip of snowflake patterned paper and adhere on top.
Step 2: Punch a border using the Treeline Border Punch with White Solid Cardstock. Trim to measure 12″ x 1-3/4″. Using the swell edge of the 12-inch Decorative Trimmer, cut the piece in two. Place both pieces on the border, spacing them apart about 3/8″ as shown.
Step 3: Adhere the wood grain border sticker, then the pinecones border sticker. Adhere the trees sticker and “The beauty of winter,” pinecones and snowflake stickers with Foam Squares.
First Snow Border

Step 1: Cut a 3-1/4″ x 12″ strip of green plaid patterned paper for the base. Cut a 2-3/4″ x 11-1/2″ strip of White Solid Cardstock and mount it on the base.
Step 2: Punch a border with the Treeline Border Punch with Dark Green Solid Cardstoc. Trim to measure 12″ x 3-3/4″. Cut into 2-1/2″-wide sections. Repeat with snowflake paper, varying the sections so the trees offset the green ones.
Step 3: Punch a tree border with snowy pines patterned paper. Trim to measure 12″ x 4-1/2″. Cut into 2-1/2″-wide sections. Using the 12-inch Decorative Trimmer, cut the sections apart.
Step 4: Adhere the tree line sections to the white strip, starting with dark green on top, then snowflake, then the snowy pines sections, using the photo as a guide. Trim the last layers as needed to fit the strip.
Step 5: Add stickers, mounting some with Foam Squares for added dimension.
Which one of these pine tree scrapbook borders speaks to you the most? Let us know in the comments below!

I love the First Snow Boarder!! Can’t wait for my Treeline Boarder Punch to arrive next week!! ?
The Beauty of Winter Border speaks to me as to the stillness of winter; very peaceful. I got mine today so I am dreaming up ideas.
Beautiful!!
Just gorgeous!!!!!!
These border ideas are fabulous. Got my treeline border punch, can’t wait to start creating!!
Love these borders! Can’t wait for my punch to arrive!
[…] Sketch #2 is simply brr-illiant! Instructions for this pine trees border (and others) can be found in this blog post! […]
[…] The wonder of winter is right at your fingertips with this border! Check out the instructions for it in this blog post! […]
[…] do this. I’ve selected two border projects from the Creative Memories Blog – one from November 6, 2020 and the other from January 5, […]