November 24, 2020
Gobble Up Some Fun With The Turkey Scrapbook Layout

Special festive events, from Thanksgiving to “Friendsgiving,” Christmas and New Year’s (and all observances in between), have looked a bit different this year. But that doesn’t mean you can’t have a little creative fun within your craft room! If you’re looking for a project to feast upon, then blog contributor Sachiyo Omitsu has you covered with a layout that’s stuffed with cuteness — check out this turkey scrapbook layout!
Sachiyo’s Inspiration
Last year I did a turkey-themed craft project with 18 toddlers at the preschool my son goes to. My son still fondly remembers that and has been asking me to do some craft projects with him. It’s always fun to create with my craft buddy who (despite being four years old) already has his own Tape Runner and Foam Squares. I can’t wait to make this fun Thanksgiving scrapbook layout with my little helper. Do you have a craft buddy who you love to craft with?

Project by Sachiyo Omitsu – CM Independent Advisor
To create this layout you’ll need:
- Hello, Autumn Paper Pack or (Shop Canada | Shop Australia)
- Hello, Autumn Tone-on-Tone Paper Pack or (Shop Canada | Shop Australia)
- All My Love Paper Pack or (Shop Canada | Shop Australia)
- Hello, Autumn Foiled Embellishments or (Shop Canada | Shop Australia)
- Hello, Autumn Stickers or (Shop Canada | Shop Australia)
- Crimson, Goldenrod, Navy & White Solid Cardstocks or (Shop Canada | Shop Australia)
- Original Border Maker System with the Icicle Chain Border Maker Cartridge or (Shop Canada | Shop Australia)
- Custom Cutting System with the Circle, Jumbo Circle & Oval Patterns or (Shop Canada | Shop Australia)
- 12-inch Trimmer or (Shop Canada | Shop Australia)
- All-Purpose Scissors or (Shop Canada | Shop Australia)
- Tape Runner or (Shop Canada | Shop Australia)
- Repositionable Tape Runner or (Shop Canada | Shop Australia)
- Foam Squares or (Shop Canada | Shop Australia)
- Chocolate Dot Pen or (Shop Canada | Shop Australia)

Step 1: Use two pieces of Navy Solid Cardstock as the base.
Step 2: Using the outside of the Jumbo Circle Pattern and the Red Blade, cut a circle from White Solid Cardstock.

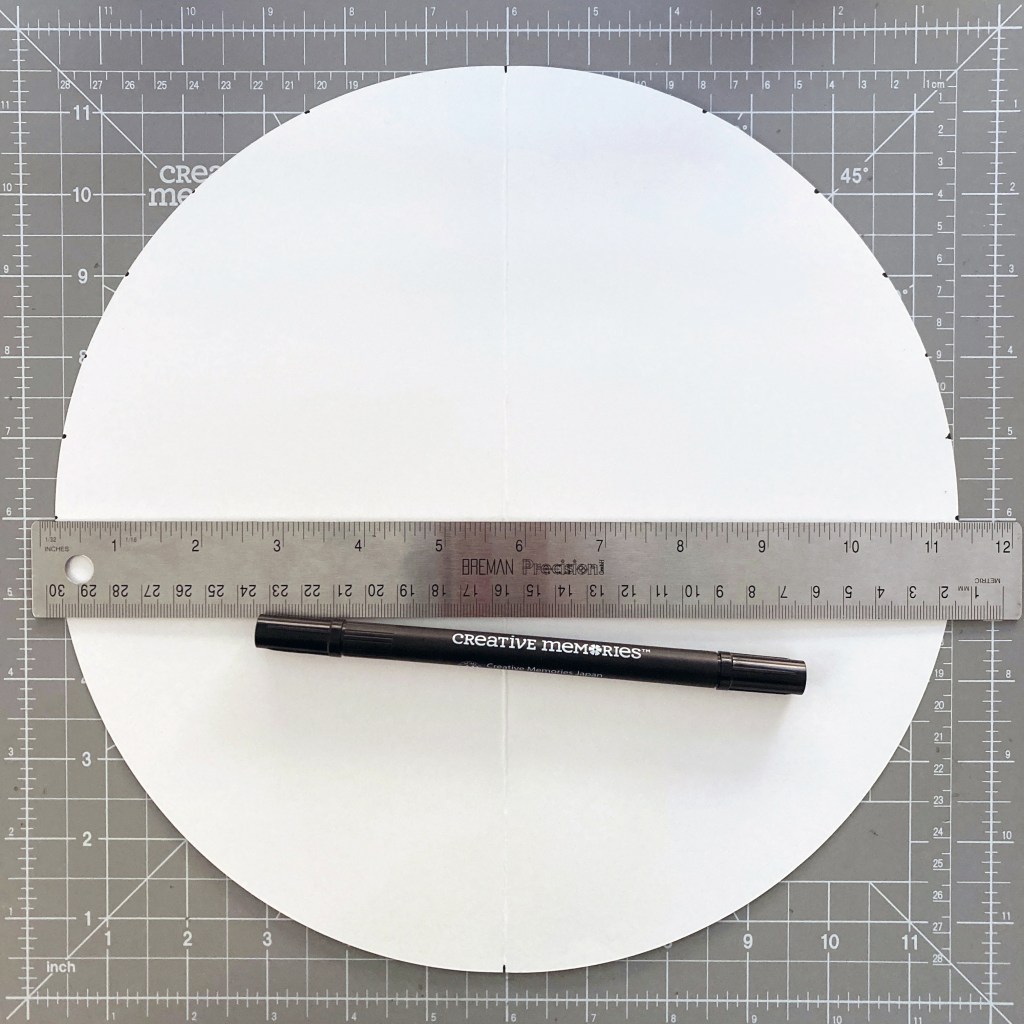
Step 3: Fold the circle in half and mark both ends. Place the circle aligning the marked points to the 6″ line of the 13 x 13 Custom Cutting System Mat as shown.
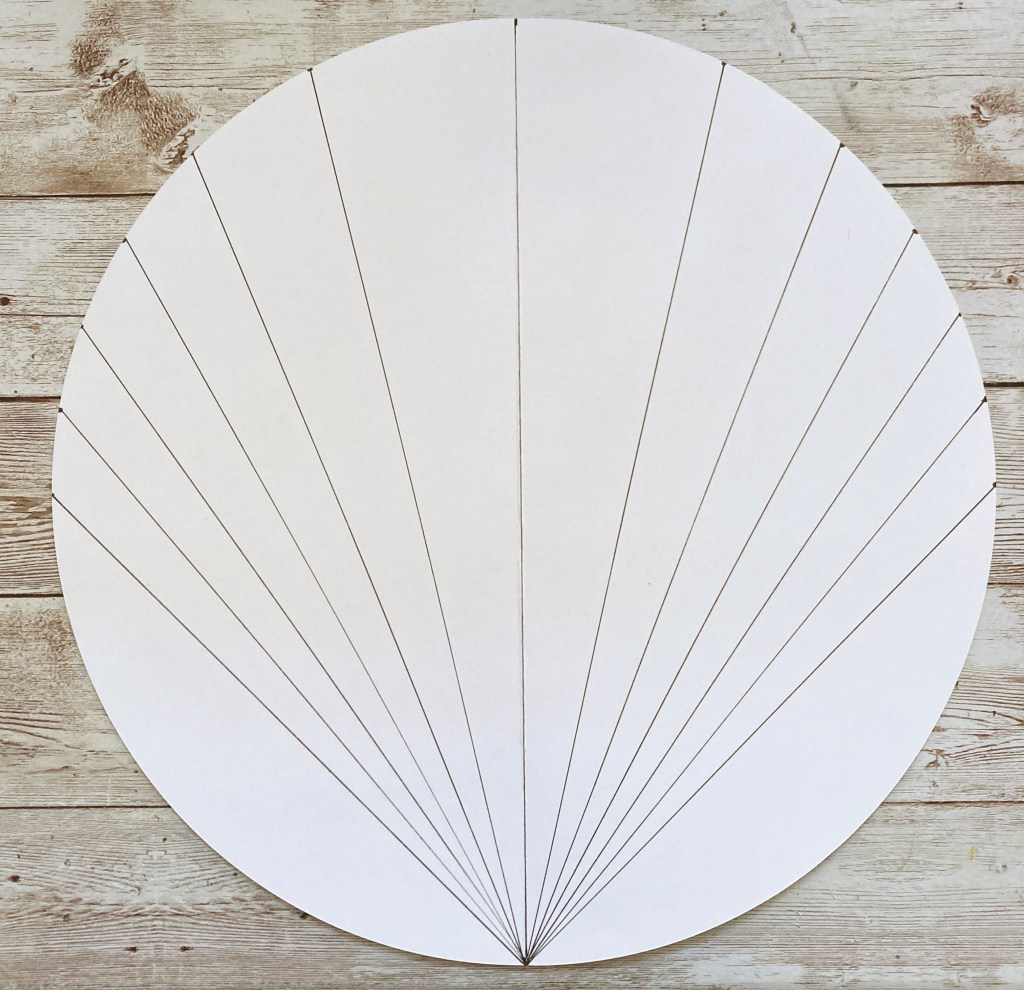
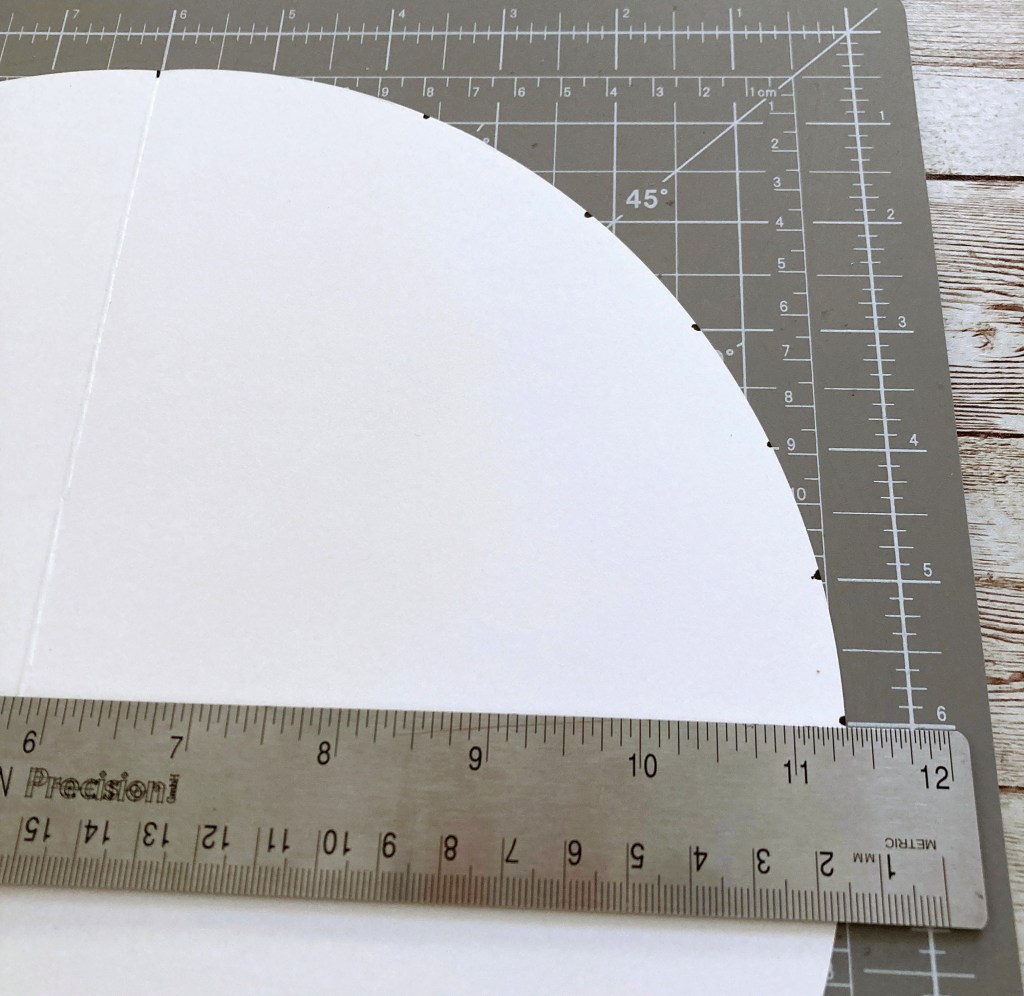
Step 4: Move and mark on the circle where it hits the 1″, 2″, 3″, 4″, 5″ and 6″ marks of the mat. Draw lines connecting each mark with the mark previously drawn at the bottom of the circle as shown.
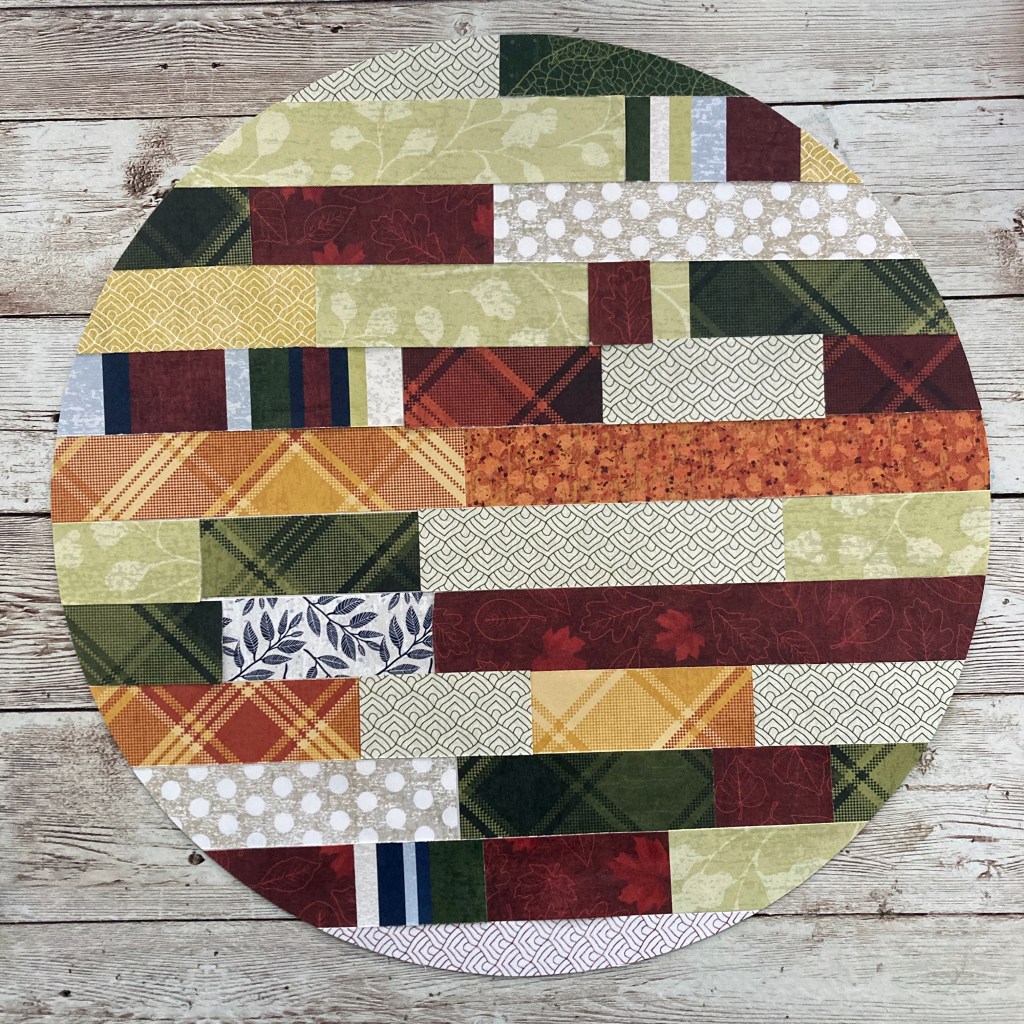
Step 5: Cut 1″ strips from various patterned papers. Adhere the strips to the circle on the side where there are no lines drawn. Trim excess strips along the circle using the All-Purpose Scissors.

Step 6: Cut the circle along the lines drawn on the back. Each time you cut a segment, set it aside in the order in which you cut.

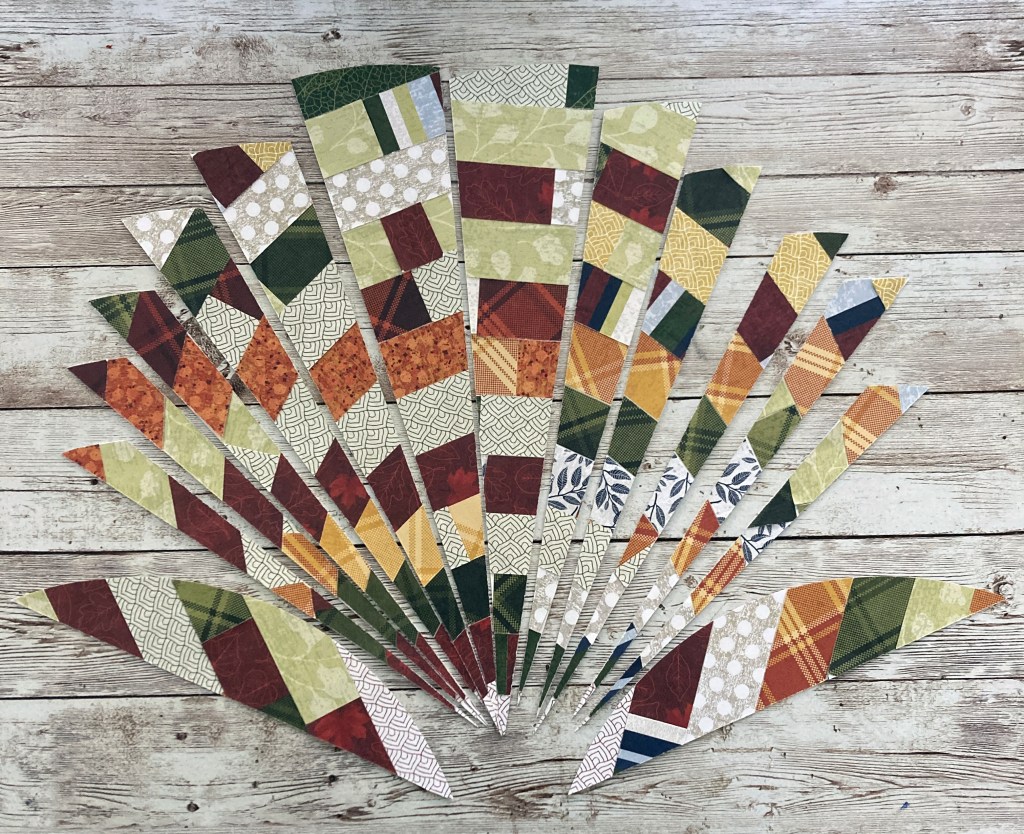
Step 7: Move the segments on the right side to left, and left side to right, as shown. Adhere the triangular segments to the base. Add a circular segment overlapping with part of the triangular segments.
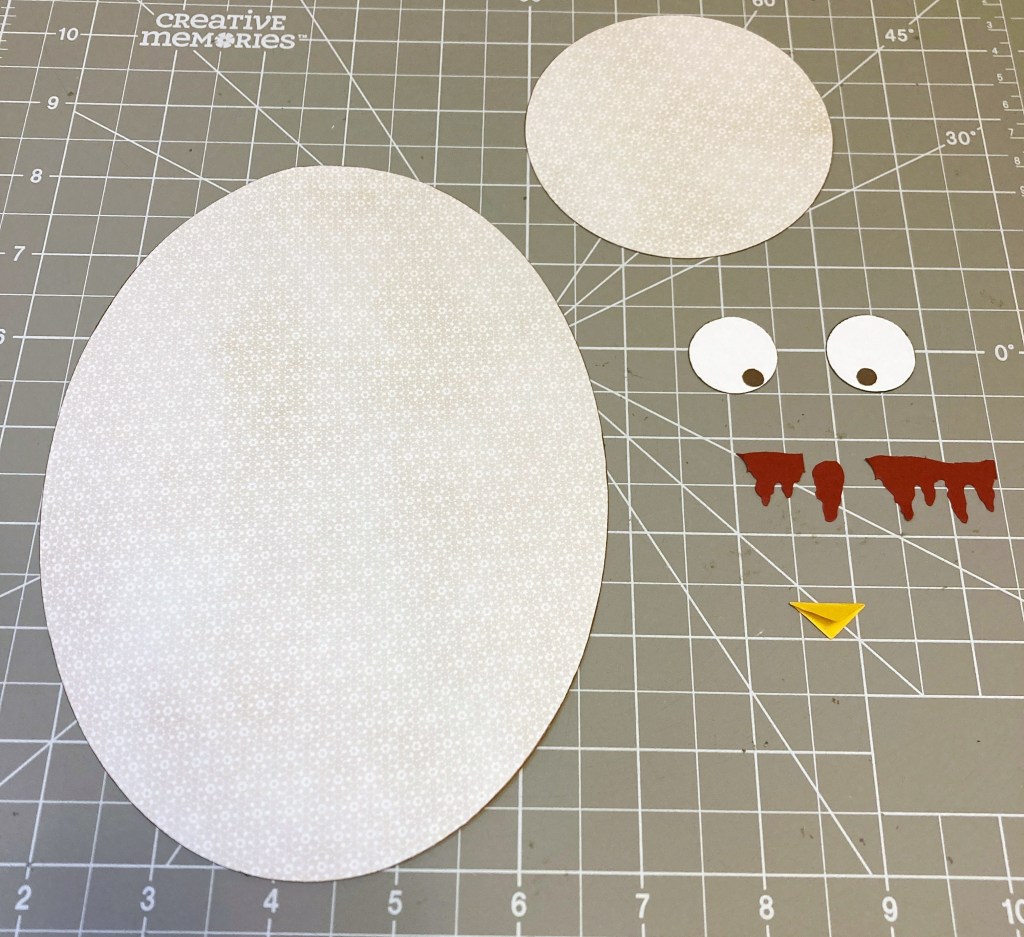
Step 8: Use a few pieces of the beige patterned paper from All My Love Paper Pack, as well as White, Goldenrod and Crimson Solid Cardstocks to make the following shapes for the turkey:
- Body — Cut the beige patterned paper with the largest Custom Cutting System Oval Pattern on the outside with the Blue Blade. Ink the edges with the Chocolate Dot Pen.
- Face — Cut the beige patterned paper with the large Custom Cutting System Circle Pattern on the inside with the Red Blade. Ink the edges with the Chocolate Dot Pen.
- Eyes — Cut White Solid Cardstock with the small Custom Cutting System Circle Pattern on the inside with the Blue Blade, twice. Draw a dot using the Chocolate Dot Pen.
- Beak — Cut Goldenrod Solid Cardstock to measure 1/2″ x 1/2″. Fold in half diagonally to make a triangle.
- Wattle — Using the Icicle Chain Border Maker Cartridge, punch with Crimson Solid Cardstock. Cut out a piece with the All-Purpose Scissors.
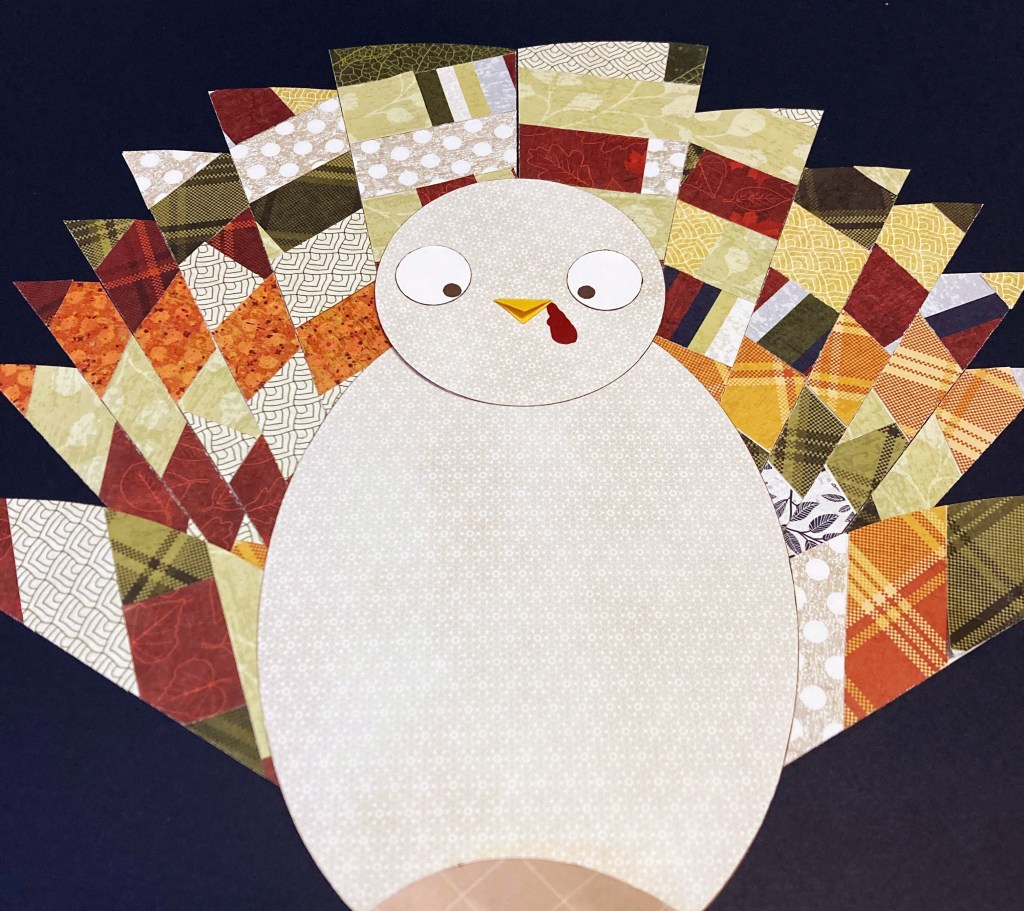
Step 9: Assemble the turkey and adhere to the base. Fold the bottom of the oval along the base. Cut the turkey in half along the base.
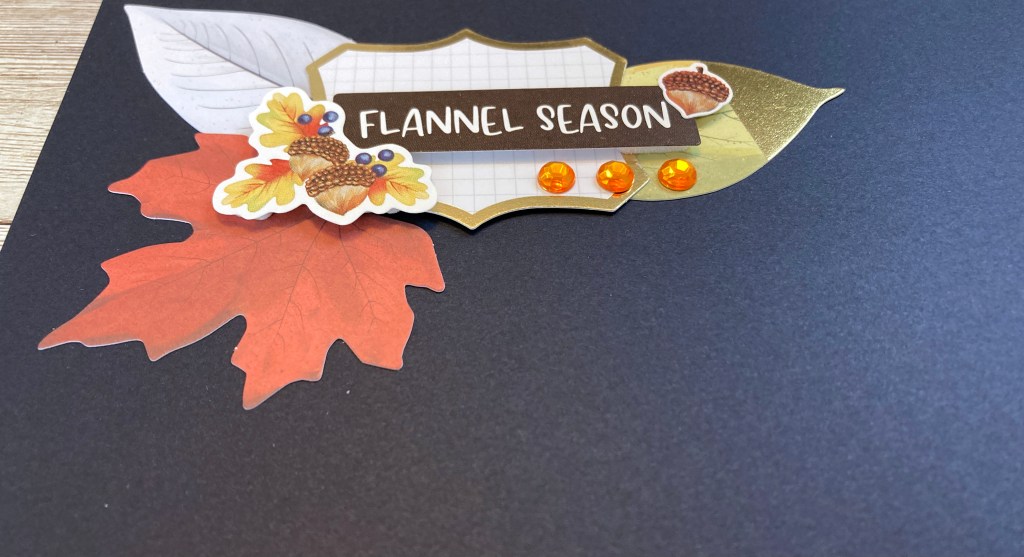
Step 10: Adhere stickers and embellishments, using Foam Squares on some for added dimension.
How will you be spending Thanksgiving, Christmas or other festive occasions this year? Will you be trying out this turkey scrapbook layout? Let us know in the comments below!


I plan on making the turkey layout. For the holiday(s), we will stay at home, making a special meal. We will do Zoom get togethers with children and grandchildren.
Amazing, thanks for sharing! You are so creative! We had our Thanksgiving in Canada in October, so I think this will be perfect for our small group that gathered.
What a great way to use lots of little scraps! Definitely doing this! So cute!
Too busy. I like things more traditional. solid color feathers would look better!
I might make it, i If I remember to take some Thanksgiving pictures this. Very creative idea.
Very creative and stunning! Thanks for sharing!