March 31, 2021
This Easter Scrapbook Layout Is Egg-stra Special

Easter is right around the corner, and the preparations are in full swing with adorable bunny decorations, kiddos dyeing eggs (and unavoidably, their hands!) in bright hues and blooms of tulips, lilies and daffodils wafting their floral presence through the air. Even Advisor Jennene Doyle has started prepping for this egg-citing occasion with an Easter scrapbook layout that’s sure to make you crack a smile. In fact, she uses a cool weaving technique, as well as a trick with the Dot Tip Pens — hoppin‘ into action to make beautiful designs. Ready to see what it’s all about?
Jennene’s Inspiration:
Easter is approaching, so there’s no better time to start getting prepared for those special photos. I wanted to make a special page this year for a photo of my granddaughter and an Easter egg. I love the hues of the Dot Tip Pens and the variety of ways of using them. Combining the softened shades of the Dot Tip Pens with the Spring Cottage Paper Pack, woven as a basket, completed the page.

To create this layout you will need:
- Spring Cottage Paper Pack or (Shop Canada | Shop Australia)
- White Solid Cardstock or (Shop Canada | Shop Australia)
- Alphabet Stamp Kit System or (Shop Canada | Shop Australia)
- Dot Tip Pens or (Shop Canada | Shop Australia)
- 12-inch Trimmer or (Shop Canada | Shop Australia)
- Custom Cutting System with Oval Patterns or (Shop Canada | Shop Australia)
- All-Purpose Scissors or (Shop Canada | Shop Australia)
- Tape Runner or (Shop Canada | Shop Australia)
- Repositionable Tape Runner or (Shop Canada | Shop Australia)
- Foam Squares or (Shop Canada | Shop Australia)
- Ruler or (Shop Canada | Shop Australia)
- Pencil
- Old plastic lid/bag
- Small pieces of cosmetic sponges

Step 1: Use a Dot Tip Pen with the thicker end to squiggle a patch on an old plastic lid/bag. Add a few small drops of clean water and mix onto one side of a small piece of cosmetic sponge. Use the sponge to transfer the muted hue onto a patch of your White Solid Cardstock. The patch needs to be big enough to cut out a few small ovals for eggs approximately 3 1/2″ x 3 1/2″ in size.

Step 2: Repeat the transfer of hues of desired pens onto patches of your White Solid Cardstock using a clean section of lid/bag and clean section of sponge. Allow time for ink to dry.
Step 3: Carefully line up the second-largest Oval Custom Cutting Pattern on one of your transferred patches, ready to cut an oval on the inside track with the Blue Blade. Align the pattern toward the edge of patch, saving ample hues for more ovals to be cut.

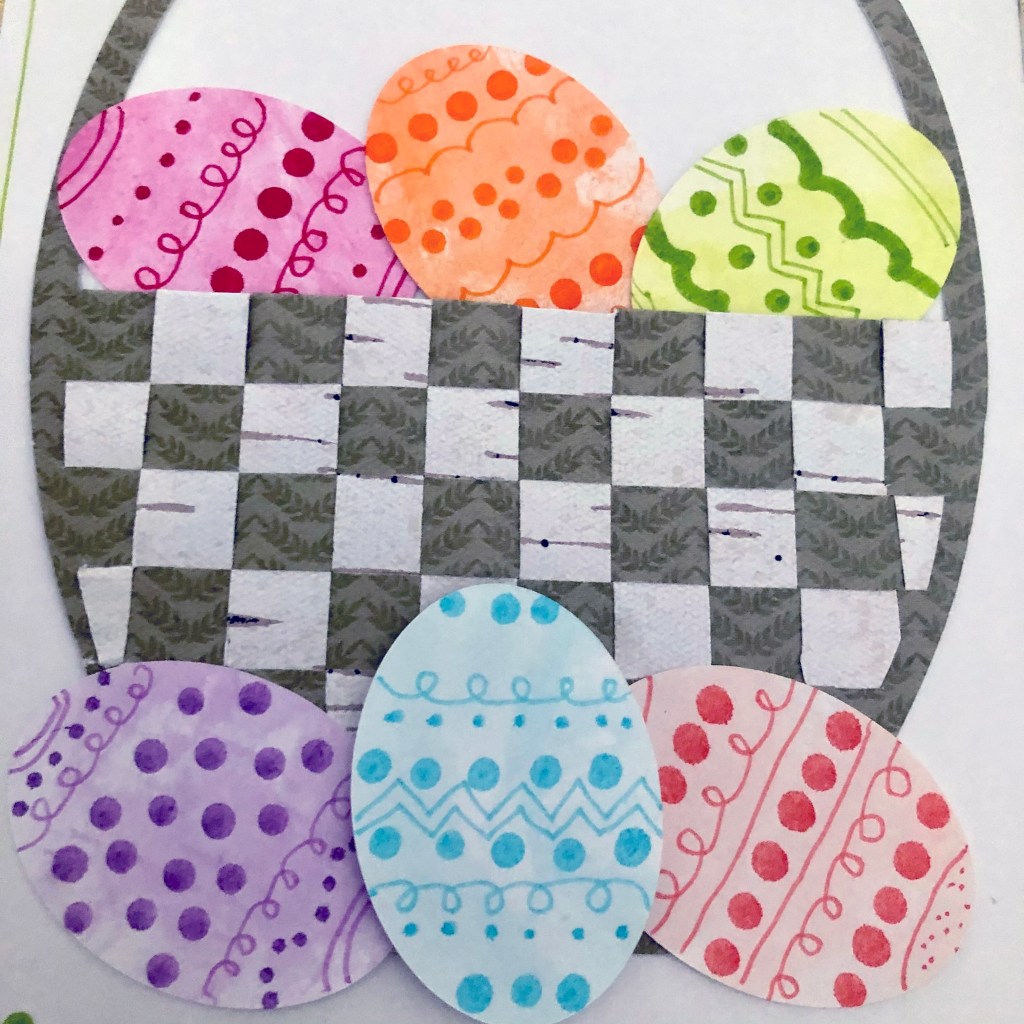
Step 4: Use the matching Dot Tip Pen to decorate each of your cut ovals into “Easter eggs.” Experiment with combinations of dots and lines using both the thick and fine tip of the pens. See photos for examples.

Step 5: Use the Alphabet Stamp Kit System to stamp individual letters onto your patches, allowing space around them to cut ovals as shown.
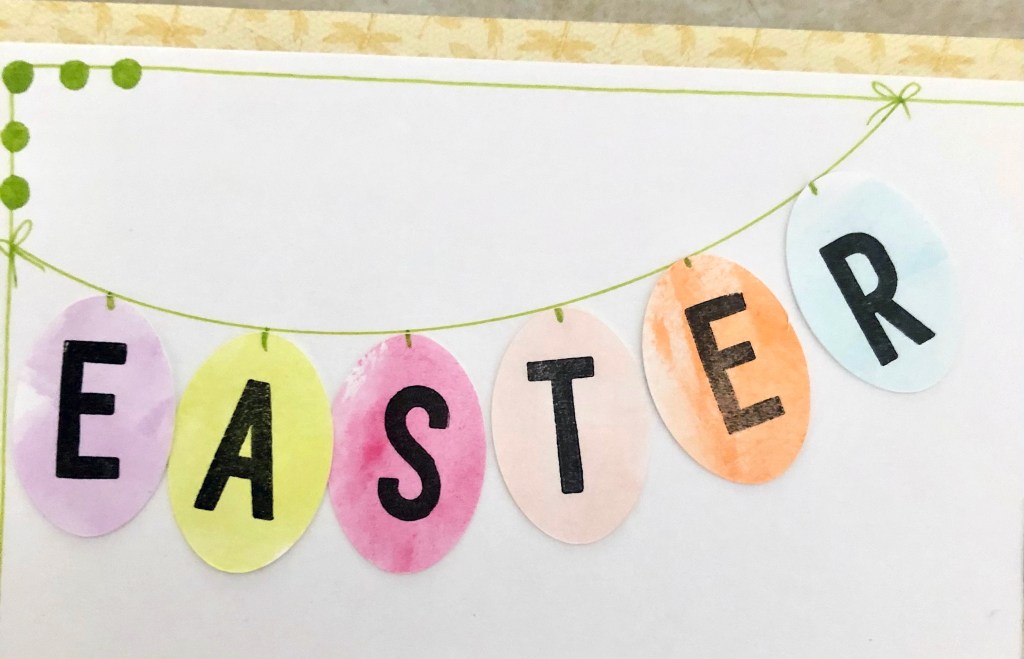

Step 6: Carefully line up the second-smallest Oval Custom Cutting Pattern on one of your stamped letter patches, ready to cut an oval on the inside track with the Blue Blade. Cut out each letter individually.
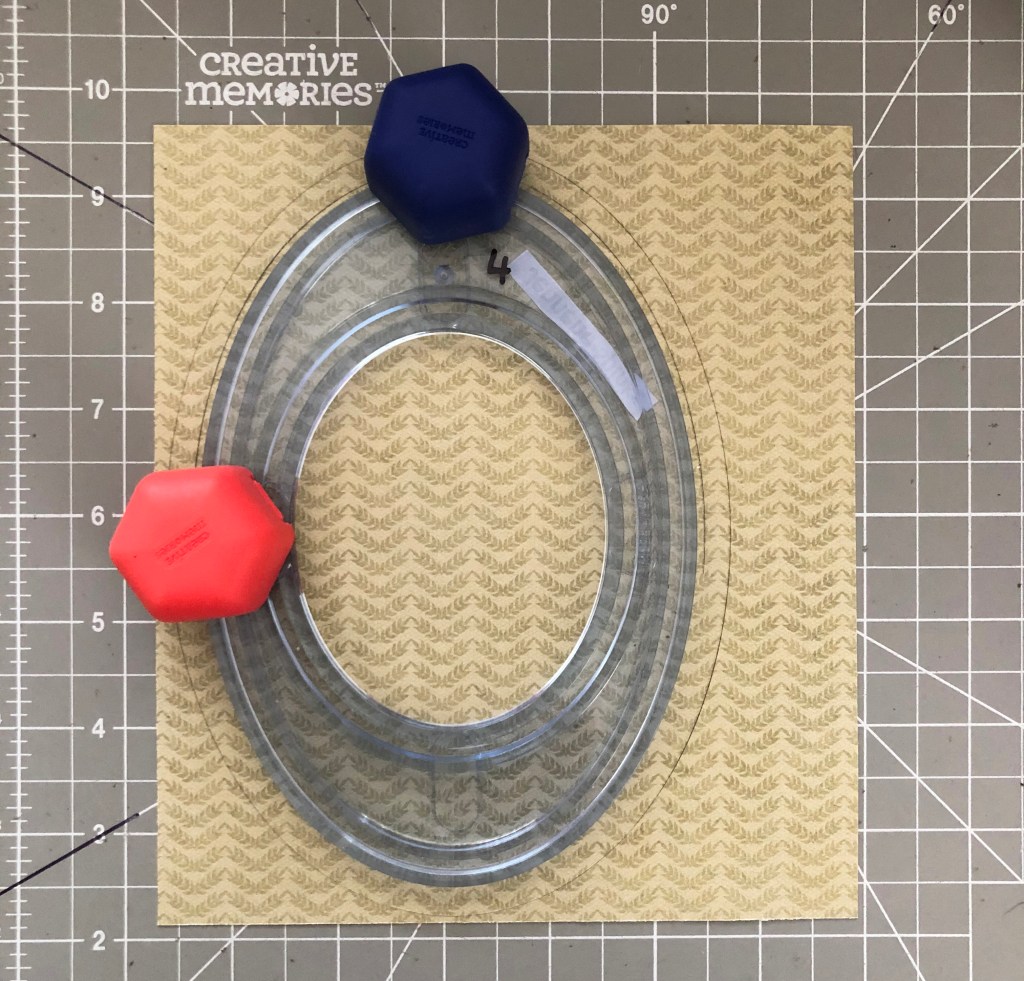
Step 7: To make the basket, cut an oval out of a sheet of leaf chevron paper using the second-largest Oval Custom Cutting Pattern on the outside track with the Blue Blade. Without moving the pattern and using the Red Blade, cut around half of the oval again, forming your “basket handle.”


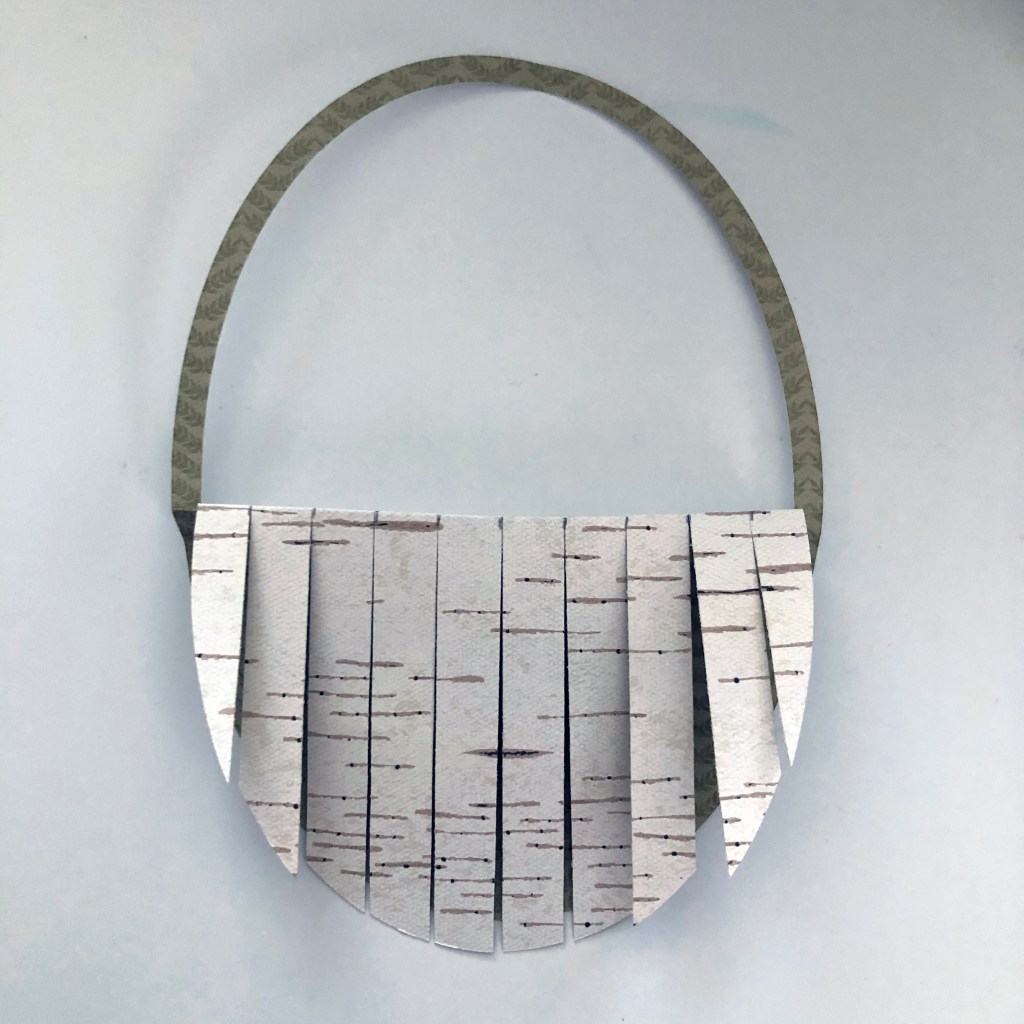
Step 8: Fold down the top section of the basket over to meet the base. Along the folded edge, align your ruler to mark at each 1/2″ interval. The outer edges will be just short of 1/2″. Unfold the paper and carefully line up on your 12-inch Trimmer. Fold the handle out of the way and then cut from the marks on the fold line through, forming rows of strips ready for weaving. It is easy to cut on the 12-inch Trimmer if you follow the grid lines printed on the trimmer. Line up your fold line on a horizontal line, continuing to keep it that way for all cuts. Use the clear pull-down sight on your trimmer, lining it up at your pencil marks. As you make your first cuts you can continue to make the remainder of cuts straight by lining the cuts with the grid lines.
Step 9: Prepare the other half of the basket by lining up the 12-inch Trimmer and making cut slits parallel to the fold at 1/2″ intervals. Cut carefully, starting and stopping inside the edge of the oval and leaving a margin around the edge. Remember, you can stop and check how far you have cut, then cut some more if you just keep your paper in place. You may like to finish the cuts carefully with the All-Purpose Scissors.

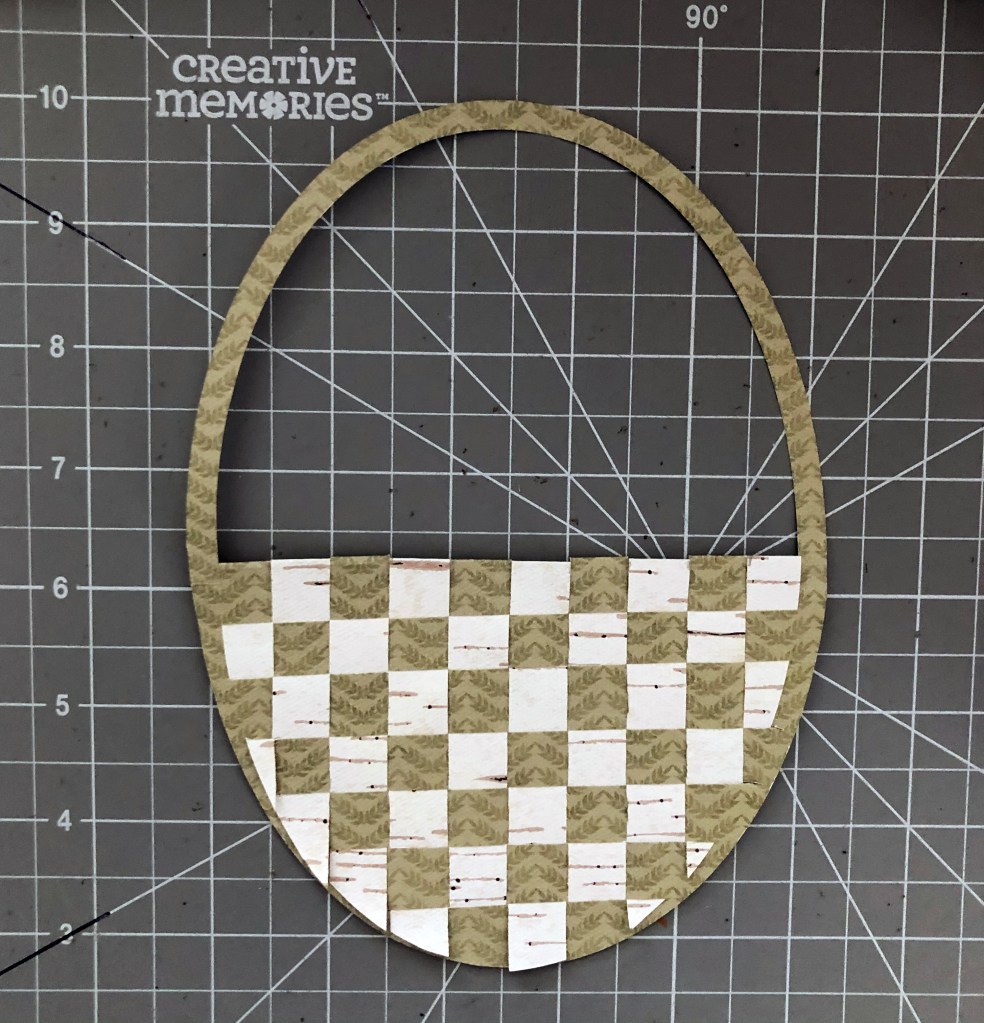
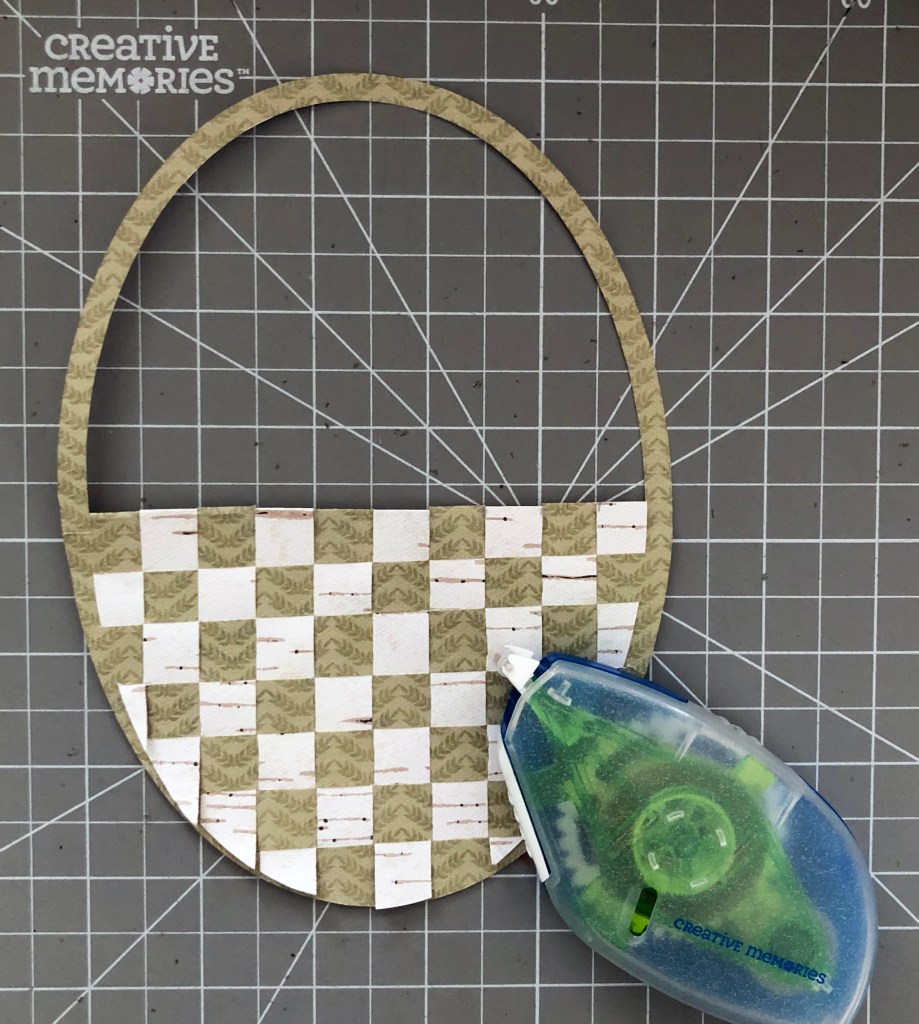
Step 10: Weave the cut strips in between the cut slits, alternating with folding the strips forward and backward at the middle fold. You will need to continually tighten the weave to allow space for all the strips to be woven. Attach edges with the Repositionable Tape Runner. Trim the base flat.
Step 11: Using yellow dragonflies paper and your 12-inch Trimmer, cut a hollow square making 1″ wide frame. Use the 12-inch Trimmer to trim 1/2″ off the top and one side of a sheet of White Solid Cardstock, leaving you with an 11-1/2″ square. Use Tape Runner attach the White Solid Cardstock to the hollow yellow dragonflies square.
Step 12: Using yellow dragonflies paper and your 12-inch Trimmer, cut a 7″ x 5″ mat. This can be trimmed out to have a 1/2″ frame, reserving the middle for another project. Using leaf chevron paper and your 12-inch Trimmer, cut a 6 1/2″ x 4 1/2″ mat. This too can be trimmed out to have a 1/2″ frame. Align and attach the cut mats to form a double-mat that is now ready for your special 6″ x 4″ photo.
Step 12: Arrange all your elements on the page, leaving even spacings and room for journal areas. Attach with your choice of adhesive, popping up some of the eggs with Foam Squares and aligning some eggs over any uneven woven pieces of basket.
Step 13: Use Dot Tip Pens to draw a border around the page, dots in corners and “strings” to hang your page title on. Have fun and don’t forget to journal!
What do you admire most about this Easter scrapbook layout? What are some of your Easter traditions, or how do you plan to spend this egg-cellent Sunday occasion? (Don’t worry, we’re done with the puns now!) Share with us in the comments below!

Whoa!! Jennene, this is fantastic!! What a clever way to make the basket!! I am totally scraplifting this idea!!
Very very nice page for that one special Easter photo. Sure like the basket technique and the coloring of the eggs. Clever. Thank you very much.
This is so beautiful and so clever! Thank you for sharing! :) ~Ali
I really like the way you used the dot pens, and showed us the technique to use on how to color the eggs and making the basket. Very Springy, colorful, and fun!
I love this page. It’s really good if you don’t have many Easter pictures.
[…] Get Instructions! […]
re some way to save these instructions?? could they bee in a pdf whatever that is?? Judith McLean jmhmcl44@Gmail.com 717-440-5228