April 19, 2021
Border Punches Promo: Add Dynamic Dimension With These Scrapbook Punch Projects

The latest and greatest promo that just launched today really packs a punch… literally! For a limited time, you can earn up to TWO exclusive border punches, the Alpine Mountains Border Punch and/or the Wheatfield Border Punch, for FREE with qualifying orders on the CM website. (Woot, woot!) And while you wait for your outdoorsy free punch(es) to arrive, we’re going to show you not two, not three but FOUR scrapbook punch projects that have been created with these limited-time items so you can see them in crafting action — pump up your punch game and check them out now!
For the Border Punches Promo details, visit: US | CA | AU

To create these borders and layout you will need:
- Homestead Paper Pack or (Shop Canada | Shop Australia)
- Homestead Laser Cut Embellishments or (Shop Canada | Shop Australia)
- Homestead Laser Cut Borders or (Shop Canada | Shop Australia)
- Homestead Stickers or (Shop Canada | Shop Australia)
- Must Have Laser Title Embellishments or (Shop Canada | Shop Australia) – Expected in May
- Alpine Mountain Border Punch & Wheatfield Border Punch or (Shop Canada | Shop Australia) – Only available through this promotion
- Custom Cutting System with Circle Patterns or (Shop Canada | Shop Australia)
- Micro-Tip Scissors (Shop Canada | Shop Australia)
- 12-inch Trimmer with Straight & Scallop Blades or (Shop Canada | Shop Australia)
- Tape Runner or (Shop Canada | Shop Australia)
- Repositionable Tape Runner or (Shop Canada | Shop Australia)
- Foam Squares or (Shop Canada | Shop Australia)
- Black Dual-Tip Pen or (Shop Canada | Shop Australia)

Alpine Mountains ‘Home Sweet Home’ Border
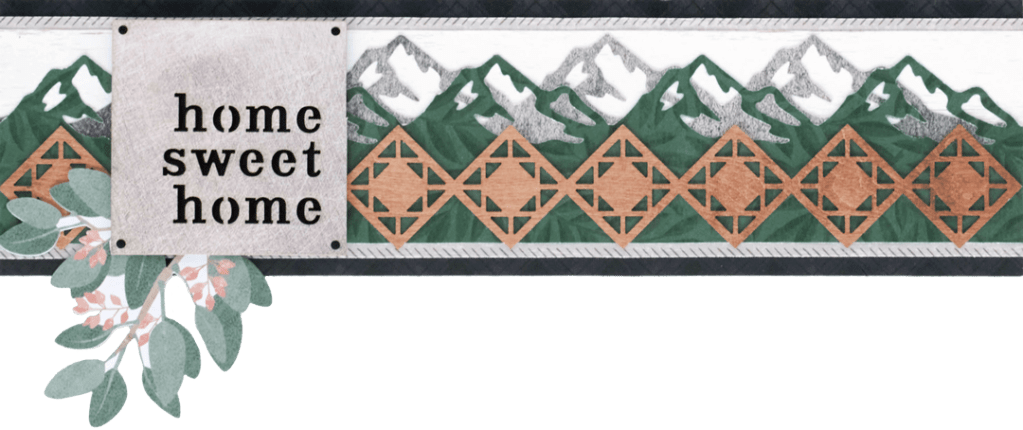
Step 1: Cut a 12″ x 3-1/4″ strip of black plaid paper for the base. Cut a 12″ x 2-3/4″ strip of chevron paper and adhere to the base. Cut a 12″ x 2-1/2″ strip of shiplap paper and mount on top.
Step 2: Punch a border using the Alpine Mountains Border Punch with green leaves paper. Trim to measure 12″ x 2-1/8″. Punch another border with brushed metal paper, but begin punching in the middle of the punch rather than where the marks are. Trim to measure 12″ x 1-1/2″. Layer the green leaves over the brushed metal and adhere to the border.
Step 3: Cut a 2-3/4″ x 2-3/4″ piece of black plaid paper. Mount the “Home sweet home” embellishment on top using Foam Squares. Adhere it along with a branch embellishment to the border.
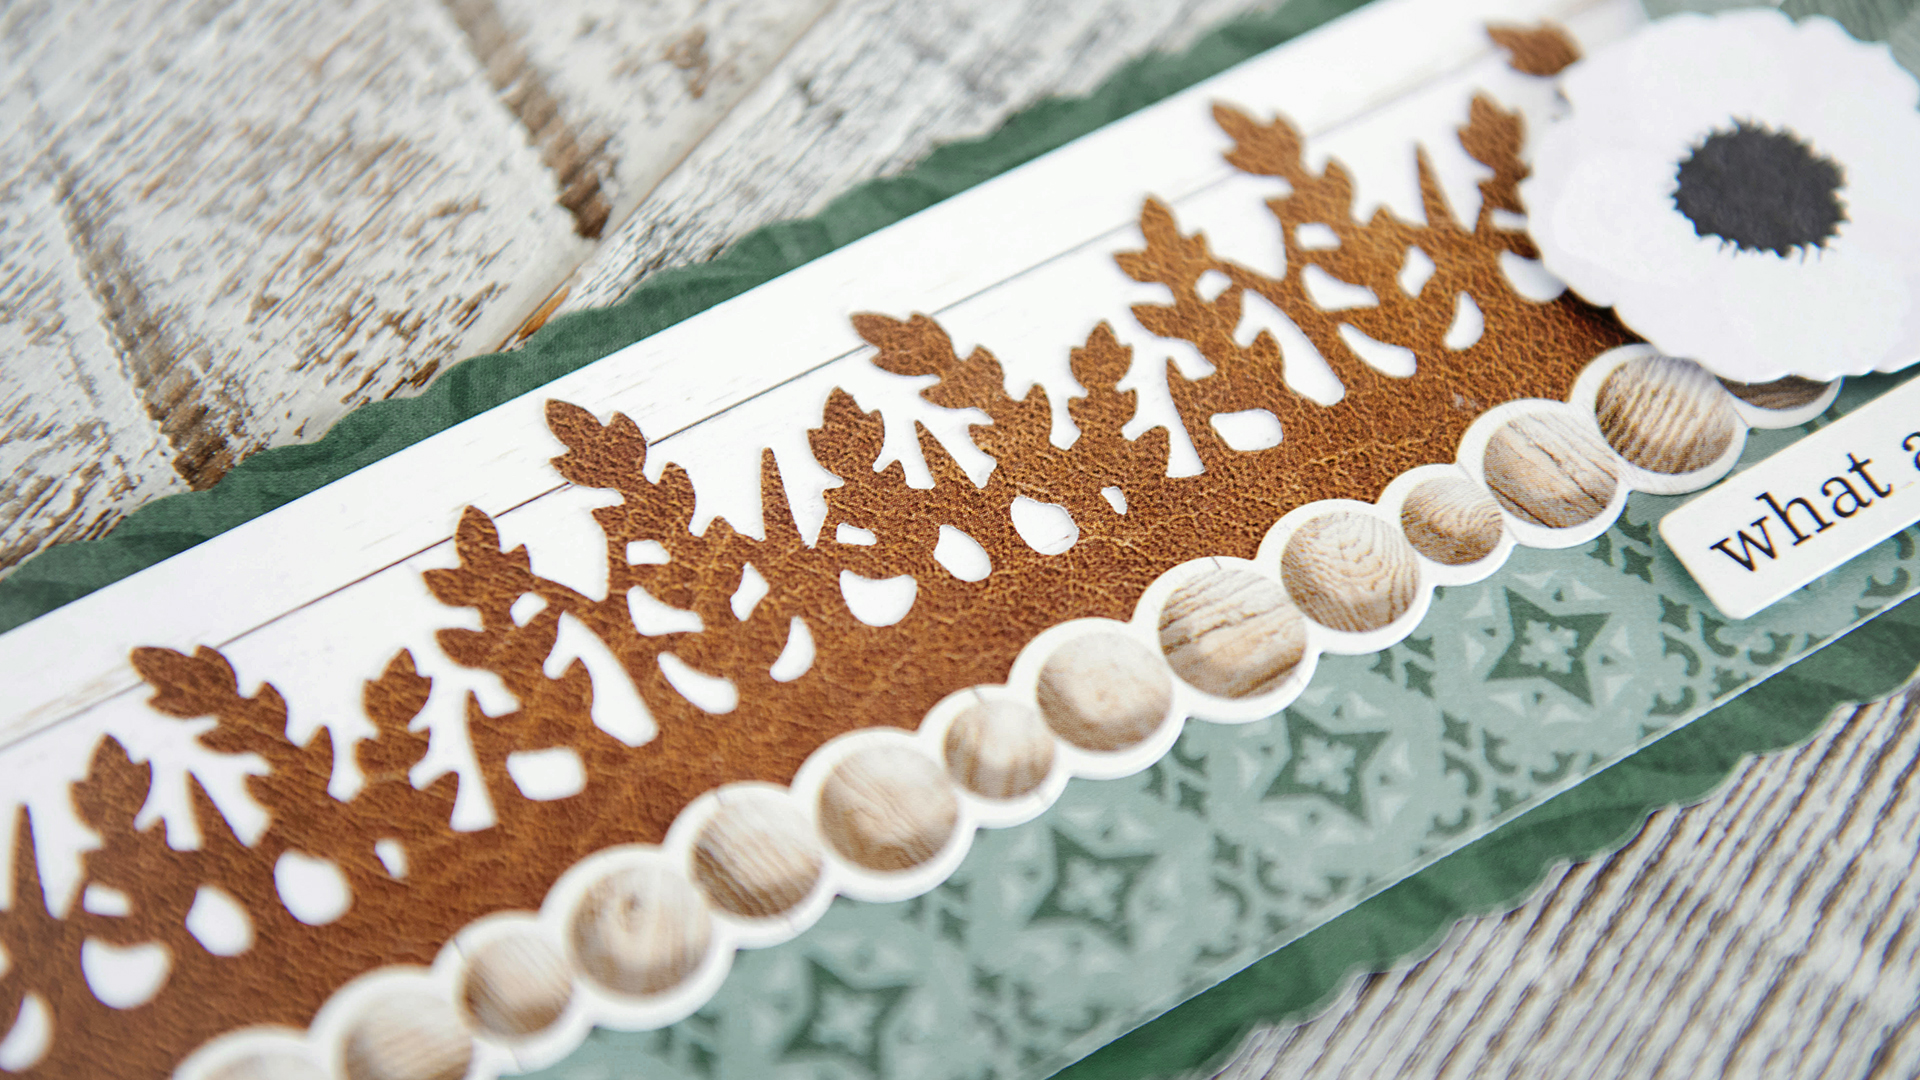
Wheatfield ‘What a Wonderful Life’ Border
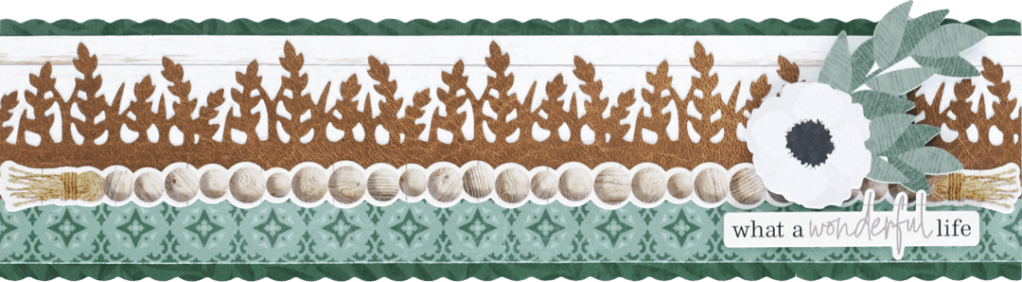
Step 1: Using the 12-inch Trimmer with the Scallop Blade, cut a 12″ x 3″ strip of green leaves paper for the base. With the 12-inch Trimmer and the Straight Blade, cut a 12″ x 1-3/4″ strip of shiplap paper and adhere to the top of the base. Cut a 12″ x 1″ strip of teal tile paper and adhere it to the bottom of the base.
Step 2: Punch a border using the Wheatfield Border Punch with brown leather paper. Trim to measure 12″ x 1-1/2″ and adhere on top of the shiplap strip. Place a wood bead border sticker along the seam.
Step 3: Add stickers and embellishments, popping them up with Foam Squares for added dimension.
Alpine Mountains & Wheatfield ‘Road Trip’ Border
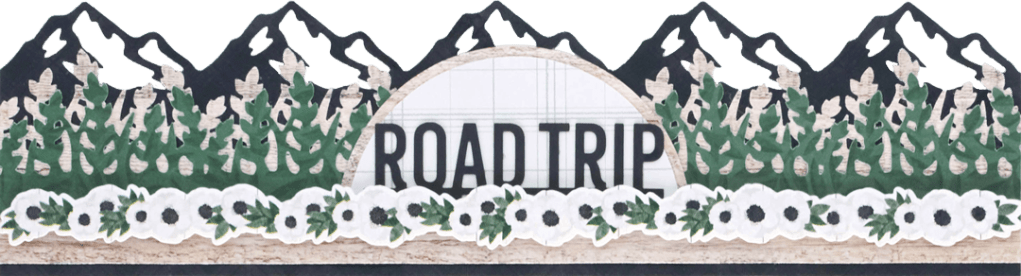
Step 1: Punch a border with the Alpine Mountains Border Punch with black plaid paper. Trim to 12″ x 3-1/4″ to create the base.
Step 2: Punch a border with the Wheatfield Border Punch with reclaimed wood paper. Trim to 12″ x 2-1/2″ and adhere to the base. Punch a border with the Wheatfield Border Punch with green leaves paper (punching the reverse side). Trim to 12″ x 1-3/4″ and adhere on top of the reclaimed wood border.
Step 3: Using the outside of the small Custom Cutting System Circle Pattern and the Red Blade, cut a half circle with light plaid paper. Using the Green Blade, cut a half circle with reclaimed wood paper. Layer and adhere in the middle of the border. Place the “Road trip” title on top.
Step 4: Adhere the anemones and greenery border sticker on the seam using Foam Squares.
Alpine Mountains & Wheatfield “Better Together” Layout

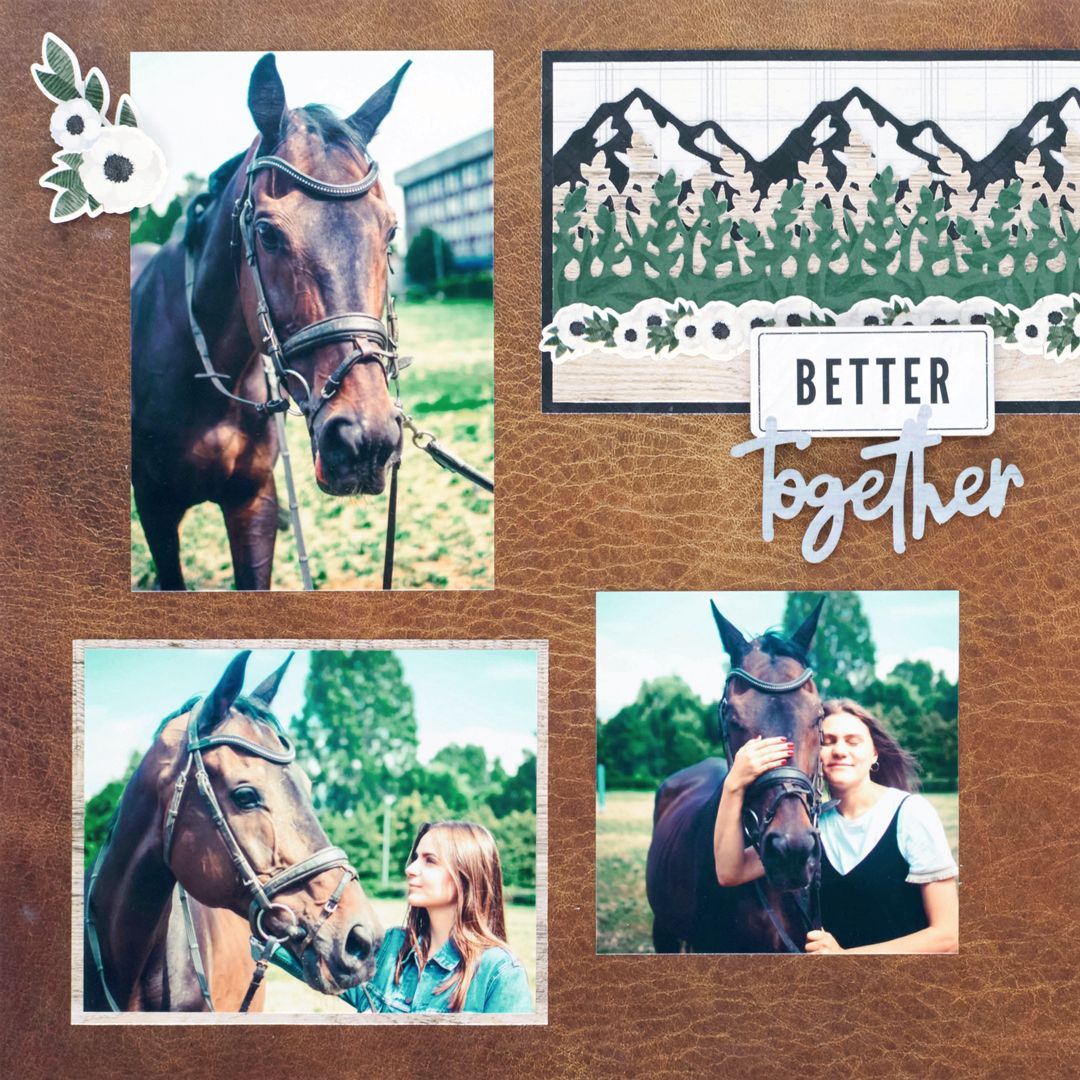
Step 1: Use a piece of shiplap paper and a piece of brown leather paper as the bases for this layout.
Step 2: Cut a 1/2″ x 12″ strip of brown leather paper and adhere it along the left side of the shiplap paper.
Step 3: To create the border, cut a 12″ x 4″ strip of black plaid paper for the base. Cut a 12″ x 1-1/2″ strip of light plaid paper and adhere it to the base, 1/8″ from the top edge. Punch a border using the Alpine Mountains Border Punch with black plaid paper. Trim to measure 12″ x 1-3/4″ and adhere it to the base, about 1/4″ from the top of the light plaid piece. Punch a border with the Wheatfield Border Punch with reclaimed wood paper. Trim to measure 12″ x 3″ and adhere. Punch a border using the Wheatfield Border Punch with green leaves paper (punching the reverse side). Trim to 12″ x 1-3/4″ and adhere on top of the reclaimed wood piece. Adhere an anemones and greenery border sticker along the seam. Cut the border in half to make two 6″ x 4″ pieces. Adhere each piece to the layout as shown.
Step 4: Crop photos — two 4″ x 6″, two 4″ x 4″ and two 5″ x 4″ (matted with two 5-1/4″ x 4-1/4″ pieces of reclaimed wood paper). Mount on the layout as shown.
Step 5: Add stickers and embellishments, popping some up with Foam Squares for added dimension.
Step 6: Journal as desired.
What do you like about the mountain scrapbook border, wheat scrapbook border and combined punches border and layout? Are you going to tap into this Border Punches Promo and make these scrapbook punch projects? Let us know in the comments!
And again, if you want info on this promo, visit: US | CA | AU

Awesome layouts!!! My granddaughter is a card maker (12) and she loves the punches. Loves to see ideas on these blogs. Thanks for giving her ideas to think about!
I love the horse spread. When I look at the mountain and wheatfield punches, I think of the song “America, The Beautiful” “. . .for amber waves of grain. . .For purple mountains majesty. . .” I’ll be looking into the promo!
Very pretty and awesome ideas!
Creating the third border for a past trip through the Norwegian fjords. This is perfect! Thanks for sharing your inspiration with us!
Love, love, love the mountains and wheat fields punches! The layouts are great!
[…] If you took up on the recent Border Punches Promo, then this two-page beauty is right up your creative alley! Learn how to create this spread and more by following the instructions in this blog post! […]
I made this for our West VA pictures. I added the car border in the middle to represent the hilly road trip.