August 25, 2021
Bring on the Wonderland (and Fun-derland!) With These Amusement Park Crafts: Scrapbook Borders and DIY Card
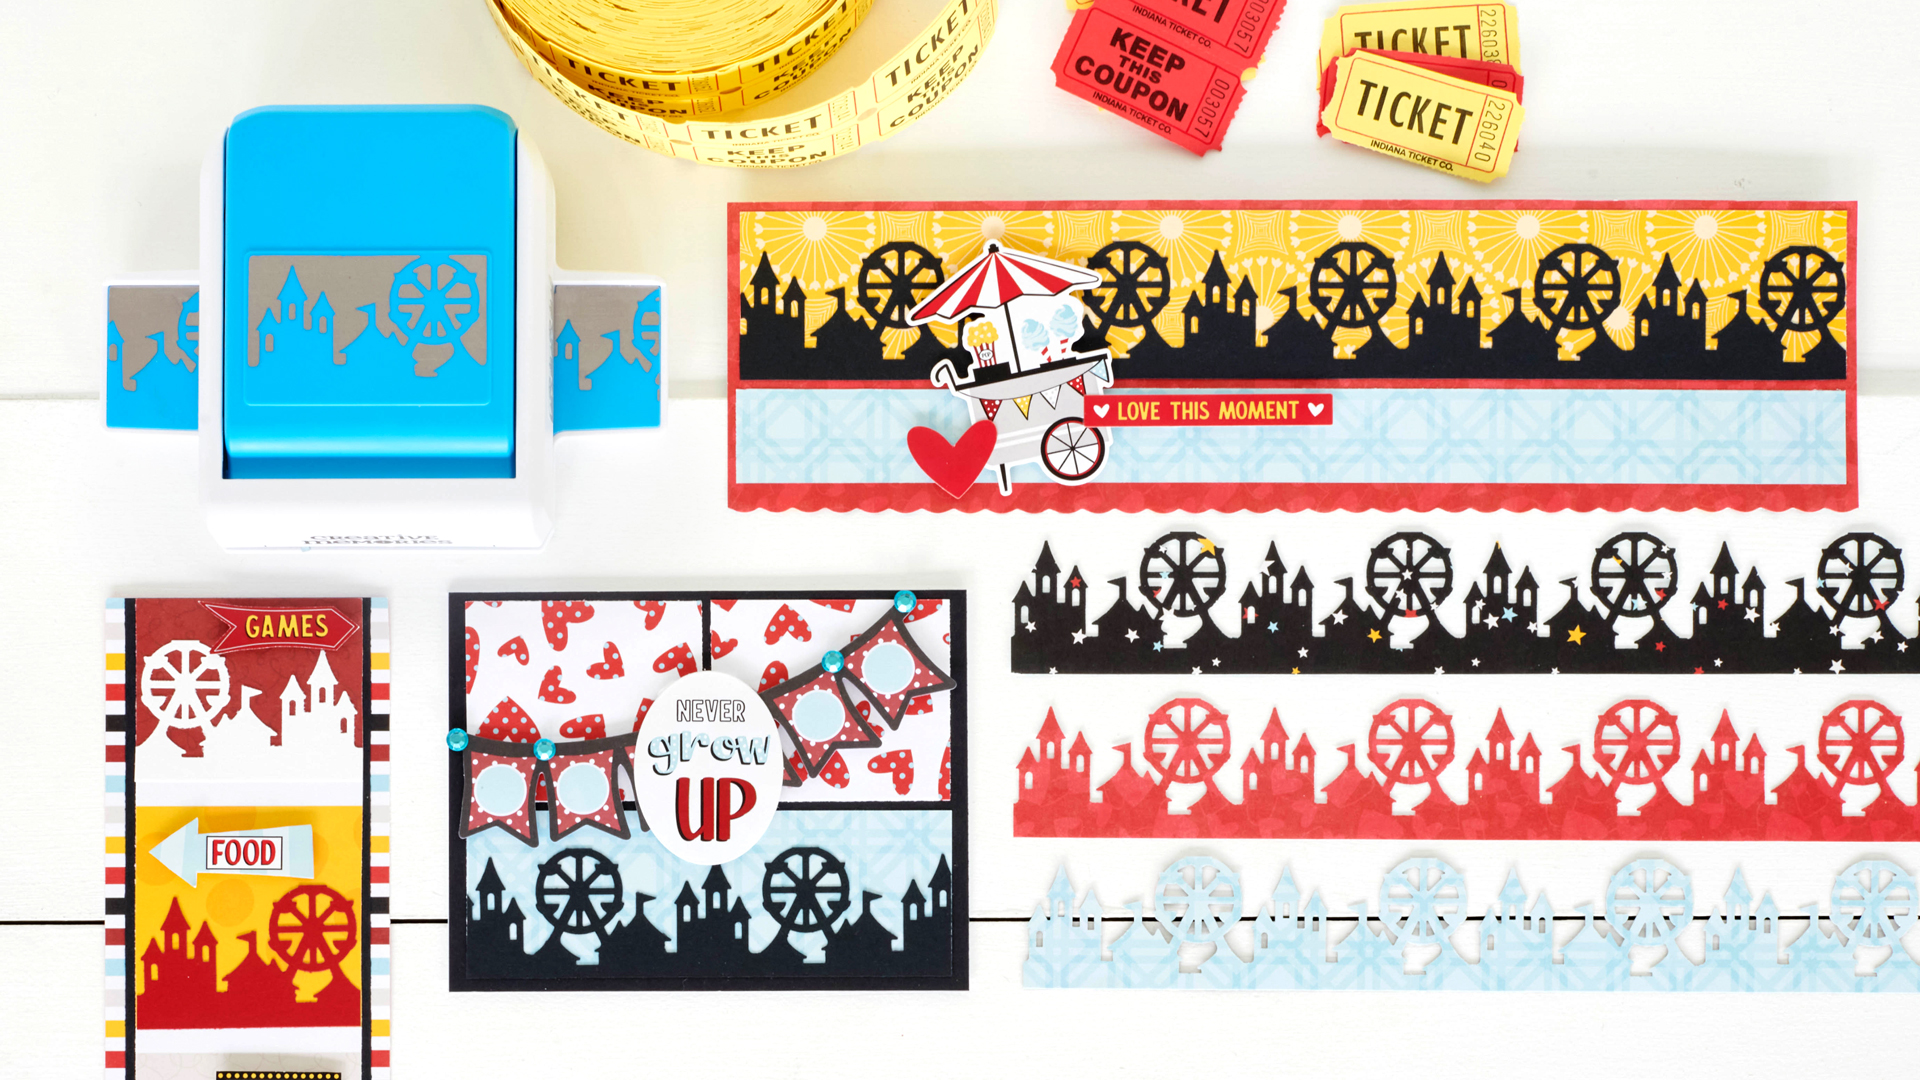
No matter if you have young kids or grandchildren or simply want a day of thrills and chills, an amusement park can bring out your inner kiddo and bring on the fun! Thrilling rollercoasters, spinning carousels, a bounty of arcade games — non-stop entertainment is always on the docket at these places of wonderland (and fun-derland)! Check out these crowd-pleasing amusement park crafts — two scrapbook borders and a DIY card — and make a beeline to your craft room to make them today!

To create these borders and card, you will need:
- Sparks of Magic Paper Pack or (Shop Canada | Shop Australia)
- Sparks of Magic Stickers or (Shop Canada | Shop Australia)
- Sparks of Magic Embellishments or (Shop Canada | Shop Australia) – Coming soon! Visit the website for expected arrival.
- Aqua, Black, Cranberry, Goldenrod & White Solid Cardstocks or (Shop Canada | Shop Australia)
- Blank Card Kit or (Shop Canada | Shop Australia)
- Fairgrounds Border Punch or (Shop Canada | Shop Australia)
- 12-inch Trimmer with Straight & Scallop Blades or (Shop Canada | Shop Australia)
- Micro-Tip Scissors or (Shop Canada | Shop Australia)
- Repositionable Tape Runner or (Shop Canada | Shop Australia)
- Foam Squares or (Shop Canada | Shop Australia)
Check out the Fairgrounds Border Punch in action in the video below!

Love This Moment Border

Step 1: Cut a piece of red hearts paper to measure 12″ x 3-1/4″ with the 12-inch Trimmer and the Scallop Trimmer Blade to cut one long edge.
Step 2: Cut a piece of yellow carnival paper to measure 11-3/4″ x 1-3/4″ and adhere to the top of the red hearts border piece, about 1/8″ from the edges.
Step 3: Cut a piece of blue paper to measure 11-3/4″ x 1″ and adhere to the bottom of the red hearts border piece, about 1/8″ from the edges.
Step 4: Use the Fairgrounds Border Punch to punch a border from Black Solid Cardstock. Cut off of the cardstock at 1-1/2″. Trim to measure 11-3/4″ and adhere to the yellow carnival strip on the border.
Step 5: Add stickers with Foam Squares.
Never Grow Up Card

Step 1: Cut a piece of Black Solid Cardstock to measure 5-1/2″ x 4-1/4″ and adhere to a blank card base.
Step 2: Cut two pieces of white and red polka dot hearts paper to measure 2-1/2″ x 2-1/8″ and adhere to the top of the card, leaving an 1/8″ edge.
Step 3: Cut a piece of blue paper to measure 5-1/8″ x 1-3/4″ and adhere to the bottom of the card, leaving an 1/8″ edge.
Step 4: Use the Fairgrounds Border Punch to punch a border from Black Solid Cardstock. Cut off of the cardstock at 1-3/8″. Trim to measure 5-1/8″, and adhere to the blue strip.
Step 5: Adhere an embellishment and sticker with Foam Squares. Add gemstone embellishments as shown.
Vertical Fairgrounds Border

Step 1: Cut a piece of multi-hued stripes paper to measure 3″ x 12″.
Step 2: Cut a piece of Black Solid Cardstock to measure 2-1/2″ x 12″ and adhere to the multi-hued stripes border.
Step 3: Cut a piece of large stripes paper to measure 2-3/8″ x 12″. Adhere to the border.
Step 4: Use the Fairgrounds Border Punch to punch single segments from White, Cranberry, Black, Goldenrod and Aqua Solid Cardstocks. Cut off of the cardstock at 1-1/2″ and trim to 2-3/8″ wide. Adhere the segments to the large stripes strip as shown.
Step 5: Use Micro-Tip Scissors to cut apart a signs sticker and adhere with Foam Squares as shown.
Which of these amusement park crafts has you the most excited? Or will you be making both scrapbook borders and DIY card? Fill us in on your thoughts and input in the comments below!

These are so bright and fun! A lot of states in the Midwest are having their state fair or have just finished them. And of course, the midway is a big part of that. These are all perfect for State Fair layouts!