October 4, 2021
This Christmas Scrapbook Layout Will Make Your Spirits Bright
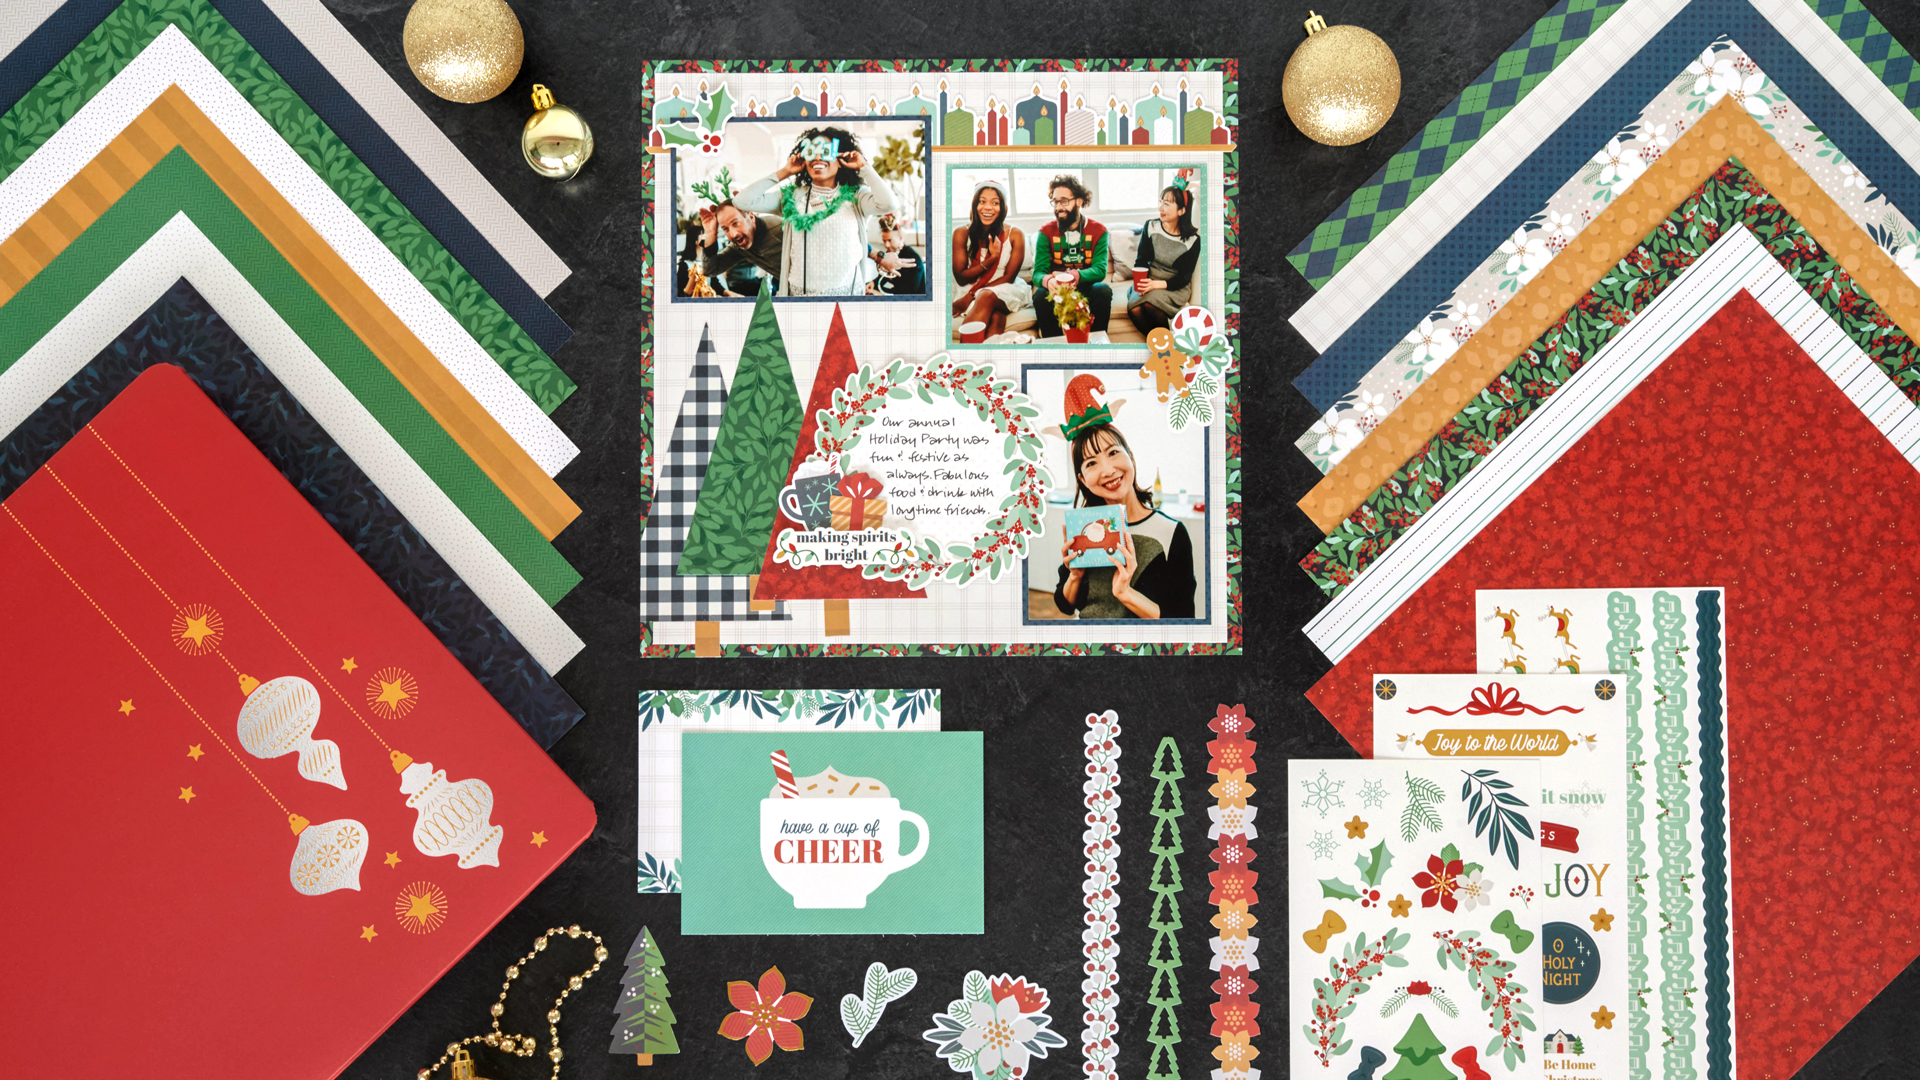
Hark! Bells are jingling, sugar cookies are baking, trees are being bedazzled with twinkling lights and sparkly ornaments aplenty… we’re making spirits bright here at Creative Memories by introducing the Joy to the World collection! This collection offers the magic of a modern Christmas with its contemporary palette, yet still hits home with the classic nostalgia that the season brings to many — stuffing stockings, Christmas parties, Secret Santa fun, afternoons at the tree farm, decorating gingerbread houses and so much more. Check the list of goodies that it takes to make this Christmas scrapbook layout — yule love it!

To create this layout you will need:
- Joy to the World Designer Paper Pack or (Shop Canada | Shop Australia)
- Joy to the World Tone-on-Tone Paper Pack or (Shop Canada | Shop Australia)
- Joy to the World Variety Mat Pack or (Shop Canada | Shop Australia)
- Joy to the World Embellishments or (Shop Canada | Shop Australia)
- Joy to the World Laser Cut Borders or (Shop Canada | Shop Australia)
- Joy to the World Stickers or (Shop Canada | Shop Australia)
- Custom Cutting System with Circle Patterns or (Shop Canada | Shop Australia)
- 12-inch Trimmer or (Shop Canada | Shop Australia)
- Tape Runner or (Shop Canada | Shop Australia)
- Repositionable Tape Runner Refill or (Shop Canada | Shop Australia)
- Foam Squares or (Shop Canada | Shop Australia)
- Black Dual-Tip Pen or (Shop Canada | Shop Australia)
- CM Zero-Centering Ruler or (Shop Canada | Shop Australia)
Check out the whole Joy to the World collection in the video below!

Step 1: Use a piece of holly leaves and berries designer paper as the base for this layout. (Tip: To conserve paper, you may wish to use the 12-inch Trimmer to remove the inside.) Cut a piece of plaid designer paper to measure 11-1/2″ x 11-1/2″ and adhere to the base. Adhere the candles laser-cut border to the top of the layout.
Step 2: Crop three photos to measure 5″ x 3-1/2″. Cut three 5-1/4″ x 3-3/4″ pieces of navy blue snowflakes and teal dots designer paper for photo mats. Mount all on the layout as shown.
Step 3: Make the trees. Cut a 3-1/2″ x 6″ piece of red holly berries designer paper. With the CM Zero Centering Ruler, mark the middle at the top short edge. Cut from the mark to the bottom-right edge and then again from the mark to the lower-left edge. Repeat with green holly leaves tonal and gingham designer papers. Cut three 1/2″ x 1″ pieces of gold stripes tonal paper for trunks. Mount all on the layout as shown.
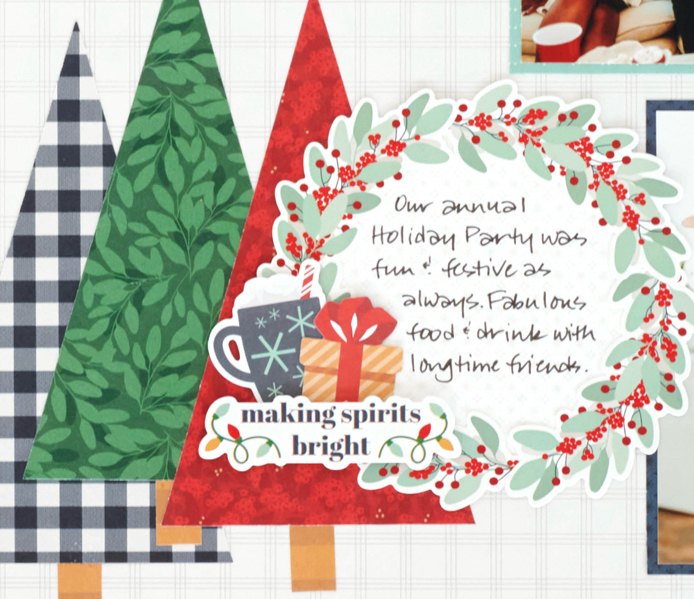
Step 4: Using the outside edge of the smallest Custom Cutting System Circle Pattern and the Red Blade, cut a circle from a white variety mat. Adhere holly sprigs stickers around the circle and adhere to the layout.
Step 5: Add additional stickers, popping some up with Foam Squares for added dimension.
Step 6: Journal on the mat as desired.
How are you prepping for the upcoming Christmas season? What are your thoughts on this Christmas scrapbook layout and what holly-jolly images would you highlight? Tell us your thoughts on this very-merry (and new!) collection in the comments below!

What a fun LO! It made me smile. TY for sharing! :) ~ Ali
[…] feeling pretty holly-jolly about Sketch #1! Follow along with this blog post to make it […]
[…] feeling fairly holly-jolly about Sketch #1! Observe together with this weblog publish to make it your […]
Oh this is so cute. Forces me to try new paper cutting techniques.
[…] Layout Instructions Layout Instructions […]