October 27, 2021
All Is Calm And All Is Bright With These Nativity Crafts: Christmas Scrapbook Borders And Card

From family to family, there can be so many Christmas traditions. Decorating the tree. Baking cookies with grandma. Driving around to see the twinkling lights. Listening to classic yuletide songs. Wrapping and opening gifts. Sending out cards. Attending a Christmas mass. Whatever it is that you and your family does, there’s so much to enjoy about this most joyous time of year. And if you have some very special Christmas memories to highlight this year, check out these Nativity crafts — two Christmas scrapbook borders and a DIY card — and make a stable foundation for your season!
To create these borders and card, you will need:
- Joy to the World Paper Pack or (Shop Canada | Shop Australia)
- Joy to the World Tone-on-Tone Paper Pack or (Shop Canada | Shop Australia)
- Joy to the World Embellishments or (Shop Canada | Shop Australia)
- Joy to the World Stickers or (Shop Canada | Shop Australia)
- Bronze Shimmer & White Solid Cardstocks or (Shop Canada | Shop Australia)
- Nativity Border Punch or (Shop Canada | Shop Australia) — EXPECTED TO RETURN NOVEMBER
- Custom Cutting System with Circle Patterns or (Shop Canada | Shop Australia)
- 12-inch Trimmer with Straight & Scoring Blades or (Shop Canada | Shop Australia)
- 12-inch Decorative Trimmer or (Shop Canada | Shop Australia)
- Micro-Tip Scissors or (Shop Canada | Shop Australia)
- Tape Runner or (Shop Canada | Shop Australia)
- Repositionable Tape Runner Refill or (Shop Canada | Shop Australia)
- Foam Squares or (Shop Canada | Shop Australia)
Looking to restock your ingredients? It’s your last chance to earn exclusive Bedazzled paper packs — 4 unique packs available — FREE with qualifying orders! View details: US | CA | AU
Check out the Nativity Border Punch in action in the video below!

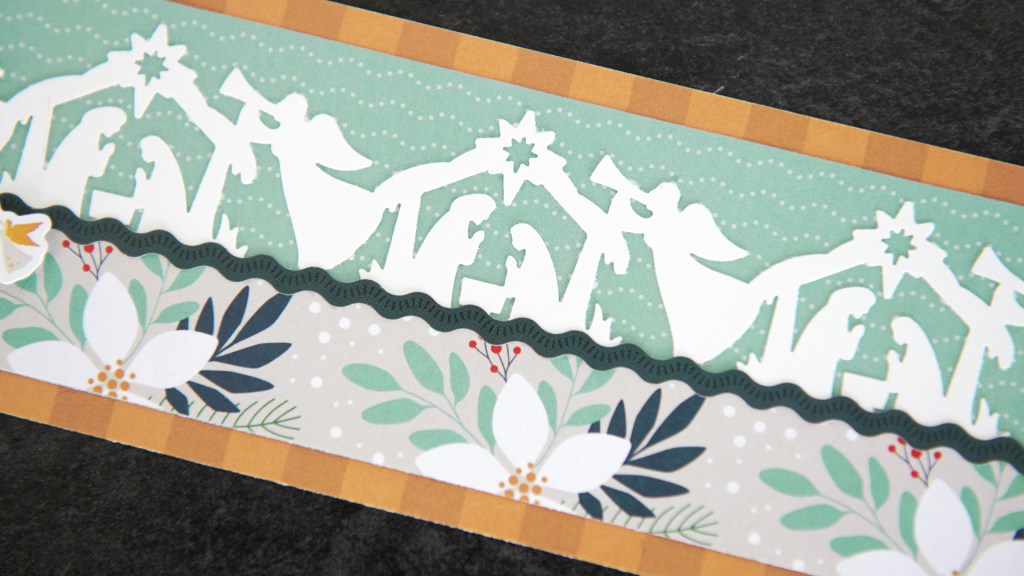
Joy to the World Border

Step 1: Cut a 12″ x 3″ strip of gold stripes tonal paper for the base.
Step 2: Cut a 12″ x 1-1/2″ strip of teal dots designer paper and mount near the top of the base. Cut a 12″ x 1″ strip of Christmas florals designer paper and mount near the bottom of the base.
Step 3: Using the Nativity Border Punch, punch a border with White Solid Cardstock. Trim and mount on the teal dots strip as shown Adhere a navy wavy border sticker over the seam.
Step 4: Using the inside edge of the medium Custom Cutting System Circle Pattern and the Red Blade, cut a circle with navy graphic snowflakes designer paper. Adhere behind one of the Nativity scenes as shown.
Step 5: Add stickers, popping the title up with Foam Squares.
Christmas Worship Border

Step 1: Cut a 12″ x 3-1/4″ strip of red stripes tonal paper for the base. Cut an 11-3/8″ x 2-5/8″ strip of Bronze Shimmer Solid Cardstock and mount on the base.
Step 2: Punch a border using the Nativity Border Punch with navy graphic snowflakes designer paper. Trim to 2-1/4″ and trim off 3/4″ from the right side of the border.
Step 3: Cut an 11-1/4″ x 2-1/2″ strip of gold ornaments designer paper. Lay the Nativity border on red holly berries designer paper and trace the space between stables, about 7/8″ on top and 1-5/8″. Cut out and use as a pattern to cut two more red shapes and three teal dots shapes. Adhere to the border along with the Nativity border. Trim edges off. Adhere onto the base.
Step 4: Add a music notes border sticker, trimming to fit. Add a star and church embellishments with Foam Squares.
Noël Card
Step 1: Create the card base. Cut an 8-1/2″ x 5-1/2″ piece of White Solid Cardstock. Using the 12-inch Trimmer and the Scoring Blade, score along the long edge at 4-1/4″ and fold in half.
Step 2: Cut a 4″ x 5-1/4″ piece of red holly berries designer paper and adhere on the front of the card. Cut a 3-3/4″ x 3-1/2″ piece of holly berries and leaves designer paper and adhere on the card.
Step 3: Cut a 12″ x 1″ piece of White Solid Cardstock using the swell edge of the 12-inch Decorative Trimmer. Cut into 3-3/4″ sections and layer on the card for the “snow.”
Step 4: Using the inside edge of the largest Custom Cutting System Circle Pattern and the Red Blade, cut a circle with teal dots designer paper. Using the Green Blade, cut a circle with red holly berries designer paper. Using the Blue Blade, cut a circle with Bronze Shimmer Solid Cardstock. Layer and adhere to the card, tucking them into the white layers.
Step 5: Punch a single Nativity scene using the Nativity Border Punch with White Solid Cardstock. Trim out and adhere inside the bronze shimmer circle.
Step 6: Add gems and the “Noël” sticker with Foam Squares.
Are you feeling tidings of comfort and joy with these Nativity crafts? Will you be making these Christmas scrapbook borders and card for the upcoming season? Share, share, share down below!

So beautiful! TYFS your creativity! :)