December 22, 2021
This Christmas Scrapbook Layout Is Baking Spirits Bright With a Gingerbread House Craft
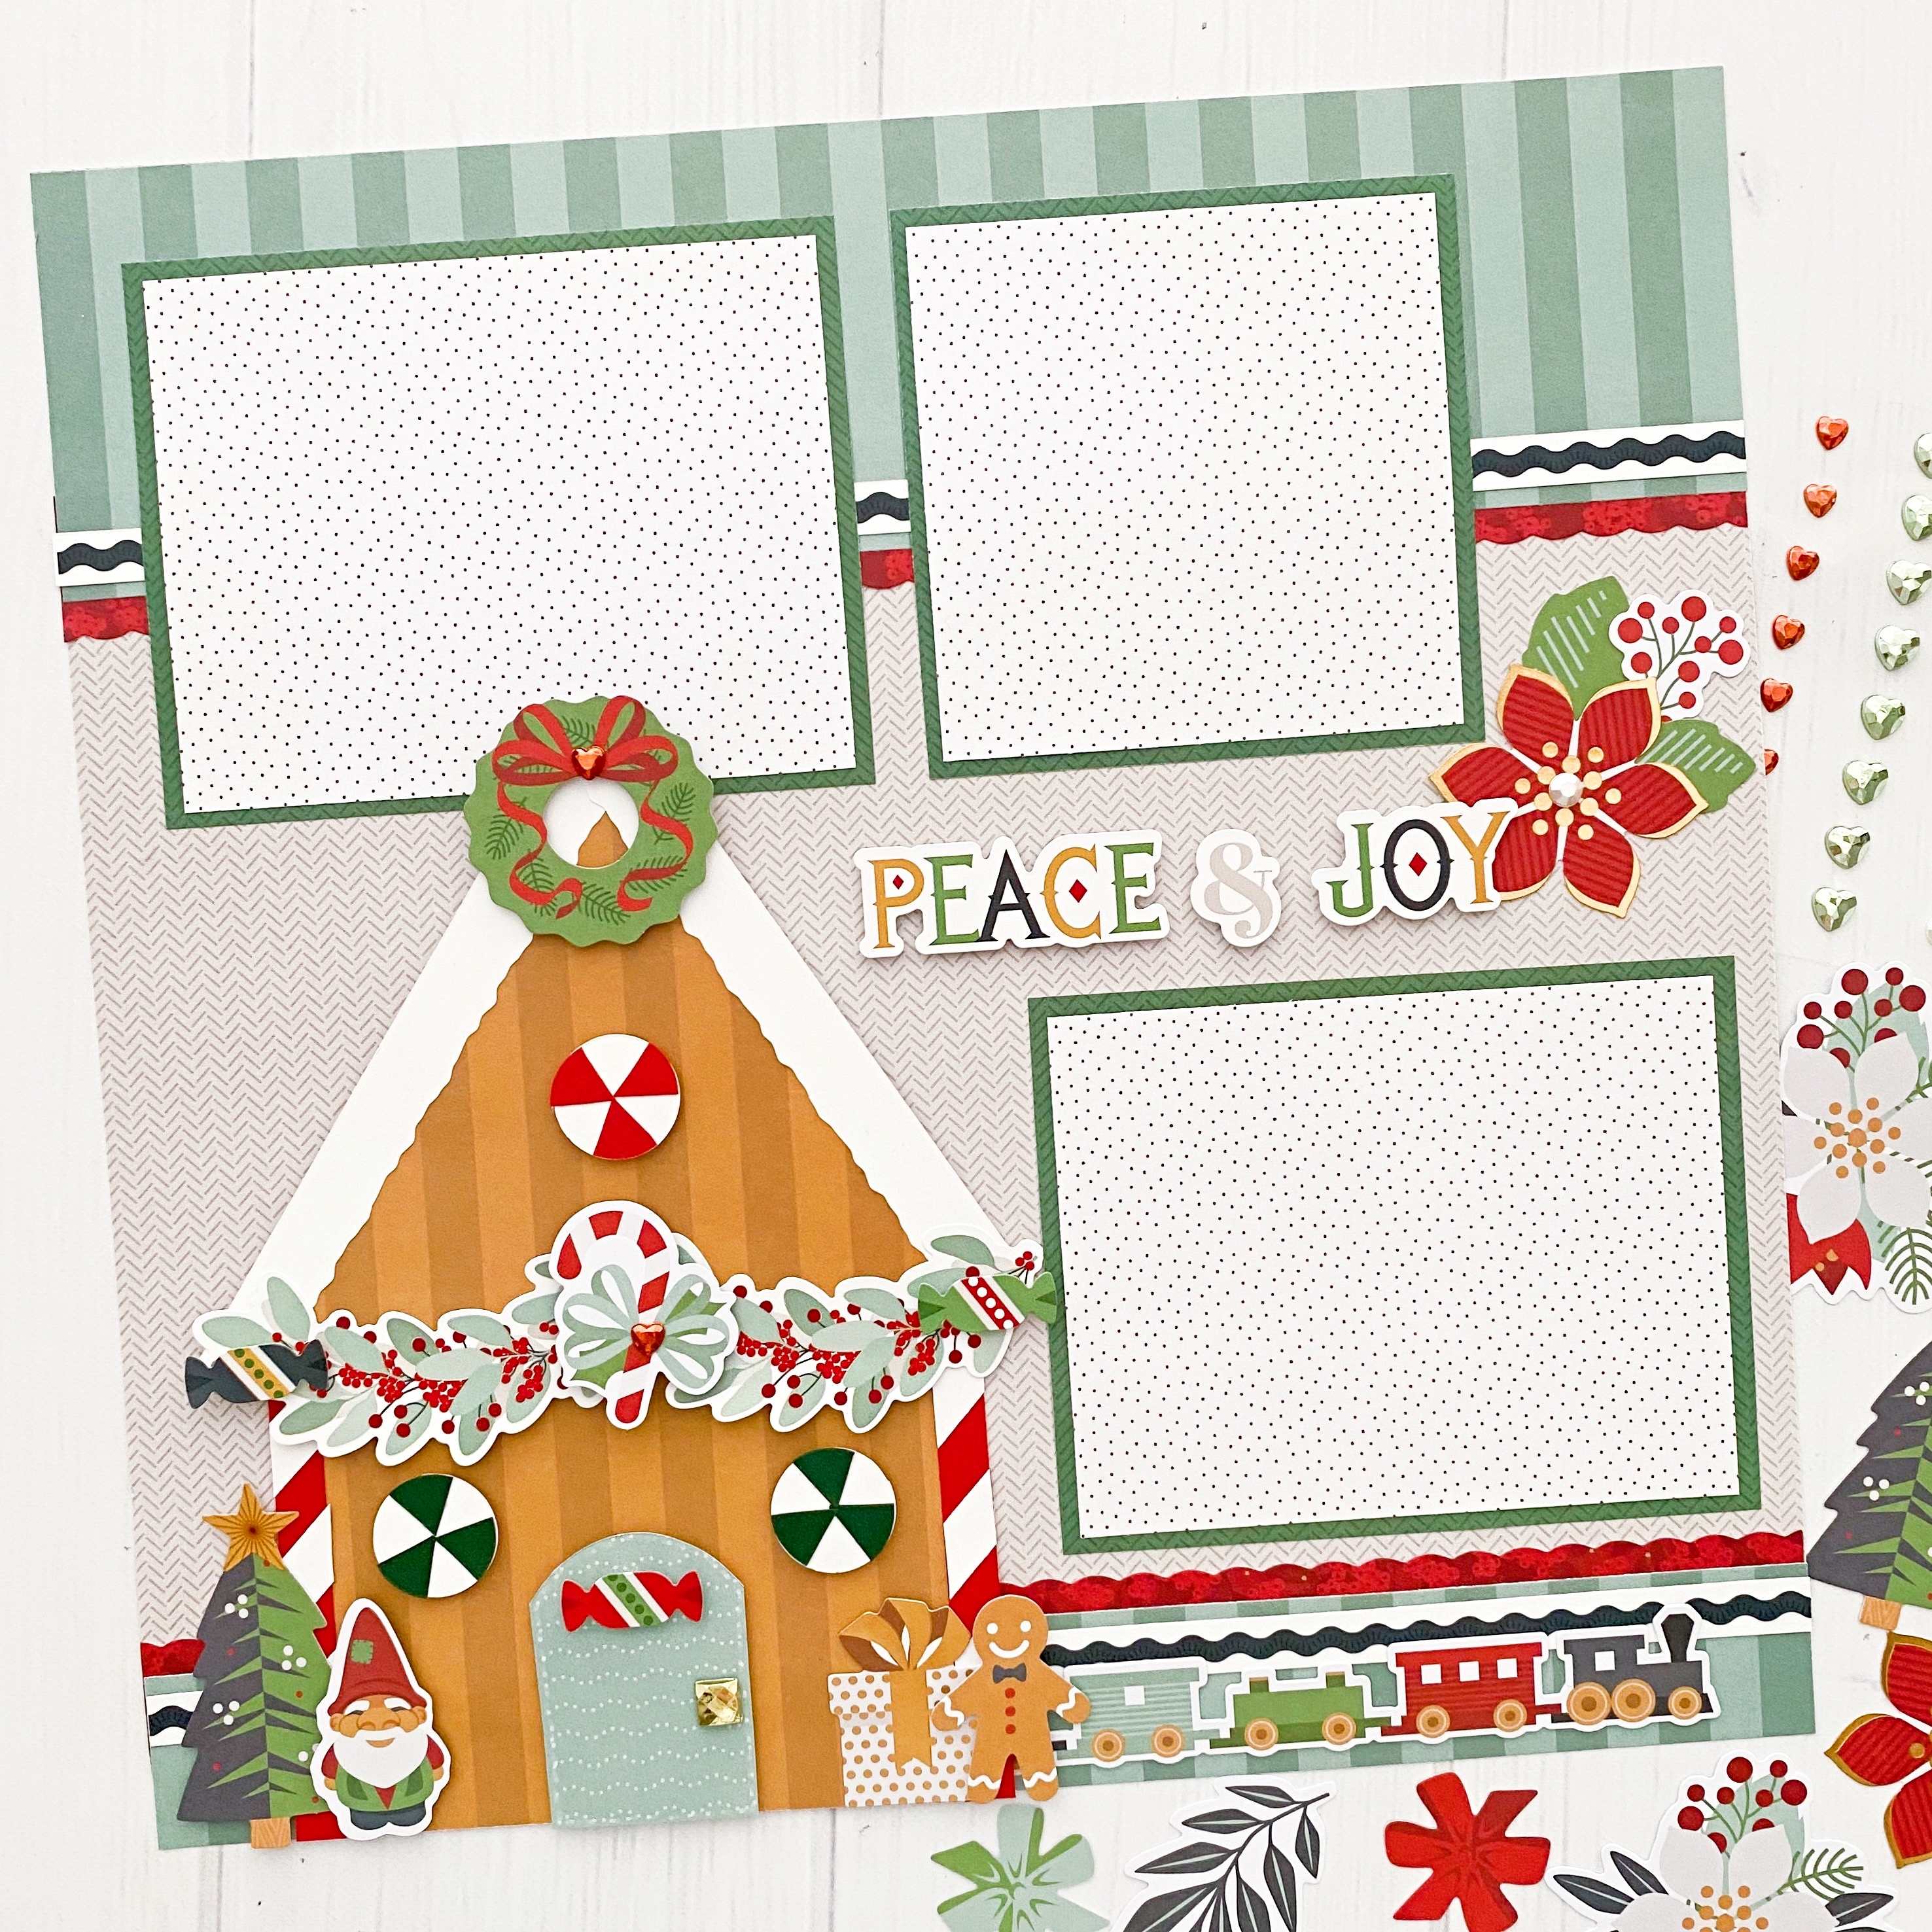
Sweet, spicy, full of Christmas spirit and style… gingerbread houses! Did you know an early form of gingerbread can be traced back to the ancient Greeks and Egyptians who used it for ceremonial purposes? And another fun tidbit: The popularity of gingerbread houses rose in the 1800s when the Brothers Grimm wrote the (well, not-so-Christmassy) fairytale of Hansel and Gretel, as the two children stumble upon a house made entirely of sweets. Well, no matter the history, these cookie-walled structures are a creative and tasty way to celebrate the Christmas season for kids and adults alike by decorating them with frostings and icings, gumdrops, festive sprinkles, peppermints, chocolates other candied elements. And whether you’re building the house from scratch or using a kit, blog contributor Kylie Kingham has a Christmas scrapbook layout with a cute gingerbread house craft to pay homage to the sweetly spiced tradition!
Kylie’s Inspiration
Creating a gingerbread house at Christmas is a fun family tradition for many. Nothing beats the fresh aroma in the house from baking gingerbread — a tradition our family enjoys sharing each year. It allows us to have some quality family time together whilst we enjoy baking and decorating with sweet treats. The Joy to the World collection was perfect to create a paper gingerbread house (and to document and preserve these special memories), thanks to the delightful palette and festive embellishments and stickers.

To create this layout you will need:
- Joy to the World Paper Pack or (Shop Canada | Shop Australia)
- Joy to the World Tone-on-Tone Paper Pack or (Shop Canada | Shop Australia)
- Joy to the World Embellishments or (Shop Canada | Shop Australia)
- Joy to the World Stickers or (Shop Canada | Shop Australia)
- Joy to the World Laser Cut Borders or (Shop Canada | Shop Australia)
- Crimson, Dark Green & White Solid Cardstocks or (Shop Canada | Shop Australia)
- 12-inch Trimmer with Straight, Deckle & Scallop Blades or (Shop Canada | Shop Australia)
- Custom Cutting System with Circle, Gemstone, Oval & Rectangle Patterns or (Shop Canada | Shop Australia)
- Micro-Tip Scissors (Shop Canada | Shop Australia)
- Repositionable Tape Runner or (Shop Canada | Shop Australia)
- Foam Squares or (Shop Canada | Shop Australia)

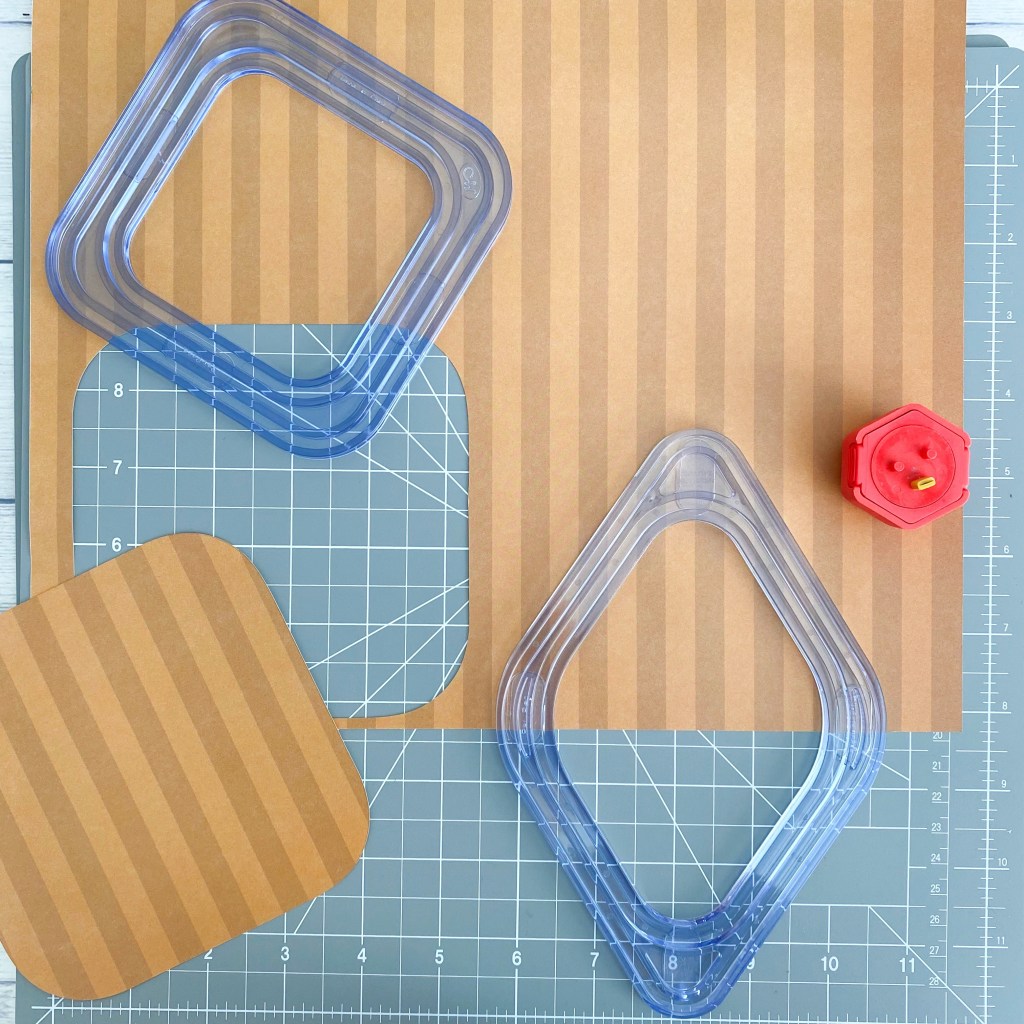
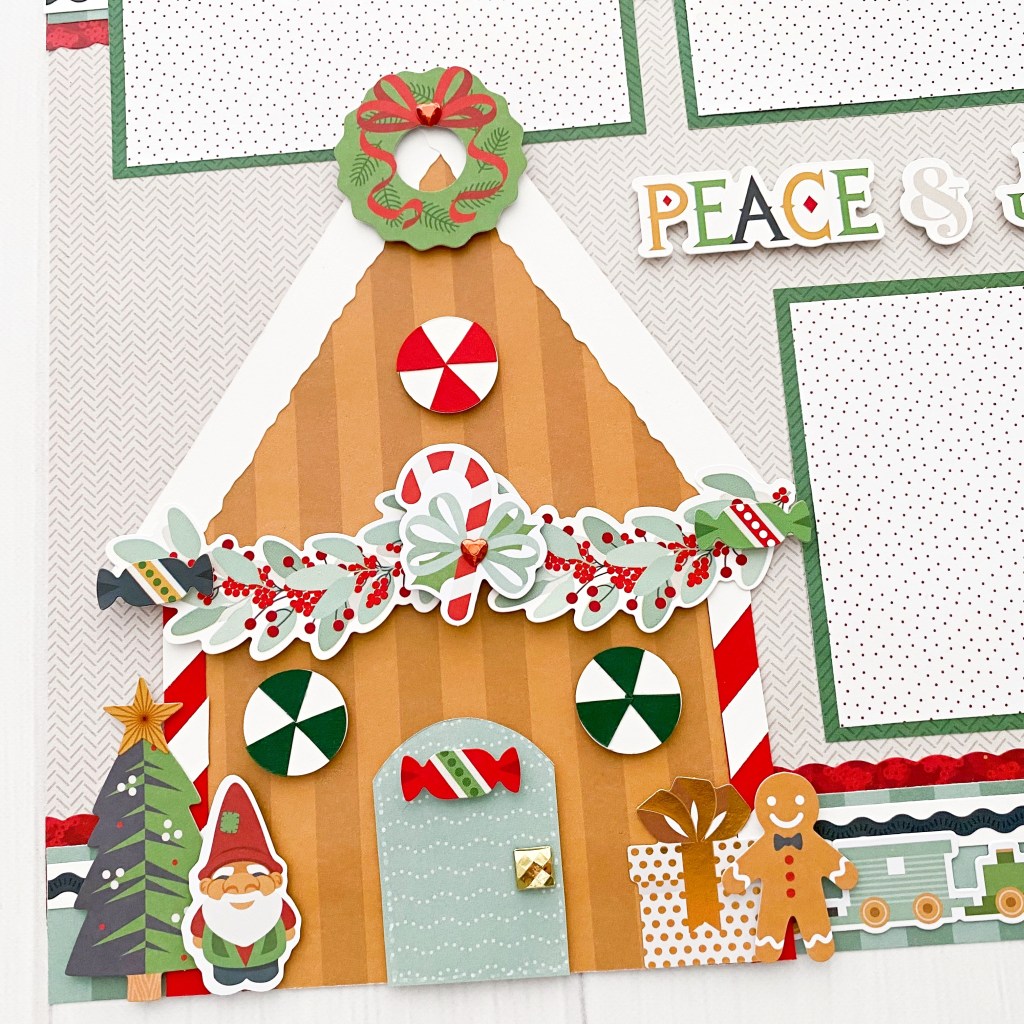
Step 1: With the outside edge of the square Custom Cutting System Rectangle Pattern and the outside edge of the diamond Custom Cutting System Gemstone Pattern with the Red Blade, cut shapes from gold stripes tonal paper. Tip: Since only one half of the diamond shape is required for the roof, it can be lined up halfway along the paper edge before cutting to conserve paper as shown.
Step 2: Using the 12-inch Trimmer with the Deckle Blade, cut a 1/2″ x 12″ strip of White Solid Cardstock, making sure one side of the strip is a straight edge. Cut in half and adhere each pieces over the two long edges of the half diamond piece, with the deckle side facing inward. Cut off any overhang.

Step 3: Using the 12-inch Trimmer with the Straight Blade, cut a 3/8″ x 12″ strip from Crimson Solid Cardstock. Repeat with a piece of White Solid Cardstock. Cut the crimson strip in half and adhere one strip to the left side and one strip to the right side of the square gold stripes piece. Cut off any overhang. Align the white strip along the 45-degree line on the 12-inch Trimmer and cut several pieces 3/8” long. Adhere these pieces down the red strips, evenly spaced to replicate a candy cane. Adhere the roof over the top portion of the gold stripes square with Foam Squares. Using the 12-inch Trimmer, cut a straight edge off the bottom of the square house (enough to remove the curved corners).
Step 4: With the inside edge of the second-largest Custom Cutting System Oval Pattern and Red Blade, cut an oval from teal dots designer paper. Using the Micro-Tip Scissors, carefully cut straight edges on the bottom and right and left sides, leaving the top edge curved, to form a door shape. Adhere to the house with Foam Squares and add a gemstone as a doorknob.
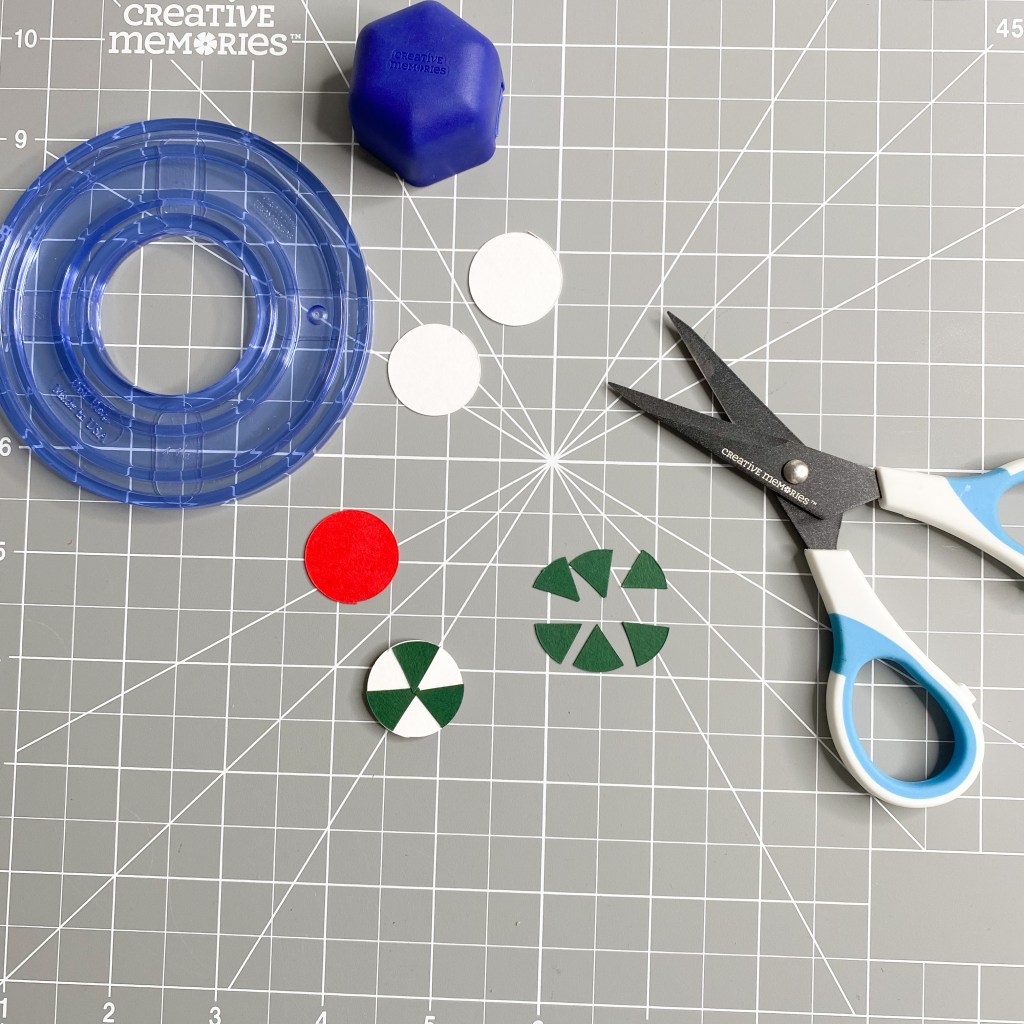
Step 5: From White Solid Cardstock, cut three circles using the inside edge of the smallest Custom Cutting System Circle Pattern and Blue Blade. Cut two circles from Dark Green Solid Cardstock and one circle from Crimson Solid Cardstock with the same sizing as the previous white circles. Using the Micro-Tip Scissors, cut each dark green and crimson circles in half. With the two halves together, cut into three pie-shaped portions, giving you six pieces from each dark green and crimson circles. Add three hued pieces over the top of each white circle with Repositionable Tape Runner adhesive to have two dark green/white candy swirls and one crimson/white candy swirl. Adhere these to the house with Foam Squares. Decorate the house with embellishments and stickers.
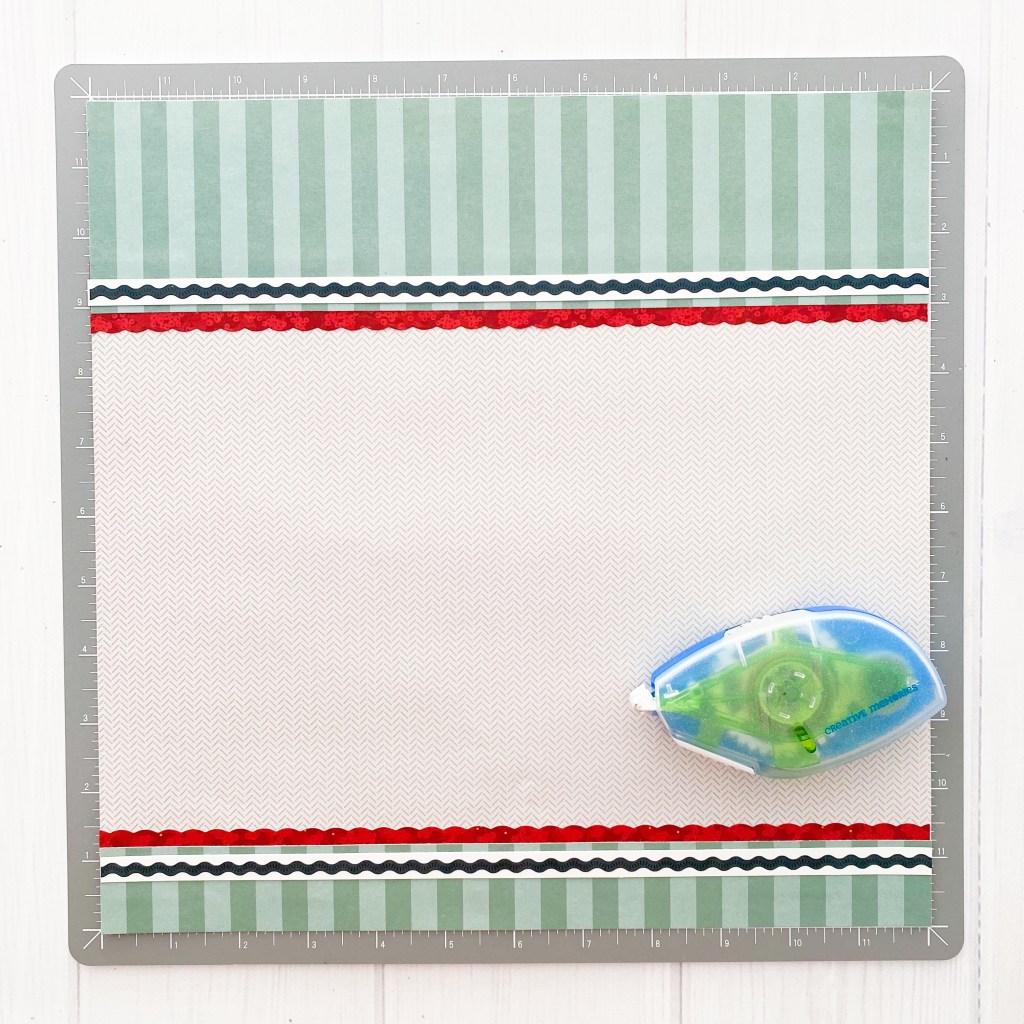
Step 6: Select a piece of designer paper as your background. From another piece of contrasting paper, cut two strips to measure 3″ x 12″ and 1-1/2″ x 12″. Adhere the wider strip to the top of the page and the other to the bottom using Repositionable Tape Runner adhesive. Using the 12-inch Trimmer and the Scallop Blade, cut two strips of another contrasting paper to measure 1/2″ x 12″. Adhere each length under the straight-edged strips so just the scalloped edge can been seen. Adhere down the straight-edged strips. With the 12-inch Trimmer and Straight Blade, cut two strips from White Solid Cardstock to measure 3/8″ x 12″. Adhere near the top and bottom of the page, near the straight edge of the decorative strips as shown. Add wavy border sticker to the white strip.
Step 7: Adhere the gingerbread house to the lower-left corner of the page. You will need Foam Squares for the roof and Repositionable Tape Runner adhesive on the house.
Step 8: Cut two photo mats to measure 5″ x 4″ and one photo mat to measure 4″ x 4″. Cut two photos to measure 4-3/4″ x 3-3/4″ and one photo to measure 3-3/4″ x 3-3/4″. Adhere photos to the mats and adhere to the layout. Finish the page by adding embellishments, title stickers and a laser-cut border.
Do you and your family make gingerbread houses for Christmas each year? What are your thoughts on Kylie’s gingerbread house craft upon this Christmas scrapbook layout? Gift your thoughts and stories in the comments below. Merry Christmas, one and all! ?

Love it, and it looks easy to put together. Thank you.
I like it. It is cute. Thank you.
Absolutely gorgeous and appears doable even for a novice. Well done clever girl.
Absolutely Adorable! Would love to have gingerbread house photos for here! Didn’t do any this year! Always next year!!