January 5, 2022
These Scrapbook Borders & DIY Card Are Worth All The Buzz: Honeycomb Borders

There’s a lot of buzz going around, and that’s because the latest bee’s knees Border Maker Cartridge is on the CM scene. In fact, this BMC makes for sweet-as-honey, continuous honeycomb borders and is perfect for photos of family time, picnics, gardening, afternoons spent with friends and more — and a bee-utiful accompaniment with the Welcome Home collection, too. (Okay, okay, we’re done with the puns now!) See how you can hone in on its hexagonal design with these scrapbook borders and DIY card.

To create these borders and card, you will need:
- Welcome Home Paper Pack or (Shop Canada | Shop Australia)
- Welcome Home Tone-on-Tone Paper Pack or (Shop Canada | Shop Australia)
- Welcome Home Stickers or (Shop Canada | Shop Australia)
- Welcome Home Foiled Embellishments or (Shop Canada | Shop Australia)
- Welcome Home Laser Cut Borders or (Shop Canada | Shop Australia)
- White Solid Cardstock or (Shop Canada | Shop Australia)
- 12-inch Trimmer with Straight & Scoring Blades or (Shop Canada | Shop Australia)
- Original Border Maker System with Honeycomb Chain Border Maker Cartridge or (Shop Canada | Shop Australia)
- Micro-Tip Scissors or (Shop Canada | Shop Australia)
- Tape Runner or (Shop Canada | Shop Australia)
- Repositionable Tape Runner Refill or (Shop Canada | Shop Australia)
- Foam Squares or (Shop Canada | Shop Australia)
Stay Awhile Border

Step 1: Cut a 12″ x 2-1/2″ strip of navy blue heavy ivy tonal paper for the base. Cut a 12″ x 1-7/8” strip of basketweave designer paper and mount on top.
Step 2: Cut a 12” x 1-1/4” strip of woodgrain designer paper and adhere on the border, about 1/2″ from the top edge.
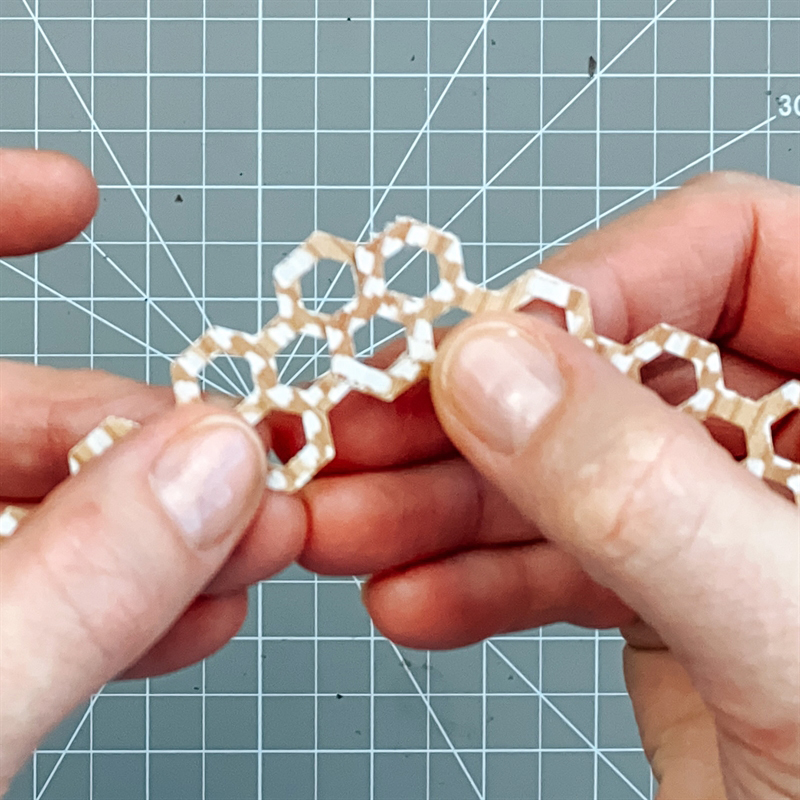
Step 3: Using the Honeycomb Chain Border Maker Cartridge, punch a border from ditsy flowers designer paper. Punch another with terra cotta small triangles tonal paper and save seven small hexagons. Adhere the border to the woodgrain strip. Top with the seven terra cotta hexagons as shown.
Step 4: Adhere a leaves laser-cut border along the bottom woodgrain/basketweave seam. Top with embellishments, popping a title up with Foam Squares for added dimension.
Our Garden Border
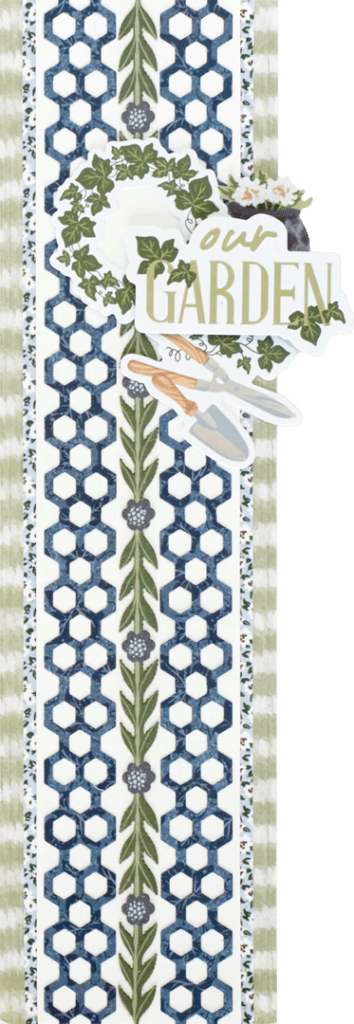
Step 1: Cut a 3-1/4″ x 12″ strip of green stripes designer paper for the base.
Step 2: Cut a 2-3/4″ x 12″ strip of ditsy flowers designer paper and mount on top of the base piece. Cut a 2-3/8″ x 12″ strip of White Solid Cardstock and adhere on top of the previously adhered flower piece.
Step 3: Using the Honeycomb Chain Border Maker Cartridge, punch two borders with navy blue heavy ivy tonal paper. Adhere these two borders along the edges of the white cardstock strip, mounting a leaves and flowers laser-cut border in between, as shown.
Step 4: Cut a small piece of White Solid Cardstock to tuck behind the wreath embellishment. Adhere the wreath and other embellishments to the border, popping a title up with Foam Squares for added dimension.
Living Our Best Life Border
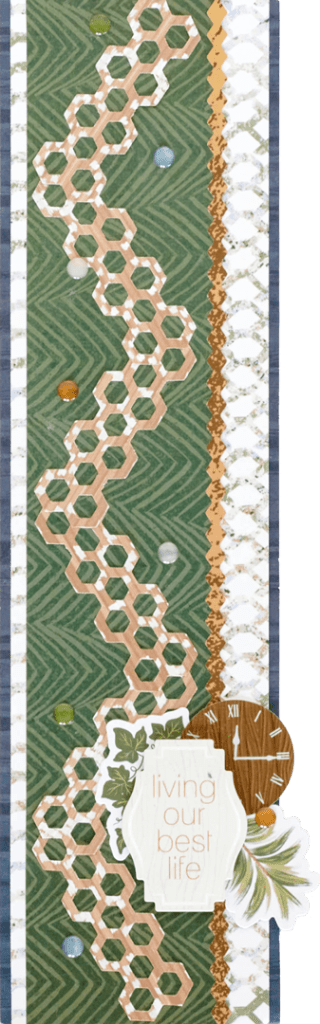
Step 1: Cut a 3-1/4″ x 12″ strip of navy blue brushstrokes designer paper for the base.
Step 2: Cut a 3″ x 12″ strip of open trellis designer paper and mount on top of the base piece. Cut a 2-1/4″ x 12″ strip of green herringbone designer paper and adhere on top of the previously adhered trellis piece, about 1/2″ from the left edge. Place a border sticker along the seam.
Step 3: Using the Honeycomb Chain Border Maker Cartridge, punch two borders with basketweave designer paper. With the Micro-Tip Scissors, trim out 2-1/2″ sections. Overlap and adhere in a wavy/chevron pattern along the green herringbone strip.

Step 4: Add stickers and embellishments, popping the title up with Foam Squares for added dimension. Apply some epoxy stickers.
Pride & Joy Card

Step 1: Create the card base. Cut an 8-1/2″ x 5-1/2″ piece of White Solid Cardstock. Using the 12-inch Trimmer and the Scoring Blade, score along the long edge at 4-1/4″ and fold in half.
Step 2: Cut a 5-1/2″ x 1″ piece of terra cotta heavy ivy tonal paper and adhere to the top of the card. Cut a 5-1/2″ x 1-1/2″ strip of the same paper and adhere to the bottom of the card. Cut an ivy border sticker into two 5-1/2″ lengths and adhere them to the card as shown.
Step 3: Using the Honeycomb Chain Border Maker Cartridge, punch a border with each terra cotta heavy ivy and sky blue small triangles tonal papers. Trim each to 5-1/2″ long, overlap and adhere to the card as shown.
Step 4: Add embellishments, popping a title up with Foam Squares for added dimension. Apply some epoxy stickers.
What do you think of the honeycomb borders this BMC makes? Will you be putting together these scrapbook borders and DIY card soon? Share your thoughts and opinions in the comments below!

Nice ideas! Love the wiggly one!
I like the card lots. Think it would be great with some bees
Love these ideas! Thank you.
Thank you for your clear instructions for each.