April 7, 2022
Pruned To Perfection: Vines Borders and DIY Card For Scrapbooking

Clinging, twining and sprawling vines give an old-time fairytale look (as well as organic and eye-catching accents!) to many homes, doorways, landscapes and gardens. And if you want to intertwine your photos and layouts together with this ornamental appeal, then stem your scrapbooking toward the Flourish Vine Border Maker Cartridge! See how this vine-of-the-times tool can do just that by making these vines borders and DIY card for scrapbooking!
To create these borders and card, you will need:
- Our Moments Paper Pack or (Shop Canada | Shop Australia)
- Our Moments Tone-on-Tone Paper Pack or (Shop Canada | Shop Australia)
- Our Moments Stickers or (Shop Canada | Shop Australia)
- Our Moments Foiled Embellishments or (Shop Canada | Shop Australia)
- Blank Card Kit or (Shop Canada | Shop Australia)
- Border Maker System with Flourish Vine Border Maker Cartridge or (Shop Canada | Shop Australia)
- Custom Cutting System with Circle Patterns or (Shop Canada | Shop Australia)
- 12-inch Trimmer with Straight & Victorian Blades or (Shop Canada | Shop Australia)
- Micro-Tip Scissors (Shop Canada | Shop Australia)
- Tape Runner or (Shop Canada | Shop Australia)
- Repositionable Tape Runner Refill or (Shop Canada | Shop Australia)
- Foam Squares or (Shop Canada | Shop Australia)
Check out the Flourish Vine Border Maker Cartridge in action in the video below!

You Make Life Wonderful Card

Step 1: Use a blank card from the Blank Card Kit as the base.
Step 2: Cut a piece from the maroon tiled mosaic designer paper to measure 4″ x 5-1/4″. Adhere to the card.
Step 3: Cut a piece of the houndstooth tonal paper to measure 3″ x 5″. Adhere to the card.
Step 4: Cut a piece of charcoal bricks designer paper to measure 2-1/4″ x 5-1/4″. Adhere to the card.
Step 5: Cut a piece of mustard leaf outline designer paper to measure 2-1/4″ x 5-1/4″. Punch both sides with the Flourish Vine Border Maker Cartridge. Adhere to the card.
Step 6: Cut a piece of umber woodgrain tonal paper to measure 3/8″ x 5-1/4″. Adhere to the front of the card.
Step 7: Adhere stickers and embellishments to the card for a sentiment, using Foam Squares on some for added dimension.
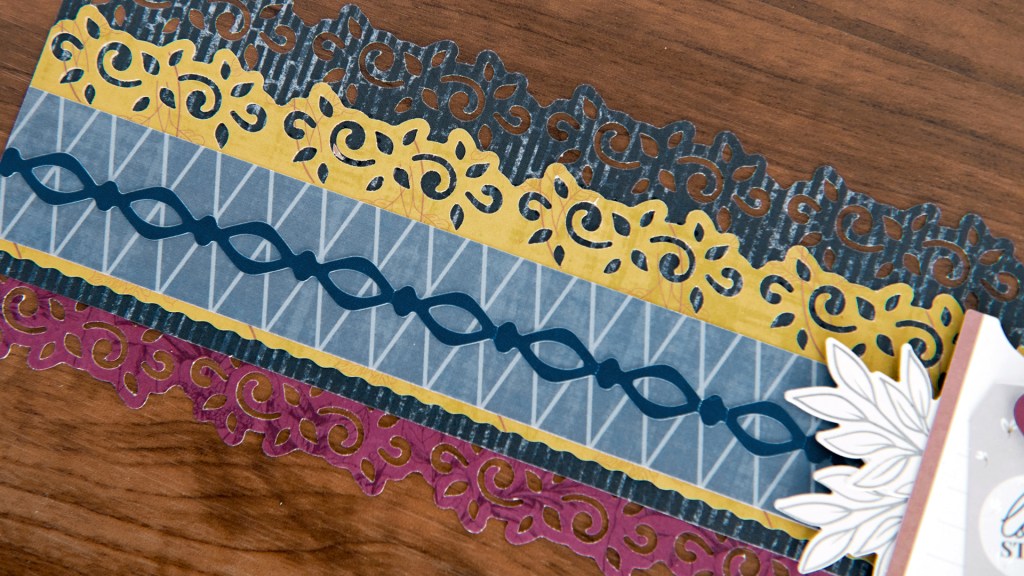
A Love Story Border

Step 1: Using the Flourish Vine Border Maker Cartridge, punch a 12″ edge of charcoal bricks designer paper, then cut at 3″. Use this as the base of the border.
Step 2: Using the Flourish Vine Border Maker Cartridge, punch a 12″ edge of mustard leaf outline designer paper, then cut at 2-1/8″. Adhere to the top of the charcoal bricks base.
Step 3: Cut a strip of dusted blue diamonds tonal paper to measure 12″ x 1-1/4″. Adhere to the border.
Step 4: Using the Flourish Vine Border Maker Cartridge, punch a 12″ edge of maroon vintage florals designer paper, then cut at 1-1/4″. Adhere from the back bottom edge of the border.
Step 5: Adhere stickers and embellishments, using Foam Squares on some for added dimension.
Love These Moments Border

Step 1: Cut a piece of charcoal bricks designer paper to measure 2-1/2″ x 12″ for the base of the border.
Step 2: Using the 12-inch Trimmer with the Victorian Blade, cut a piece of dusted blue leaf scatter designer paper that is 2-1/4″ x 12″. Adhere to the border.
Step 3: From the maroon tiled mosaic designer paper, cut a piece that is 4″ x 12″. Punch both of the long edges with the Flourish Vine Border Maker Cartridge. Once punched, score each side 1″ from the edge. Fold the edges over and adhere.
Step 4: Using the inside edge of the large Custom Cutting System Circle Pattern and the Green Blade, cut out the heart from the variety mat.
Step 5: Using the inside edge of the large Custom Cutting System Circle Pattern and the Red Blade, cut a circle from maroon tiled mosaic designer paper. Adhere the previous circle on top of this piece, then adhere to the border.
Step 6: Adhere stickers to the border using Foam Squares for dimension.
What do you think of the ornamental look from these vines borders and DIY card for scrapbooking? What sorts of themed layouts and projects would you make with this BMC (wineries, gardening, visiting botanical gardens, family portraits, etc.)?

I’m thinking there’s a step missing in the “Love These Moments” border, because it looks like the Flourish Vine Border Maker Cartridge was used with a white paper on top of the maroon tiled mosaic designer paper. (Step 3)
I think the idea is to punch both long edges of a 4 inch wide strip of 12″ paper that is gray on one side and maroon on the other. Then score each long edge at 1 inch, then fold them INWARD so the punched edges meet in the middle. The gray paper shows on top and the maroon paper under the punched edges. Hope that helps! I can’t wait to try this!
Thank you for explaining. I, too, was confused.
Love this punch! It is a beautiful intricate border maker!