April 19, 2022
3 Project Ideas Using The Dollop Arch Frame Punch

A scrapbook border can really add that WOW factor or finishing touch to your projects and layouts. What’s even better is when the tool used to create those enticing elements can actually act as a two-in-one item — not just making borders, but also frames! Yes, it’s true and possible with CM’s frame punches! The recent Dollop Arch Frame Punch allows you to create borders and frames, dotting your creations with two delightfully dolloped arches. Want to see it in action? Then check out these ideas — one DIY card and two scrapbook borders — that shows off its design duality.
To create these borders and card, you will need:
- Our Moments Paper Pack or (Shop Canada | Shop Australia)
- Our Moments Tone-on-Tone Paper Pack or (Shop Canada | Shop Australia)
- Our Moments Stickers or (Shop Canada | Shop Australia)
- Our Moments Foiled Embellishments or (Shop Canada | Shop Australia)
- Blank Card Kit or (Shop Canada | Shop Australia)
- Dollop Arch Frame Punch or (Shop Canada | Shop Australia)
- 2-Way Corner Rounder or (Shop Canada | Shop Australia)
- 12-inch Trimmer or (Shop Canada | Shop Australia)
- Micro-Tip Scissors (Shop Canada | Shop Australia)
- Tape Runner or (Shop Canada | Shop Australia)
- Repositionable Tape Runner Refill or (Shop Canada | Shop Australia)
- Precision Point Adhesive Pen or (Shop Canada | Shop Australia)
- Foam Squares or (Shop Canada | Shop Australia)
Check out the Dollop Arch Frame Punch in action in the video below!

You Make Life Wonderful Card
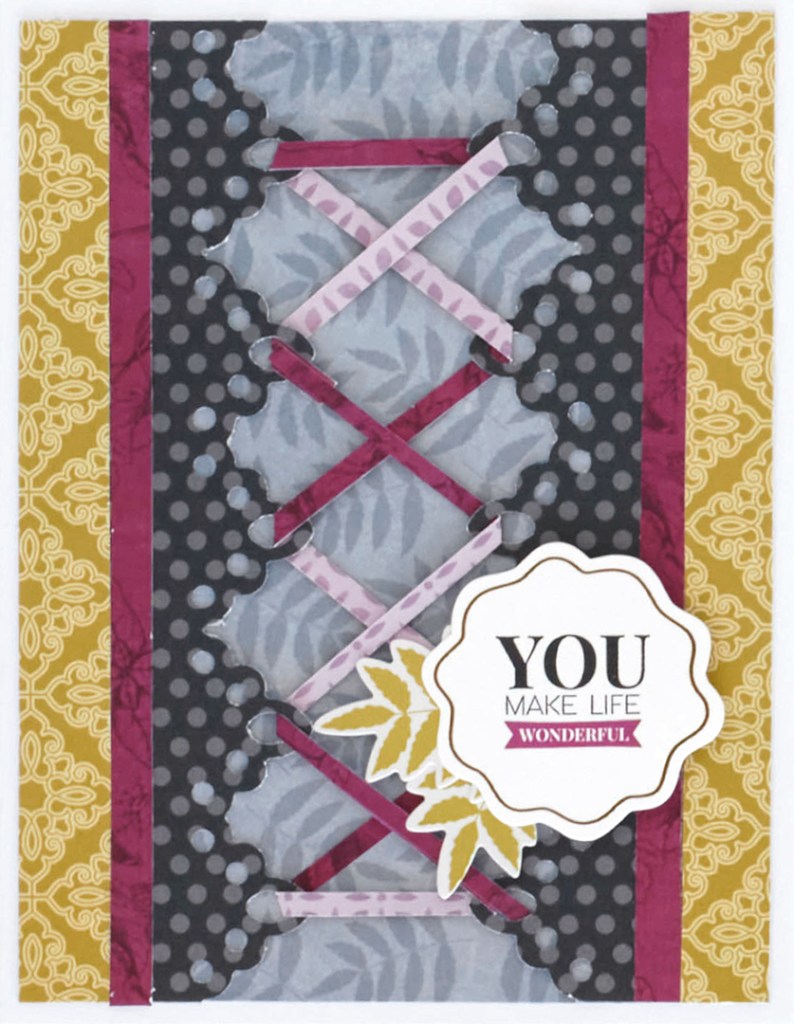
Step 1: Use a card from the Black Card Kit for the base.
Step 2: Cut a piece of dusted blue scattered leaves designer paper to measure 4″ x 5-1/4″. Adhere to the front of the card.
Step 3: Cut a piece of charcoal polka dots tonal paper to measure 4″ x 5-1/4″. Punch the sides of this piece using the Dollop Arch Frame Punch. Cut in half, adhering to the edges of the dusted blue paper with the dollop arches on the inside.
Step 4: Cut two pieces of maroon vintage foliage tonal paper to measure 12″ x 1/8″. Glue ends together using Precision Point Adhesive Pen. Use this piece to lace through the arches as shown.
Step 5: Cut two pieces of mustard ornate damask tonal paper to measure 1/2″ x 5-1/4″. Adhere along the edges of the charcoal polka dots paper.
Step 6: Cut two pieces of maroon vintage foliage tonal paper to measure 1/2″ x 5-1/4″. Adhere along the previous mustard ornate damask pieces.
Step 7: Adhere stickers, using Foam Squares for added dimension.
Our Story Documented Border

Step 1: Cut a piece of woodgrain designer paper to measure 12″ x 1-1/4″. Use this as the base of the border.
Step 2: Cut a piece of maroon tiled mosaic designer paper to measure 12″ x 4″. Use the Dollop Arch Frame Punch along all sides of the paper. Adhere to the base.
Step 3: Cut a piece of houndstooth tonal paper to measure 9-1/2″ x 1-1/2″. Round all four corners with the 2-Way Corner Rounder. Adhere to the border.
Step 4: Adhere stickers and embellishments, using Foam Squares on some for added dimension.
Step 5: Cut a strip of charcoal polka dots tonal paper that is 1/4″ wide. Adhere along the ends of the border.
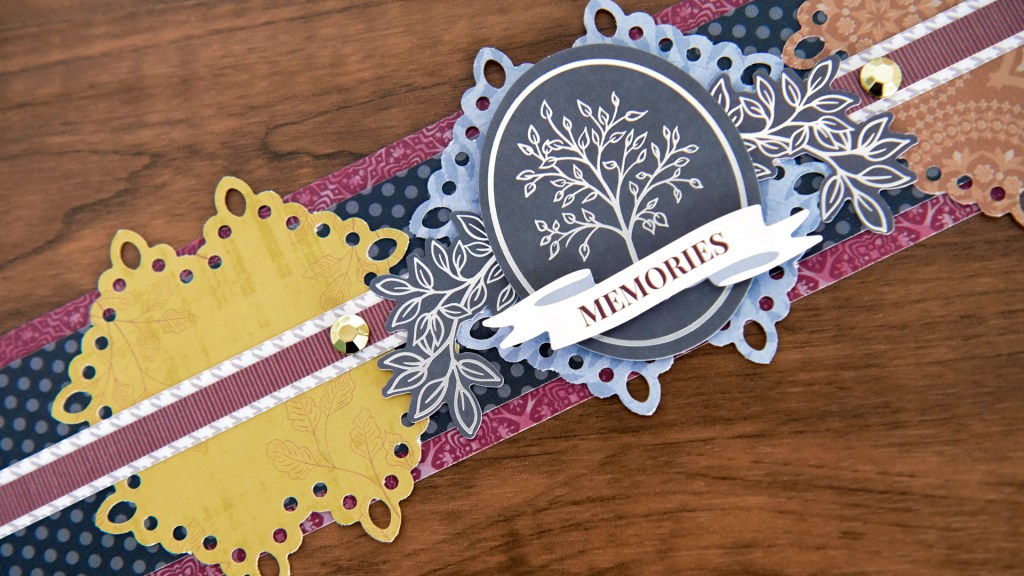
Memories Border

Step 1: Cut a piece from the maroon tiled mosaic designer paper to measure 12″ x 2-1/2″. Use this piece as the base of the border.
Step 2: Cut a piece from charcoal polka dots tonal paper to measure 12″ x 2″. Adhere to the border.
Step 3: Cut three pieces of different papers to measure 4″ x 4″. Punch around all four sides with the Dollop Arch Frame Punch. Adhere to the border.
Step 4: Adhere a 12″ x 1/2″ strip of houndstooth tonal paper across the top of the previous pieces.
Step 5: Adhere stickers and embellishments to the border, using Foam Squares on some for added dimension.
Which of these projects do you like most using the Dollop Arch Frame Punch? Have you ever made borders AND frames using a CM frame punch? Share your thoughts, ideas and innovations with us!

Thank you, Melissa. These projects are beautiful. I can’t wait to try it out myself. ?
Just got my punch so excited to try these cool ideas. Gotta LOVE it!
You could use ribbon too. Great inspiration.