June 24, 2022
Roll In Relaxation With These Water Themed Scrapbook Borders And DIY Card

H?-oh, my goodness — there’s something so relaxing about being on, in or near water. From fishing to frolicking on the beach, surfing and sailing across open waters, maritime memories are worth remembering and reminiscing. And you can pay homage to hydration with these water themed scrapbook borders and DIY card! Dive into these designs!

To create these borders and card, you will need:
- Serene Waters Paper Pack or (Shop Canada | Shop Australia)
- Serene Waters Tone-on-Tone Paper Pack or (Shop Canada | Shop Australia)
- Serene Waters Stickers or (Shop Canada | Shop Australia)
- Serene Waters Laser Cut Borders or (Shop Canada | Shop Australia)
- Serene Waters Embellishments or (Shop Canada | Shop Australia)
- White Solid Cardstock or (Shop Canada | Shop Australia)
- Original Border Maker System with Rolling Sails Cartridge or (Shop Canada | Shop Australia)
- Custom Cutting System with Circle Patterns or (Shop Canada | Shop Australia)
- 12-inch Trimmer with Straight, Scoring & Wave Blades or (Shop Canada | Shop Australia)
- Micro-Tip Scissors or (Shop Canada | Shop Australia)
- 12-inch Trimmer or (Shop Canada | Shop Australia)
- Tape Runner or (Shop Canada | Shop Australia)
- Repositionable Tape Runner or (Shop Canada | Shop Australia)
- Foam Squares or (Shop Canada | Shop Australia)
Check out the Rolling Sails Border Maker Cartridge in action in the video below!

Let the Waves Roll in Border

Step 1: Cut a 12″ x 2-3/4″ strip of cool stripes designer paper for the base. Cut a 12″ x 2-1/4″ strip of sunset border from the strips designer paper and adhere on top. Cut out one row of squares from the multi-hued blocks paper (about 12″ x 1/4″) and adhere at the bottom of the sunset borders piece.
Step 2: Using the Rolling Sails Border Maker Cartridge, punch a border with navy abstract paint daubs tonal paper. Trim to 12″ x 1-1/4″ and adhere just above the blocks strip.
Step 3: Cut a 12″ x 1/4″ strip of soft medium orange stripes designer paper and adhere it behind the diamond cutouts in the wavy laser-cut border. Mount on the border using Foam Squares.
Step 4: Add stickers and embellishments.
Relax Border

Step 1: Using the 12-inch Trimmer and the Wave Blade, cut a 12″ x 2-1/2″ strip of soft medium orange stripes designer paper for the base.
Step 2: With the 12-inch Trimmer and the Straight Blade, cut a 12″ x 3/4″ strip of mint waves tonal paper and adhere near the bottom of the base. Cut a 12″ x 1-1/2″ strip of light blue wash tonal paper and adhere near the top.
Step 3: Using the Rolling Sails Border Maker Cartridge, punch a border with each bright blue waves, red-orange abstract paint daubs, butter yellow abstract paint daubs and mint waves tonal papers and White Solid Cardstock. Trim the bright blue waves border out to 12″ x 1-1/4″ and adhere to the border, just above the mint waves piece. Trim out the boats from the red-orange, butter yellow and mint borders and adhere as shown. Trim out the sails from the cardstock border and adhere as shown.
Step 4: Adhere the starfish border sticker, title sticker and “Relax” embellishment.
Sunset Sail Border
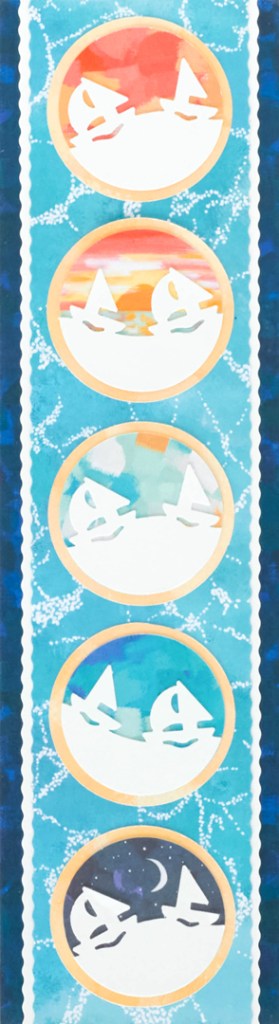
Step 1: Cut a 3-1/4″ x 12″ strip of navy abstract paint daubs tonal paper for the base.
Step 2: Using the 12-inch Trimmer and the Wave Blade, cut a 12″ x 2-3/4″ strip of White Solid Cardstock and adhere on the base. Using the Wave Blade, cut a 12″ x 2-1/2″ strip of teal glistening ripples designer paper and mount on top.
Step 3: Using the inside edge of the medium Custom Cutting System Circle Pattern and the Green Blade, cut five circles with butter yellow abstract paint daubs tonal paper. Adhere on the border. Using the inside edge of the medium Custom Cutting System Circle Pattern and the Blue Blade, cut five circles with sunset designer paper and mount on the butter yellow circles. (Optionally, you may use the two sunrise/sunset embellishments in place of two of them, as this example shows.)
Step 4: Using the Rolling Sails Border Maker Cartridge, punch a border from White Solid Cardstock. Using the inside edge of the medium Custom Cutting System Circle Pattern and the Blue Blade, cut out sailboat sections as shown. Mount on the circles.
Breathe In Breathe Out Card

Step 1: Create the card base. Cut an 8-1/2″ x 5-1/2″ piece of White Solid Cardstock. Using the 12-inch Trimmer and the Scoring Blade, score along the long edge at 4-1/4″ and fold in half.
Step 2: Using the Rolling Sails Border Maker Cartridge, punch a border with sunset designer paper (making sure the paper is oriented sideways). Trim out to 12″ x 5-1/4″. Cut the strip into three 4″ x 5-1/4″ sections. Adhere the darkest section to the card. Trim the other two sections to 3-1/4″ long. Adhere first the orange section, then the aqua section.
Step 3: Cut a 4″ x 5/8″ strip of multi-hued blocks designer paper and adhere on the card.
Step 4: Add a sticker as a sentiment using Foam Squares for added dimension. Embellish with enamel stickers as desired.
Do these water themed scrapbook borders and DIY make a splash? Will you be adding them to your next to-do project(s)?
