August 19, 2022
Show Your Scrapbooking Smarts: School Scrapbook Borders And DIY Card

There are so many types and formats of schooling, like private, public, online learning and many, many more. No matter what fits into one’s life, at the end of the day (or report card), education can play a significant role in a person’s life. It helps build intellect, opinions, character and friendships! To take this thought up a grade level, study up on these school scrapbook borders (and DIY card for teacher appreciation!).
To create these borders and card, you will need:
- Back to School Paper Pack or (Shop Canada | Shop Australia)
- Back to School Stickers or (Shop Canada | Shop Australia)
- Blank Card Kit or (Shop Canada | Shop Australia)
- Original Border Maker System with Home Sweet Home Border Maker Cartridge or (Shop Canada | Shop Australia)
- 13×13 Custom Cutting System Mat or (Shop Canada | Shop Australia)
- Custom Cutting System with Circle & Oval Patterns or (Shop Canada | Shop Australia)
- 12-inch Trimmer with Straight & Stamping Blades or (Shop Canada | Shop Australia)
- 12-inch Decorative Trimmer or (Shop Canada | Shop Australia)
- Tape Runner or (Shop Canada | Shop Australia)
- Repositionable Tape Runner or (Shop Canada | Shop Australia)
- Foam Squares or (Shop Canada | Shop Australia)
Check out the Home Sweet Home Border Maker Cartridge in action in the video below!

Every Day Is A Chance To Learn Border

Step 1: Using the 12-inch Trimmer, cut a 12″ x 2-1/2″ strip of mint composition notebook designer paper to use as the base. Cut a 12″ x 1/4″ piece of the stripes designer paper. Adhere stripes strip to the top edge of the border.
Step 2: Using the Original Border Maker System and the Home Sweet Home Border Maker Cartridge, punch one border from blue music notes, red apples and Kelly green dots designer papers. Trim each border strip to approximately 2″. Reserve the hearts that get punched out from the middle of the houses. Cut each border into three 4″ or 4 house sections*. Arrange sections in a line on border base and adhere. Insert reserved hearts from punched borders back into the open spaces of the houses and adhere with Repositionable Tape Runner. (*NOTE: Reserve the unused sections of the home border to use in the “Teachers Rock Card” shown below.)
Step 3: Using the 12-inch Decorative Trimmer, cut a 12″ wide piece of the stripes designer paper with the wavy blade to approximately 1″. Adhere to the bottom edge of border. Cut a 12″ x 1/4″ piece of the mint composition notebook designer paper with the wavy blade and adhere on top of the stripes piece, aligning the waves to match.
Step 4: Using the inside of the second-smallest Custom Cutting System Oval Pattern and the Red Blade, cut a 2″ oval from the blue music notes paper. Layer the “Everyday is a great day to learn” sticker on the oval and adhere to border as shown with Foam Squares for added dimension.
Alphabet Border

Step 1: Using the 12-inch Trimmer, cut a 12″ x 3″ strip of the red apples, a 12″ x 3″ strip of the Kelly green dots, and a 12″ x 1″ strip of rulers designer papers.
Step 2: Punch one edge of the red apples paper with the Original Border Maker System and the Home Sweet Home Border Maker Cartridge. Turn the paper around and punch the opposite edge.
Step 3: Mount the double-punched border strip on the Kelly green dots border base. Add the 12″ x 1″ rulers strip along the middle of the border, then use Foam Squares to add a chalkboard alphabet border sticker on top of it.
Memories Border
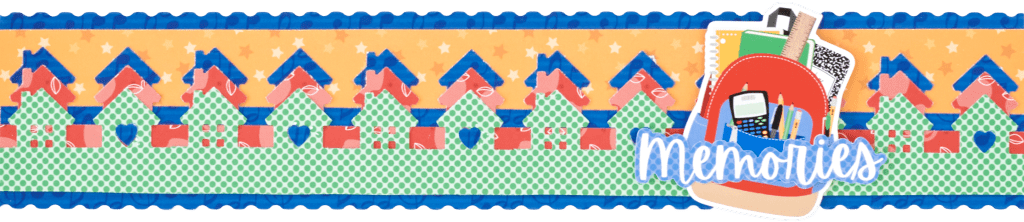
Step 1: Using the 12-inch Trimmer and the Stamping Blade, cut a 12″ x 2-1/2″ strip of blue music notes designer paper to use as the base for the border. Using the 12-inch Trimmer and the Straight Blade, cut a 12″ x 2″ strip of the stars designer paper.
Step 2: Using the Original Border Maker System and the Home Sweet Home Border Maker Cartridge, punch one border from blue music notes, red apples and Kelly green dots designer papers. Trim each border to approximately 1-1/2″. Reserve the hearts that get punched out from the middle of the houses.
Step 3: Layer the punched border strips on top of each other, lining up the peaks of the houses. Adhere with Repositionable Tape Runner. Adhere the top edge of the layered houses to the stars strip, then adhere all to the blue music notes border base with Tape Runner.
Step 4: Insert reserved hearts from punched borders back into the open spaces of the houses and adhere with Repositionable Tape Runner. Add backpack and “Memories” stickers approximately 3″ from the right-hand side with Foam Squares for added dimension.
Teachers Rock Card
Step 1: Cut out the 3″ circle from the middle of the 4″ x 6″ alphabet variety mat card with the inside edge of the largest Custom Cutting System Circle Pattern and the Blue Blade.
Step 2: Using the 12-inch Trimmer, trim the mat card to 4″ x 5-1/2″, keeping the circle in the middle.
Step 3: Trim one red apples, blue music notes and Kelly green dots house from the home border strip section strips reserved from the first border project above (“Every Day is a Chance to Learn Border” and adhere them behind the open circle with Repositionable Tape Runner. Mount mat card with houses onto the front of a blank card from the Blank Card Kit. Insert reserved hearts from punched borders back into the open spaces of the houses. Adhere with Repositionable Tape Runner.
Step 4: Add “Teachers rock!” sticker and enamel apple embellishment as shown to finish the card.
Do these school scrapbook borders pass the mark? Will you be making and sending/giving the teacher appreciation DIY card out this school year?

Wish for more pictures less words.