August 23, 2022
Framing A Chimp-ioin Project: Zoo Themed Scrapbook Layout

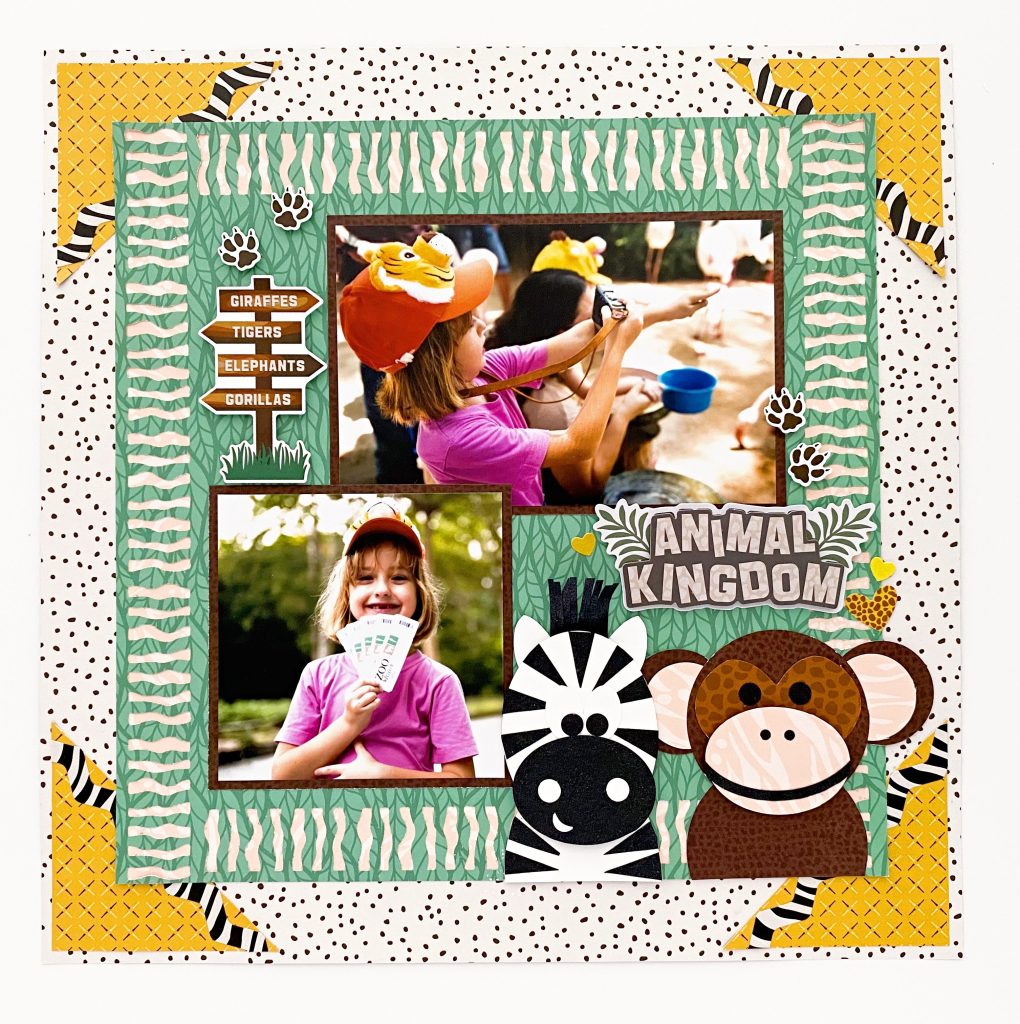
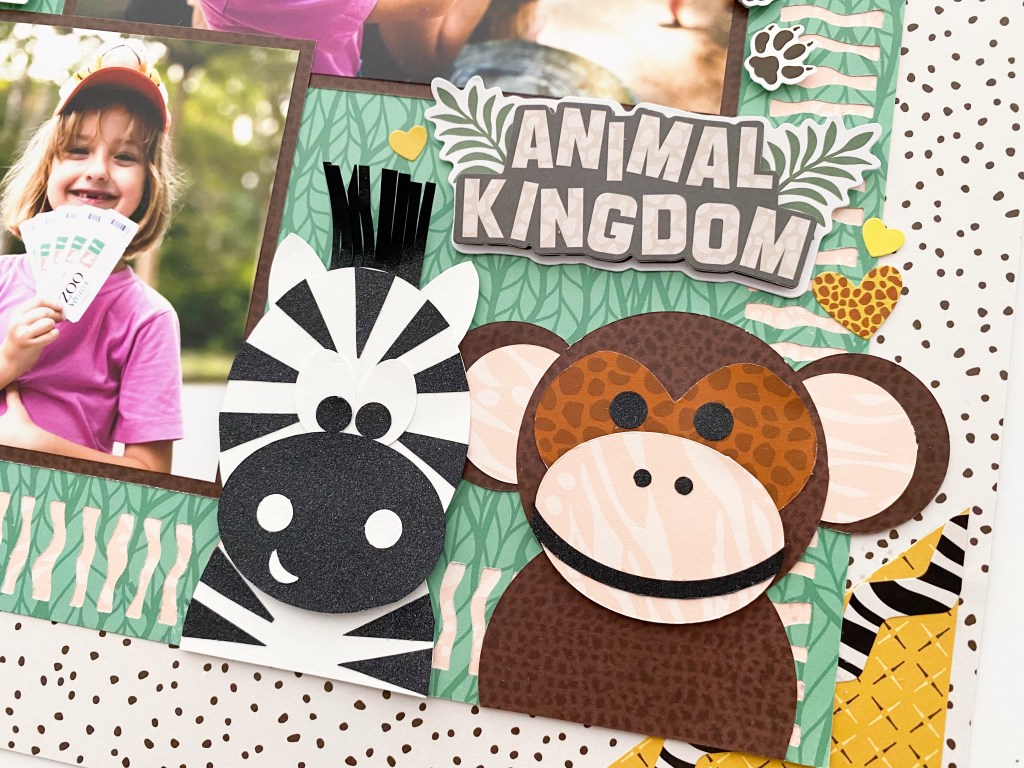
What is your go-to animal to see at the zoo? Is it the waddling penguin? The fun-loving monkey? The roar-some lion? The sleepy panda? Fast-moving iguanas? Whatever your species fancy may be, a day at the zoo can be a great memory to capture… and that is exactly what blog contributor Kylie Kingham did! Check out her framing zoo themed scrapbook layout (with a couple of cute animals that she made!).
Kylie’s Inspiration
Look out zoo — here we come! Some of our most cherished memories have been made spending days at the zoo! Our kids always love to pretend they are on a wild safari, following the zoo map to find their beloved animals. It’s always a fun day out. The new What A Zoo, Too! collection was perfect for capturing the hues, sights and sounds into a layout and to preserve those special photos thanks to so many fun prints and textural elements.
To create this layout you will need:
- What A Zoo, Too! Paper Pack or (Shop Canada | Shop Australia)
- What A Zoo, Too! Layered Embellishments or (Shop Canada | Shop Australia)
- What A Zoo, Too! Stickers or (Shop Canada | Shop Australia)
- What A Zoo, Too! Border Stickers or (Shop Canada | Shop Australia)
- Black Shimmer & White Solid Cardstocks or (Shop Canada | Shop Australia)
- Original Border Maker System with Zebra Stripe Border Maker Cartridge or (Shop Canada | Shop Australia)
- 12-inch Trimmer or (Shop Canada | Shop Australia)
- Piece by Piece Mini Trio Punch Set or (Shop Canada | Shop Australia)
- Custom Cutting System with Circle & Oval Patterns or (Shop Canada | Shop Australia)
- Micro-Tip Scissors or (Shop Canada | Shop Australia)
- Repositionable Tape Runner or (Shop Canada | Shop Australia)
- Precision Point Adhesive Pen or (Shop Canada | Shop Australia)
- Foam Squares or (Shop Canada | Shop Australia)

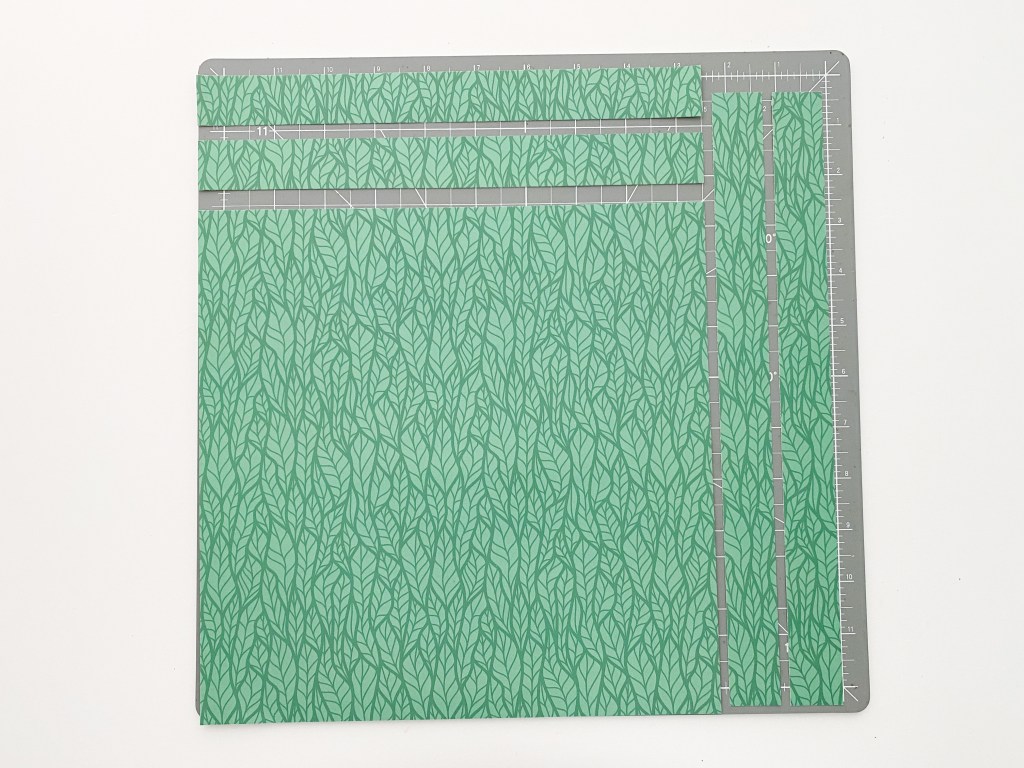
Step 1: Remove two- 1″ x 12″ strips from one side of designer paper. Remove two- 1″ x 10″ strips from the top edge of the same paper, leaving you with a perfect 10″ x 10″ square of paper. Save all cut paper strips.

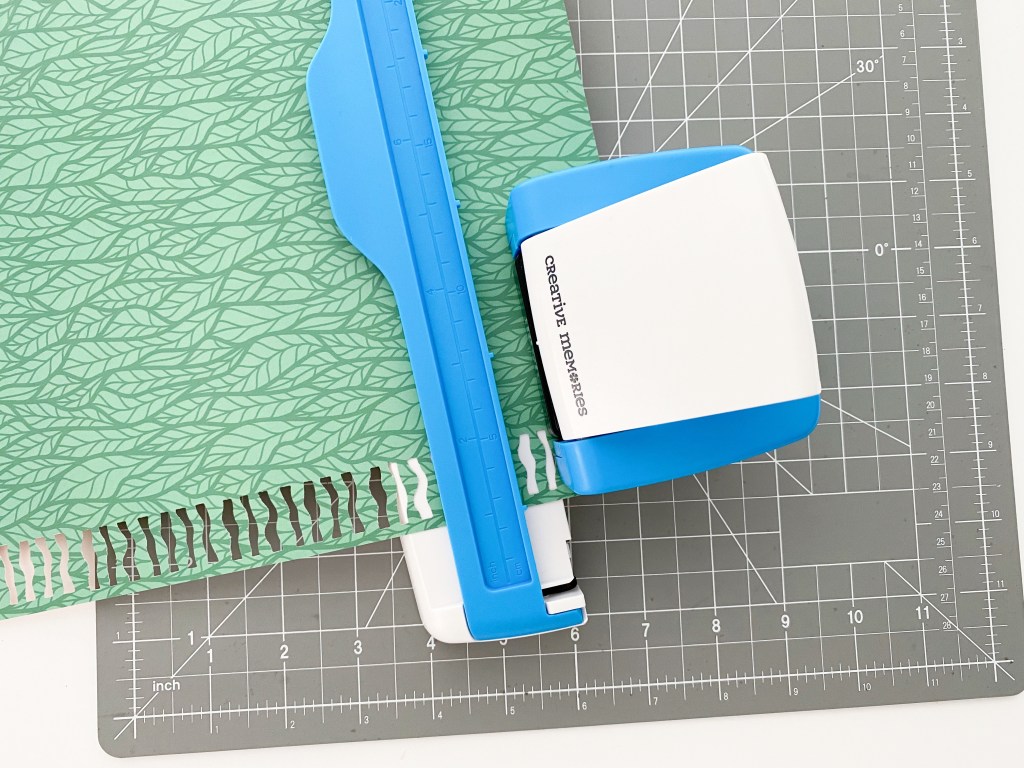
Step 2: Insert the square paper into the Original Border Maker System and punch down one edge using the Zebra Stripe Border Maker Cartridge. Next, punch down the edge on the opposite side.
Step 3: Insert one of the remaining edges into the Original Border Maker System, making sure it is aligned. This is easy to do as you will have a 1″ space to the top and bottom of the paper edge. Insert the BMC into the second set of nodules (punch space) on the Border Maker System and punch all the way along, stopping after the fifth set of nodules. (Do not punch on the first or last set of nodules.) Repeat this process on the remaining edge of paper.
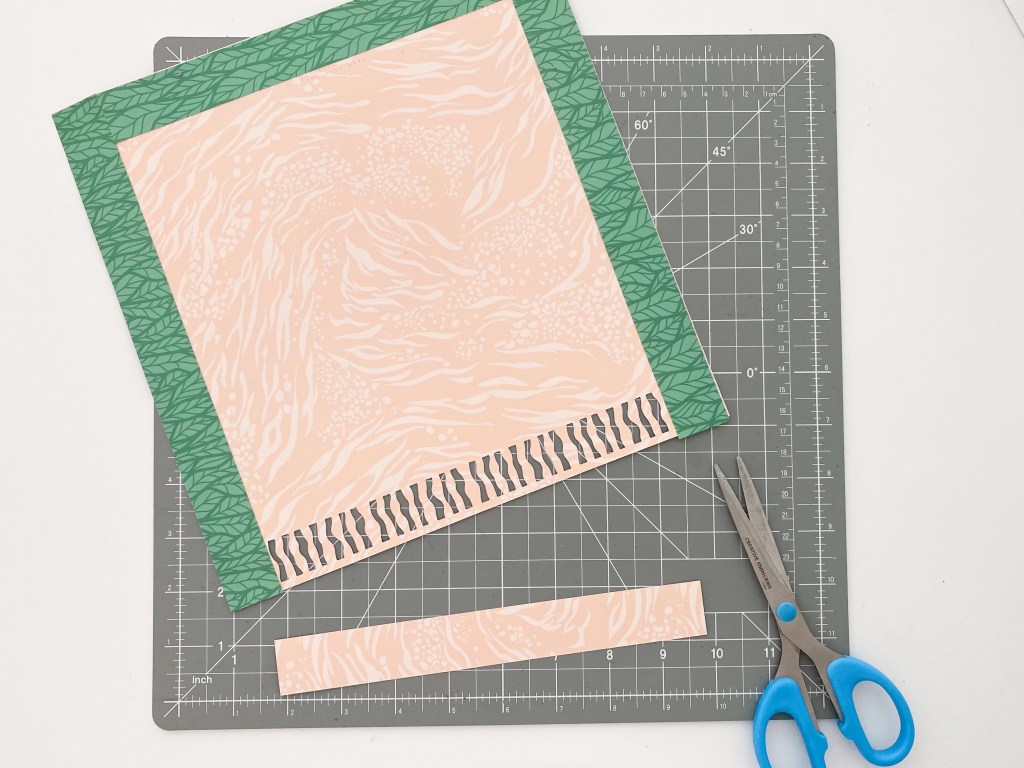
Step 4: Adhere the strips removed from the square at the beginning to the back of the paper, so that the opposite side of the paper will show through the zebra print punch. Trim off any overhang with scissors.
Step 5: Adhere this square frame aligned over the top of a contrasting piece of designer paper with Repositionable Tape Runner. (To conserve paper, you could remove the middle of the background piece first.)
Step 6: From another piece of contrasting paper, trim two- 3″ x 3″ squares. Cut each square in half diagonally. Adhere a portion of a border sticker down the longest edge of each triangle and adhere to each corner of the background paper, tucked in under the middle frame and approximately 1/4″ in from the corner edges.
Step 7: To create the zebra:
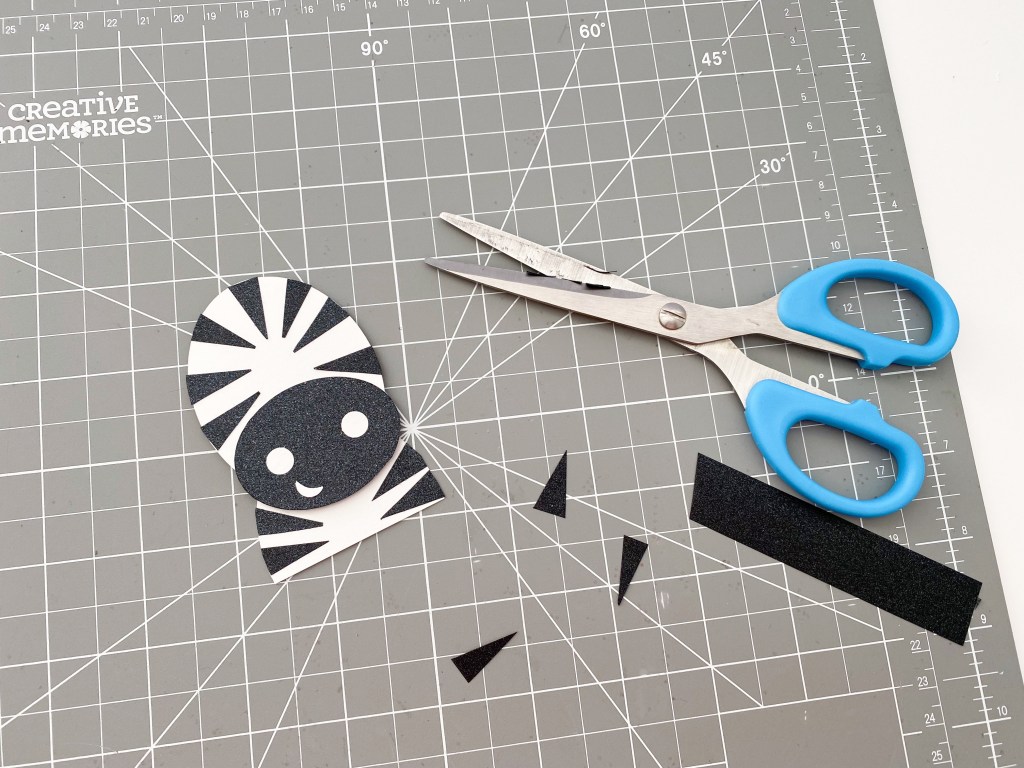
- Using White Solid Cardstock, cut two ovals from the inside edge of the second-largest Custom Cutting System Oval Pattern and the Red Blade. Cut one oval in half and adhere the full oval over the top of one half vertically to resemble the zebra’s head and body. (Straight edge of the oval half to be at the bottom.)
- From Black Solid Cardstock, cut one oval from the inside edge of the second-smallest Custom Cutting System Oval Pattern and the Red Blade. Adhere this oval horizontally over the top of where the head is joined to the body. Using the Piece by Piece Mini Trio Punch Set and White Solid Cardstock, create nostrils and a mouth. Glue in place with the Precision Point Adhesive Pen.
- Trim a 3/4″ wide strip of Black Solid Cardstock. Using scissors, freehand cut some narrow triangles from this strip. Adhere to the zebra as stripes. Fringe-cut a small section of the remaining strip and add as a mane at the top of the head. Freehand cut two small ear shapes from White Solid Cardstock and add either side of the mane.
- Using the inside edge of the smallest Custom Cutting System Oval Pattern and Blue Blade, cut two ovals from White Solid Cardstock. Adhere these as eyes. Punch two pupils from Black Solid Cardstock using the Piece by Piece Mini Trio Punch Set. Adhere in place.
Step 8: To create the monkey:
- Using the inside edge of the medium Custom Cutting System Circle Pattern and the Red Blade, cut two circles from designer paper. Cut one circle in half and adhere behind the full circle, so that the straight edge will be at the bottom. This is the monkey’s head and body.
- Using the inside edge of the smallest Custom Cutting System Circle Pattern and the Red Blade, cut two circles from the same paper. From a contrasting piece of paper, cut two more circles from the same template, only this time with the Green Blade on the inside edge. Adhere these over the top of the first circles and add as ears to the monkey’s head.
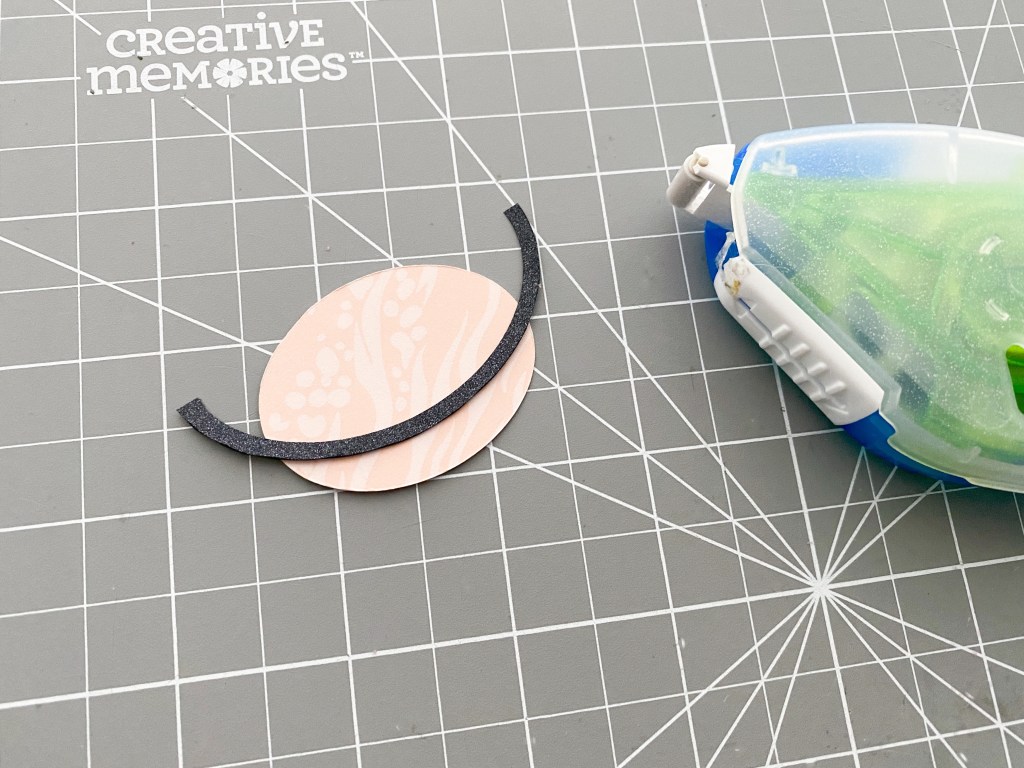
- Using the second-largest Custom Cutting System Oval Pattern, cut one oval from contrasting paper using the Blue Blade on the inside track. Carefully fold this oval in half (across the shortest center), without creasing too much and with scissors remove a small, curved piece from one folded corner. When you open the oval back out it has the same shape as the top of a heart. Adhere this piece to the top portion of the monkey’s head.
- Using the inside edge of the second-smallest Custom Cutting System Oval Pattern and the Red Blade, cut one oval from the same paper as the inside of the ears. Adhere this as a mouth to the base of the head. Using the inside edge of the second-largest Custom Cutting System Oval Pattern, and the Green Blade, cut one oval from Black Solid Cardstock. DO NOT move the oval template and cut a second oval from the inside edge, only this time with the Red Blade. Cut the oval ring in half across the longest middle and adhere it over the mouth as lips. Trim off any excess. Use the Piece by Piece Mini Trio Punch Set to create nostrils and eyes from Black Solid Cardstock. Adhere in place using the Precision Point Adhesive Pen.


Step 9: Adhere the zebra and monkey to the lower-right corner of the frame. Cut two photo mats from designer paper to measure 6″ x 4″ and 4″x 4″. Trim photos to fit each mat to 5-3/4″ x 3-3/4″ and 3-3/4″x 3-3/4″. Adhere in place. Finish the page by adding layered embellishments and stickers as desired.
What draws you in most to this zoo themed scrapbook layout? Will you be making this cute creation made by Kylie? Type out your thoughts and ideas!

Love Kyles page designs. Great imagination.
Definitely going to try this layout ???
Love this layout. The little monkey and zebra and so cute. I have been doing a book about the safari and this will definitely be in it. Thanks so much.
Love Kylie’s layouts. Love this layout. Working on Zoo pics now from a visit to the zoo with my grands back in March. Definitely will try this. Thanks Kylie.