October 5, 2022
Get A Feel For The Seasons: Seasonal Scrapbook Layouts
We love autumn, we love winter… we love seasonal scrapbook layouts! Do you agree? (YES!) Then take a look these autumn, Christmas and winter layouts! What is your beloved season?
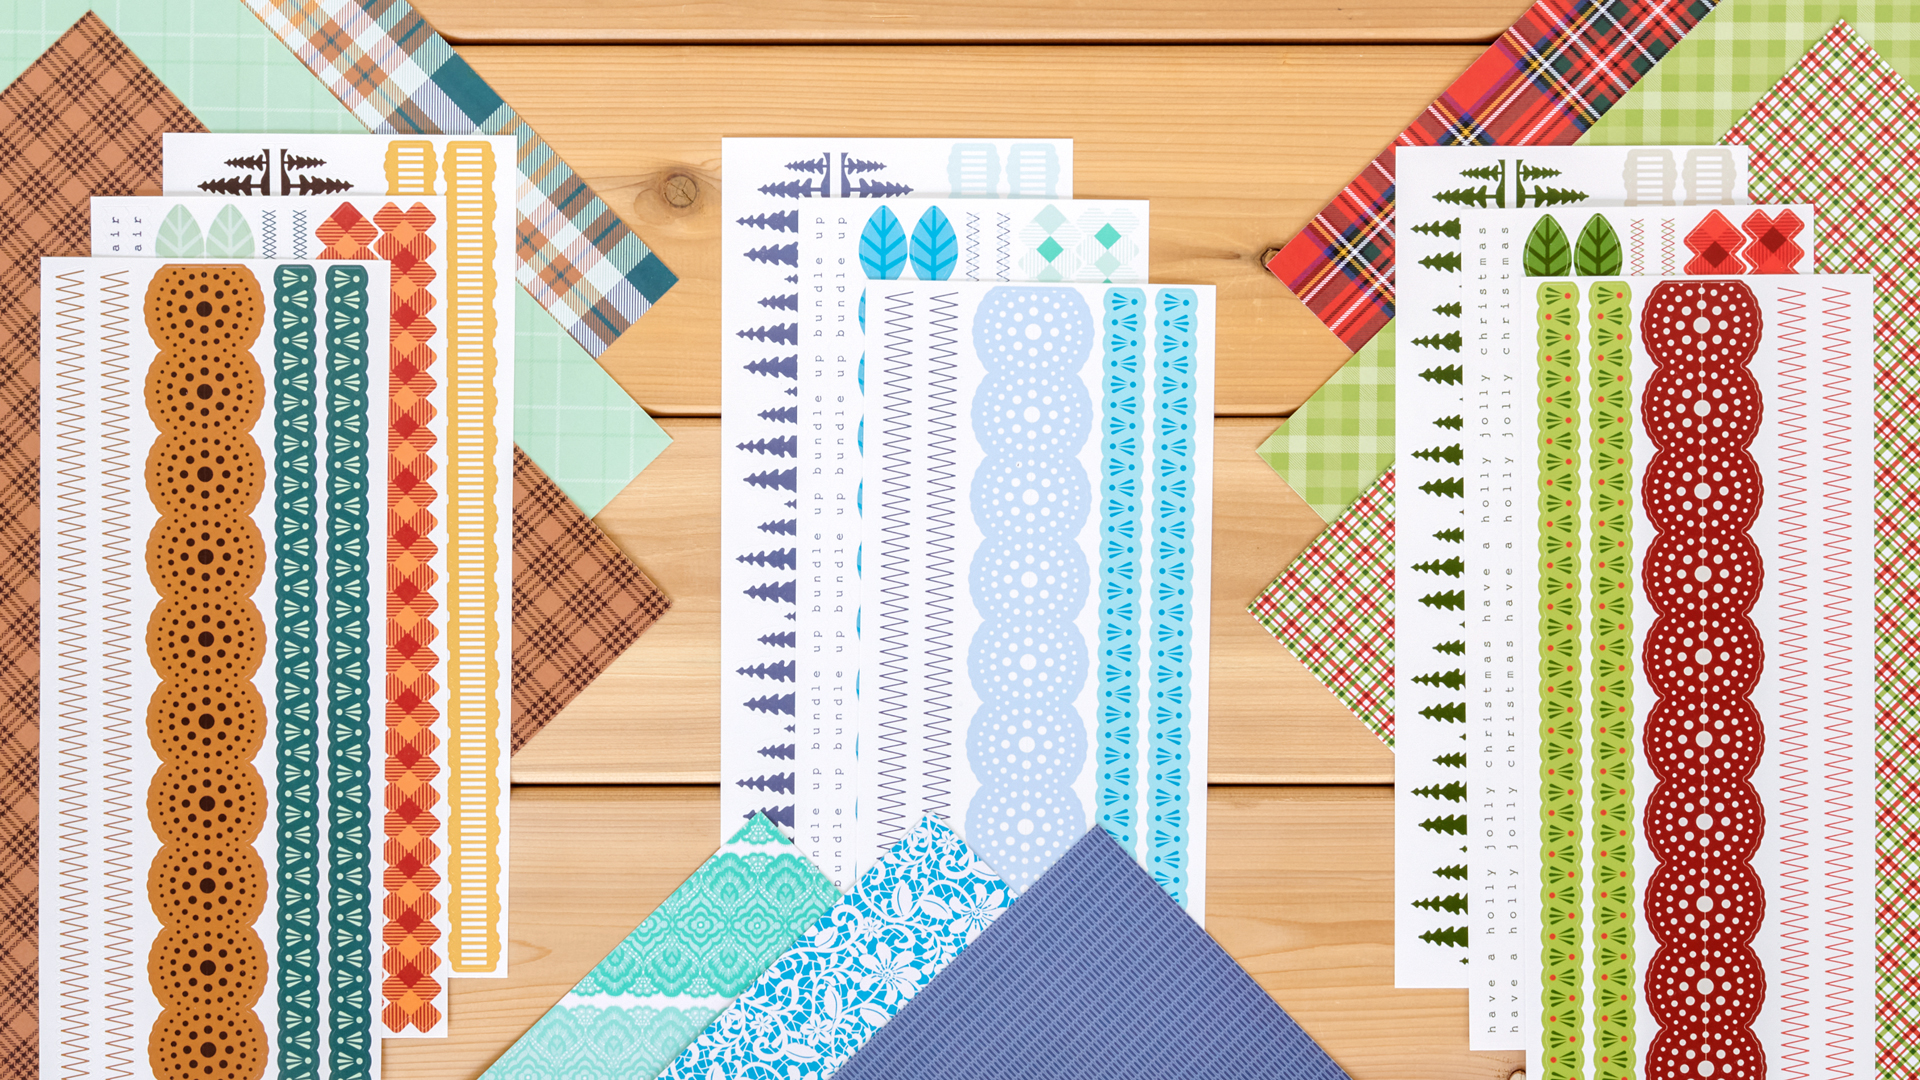
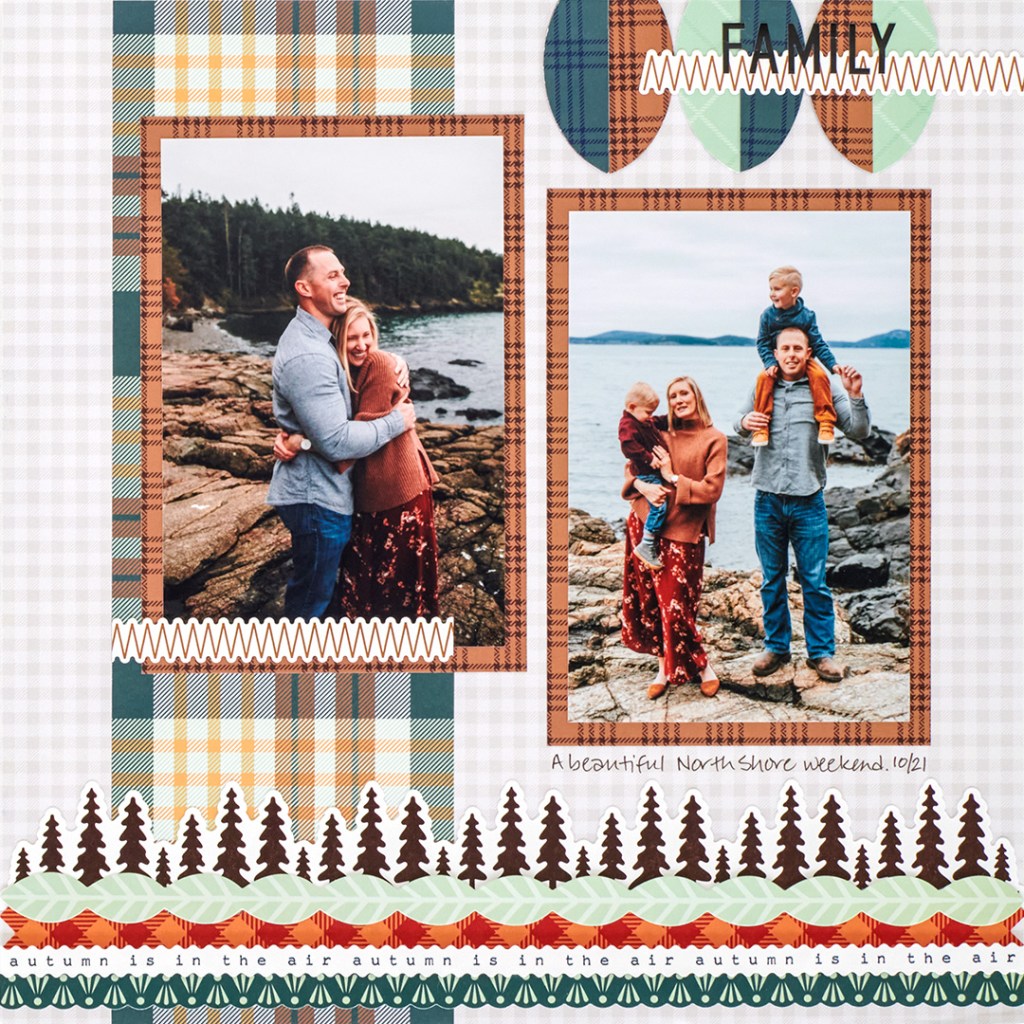
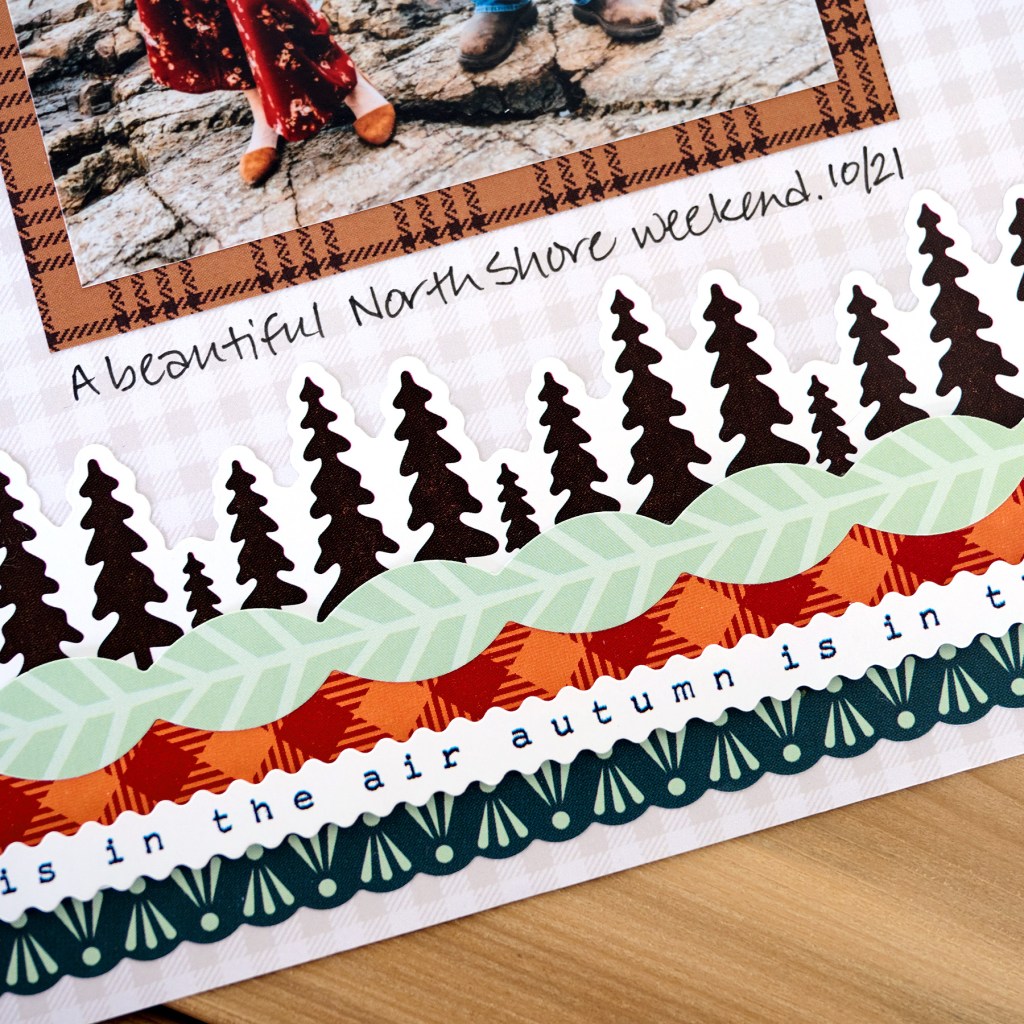
Totally Tonal Fall Layout
To create this layout you will need:
- Totally Tonal Fall Paper Pack or (Shop Canada | Shop Australia)
- Totally Tonal Fall Border Stickers or (Shop Canada | Shop Australia)
- Black Sans Serif ABC/123 Letter Stickers or (Shop Canada | Shop Australia)
- Custom Cutting System with Oval Patterns or (Shop Canada | Shop Australia)
- 12-inch Trimmer or (Shop Canada | Shop Australia)
- Micro-Tip Scissors or (Shop Canada | Shop Australia)
- Tape Runner or (Shop Canada | Shop Australia)
- Repositionable Tape Runner or (Shop Canada | Shop Australia)
- Foam Squares or (Shop Canada | Shop Australia)
- Black Dual-Tip Pen or (Shop Canada | Shop Australia)

Step 1: Use a piece of beige gingham paper as the base for this layout. Cut a 4″ x 12″ strip of multi-hued plaid paper and adhere on the layout, about 1-1/4” from the left edge.
Step 2: Mat two 4″ x 6″ photos with two 4-1/2″ x 6-1/2″ pieces of brown plaid paper. Adhere on the layout as shown.
Step 3: Adhere several border stickers across the bottom of the layout as shown. Pop the title border sticker up with Foam Squares for added dimension.
Step 4: Using the inside edge of the 4×6 Custom Cutting System Oval and the Red Blade, cut a half oval with brown plaid paper. Move the pattern inward and cut the other side, creating a leaf shape. Use this piece as a guide to cut leaves with mint green and dark turquoise papers. Cut in half and assemble as shown on the top of the layout, overlapping the edge. Trim off the excess.
Step 5: Adhere sections of a zig zag border sticker as shown. Add a title at the top. Journal as desired.
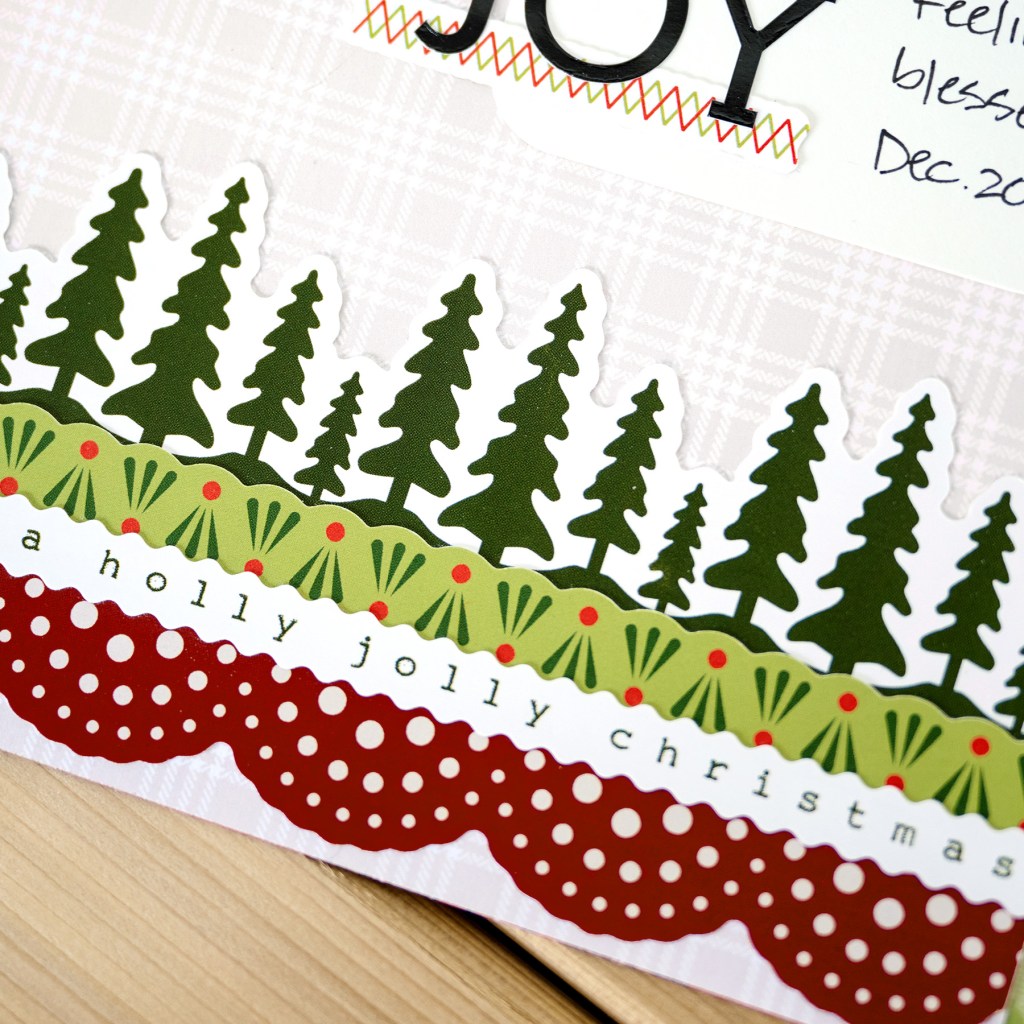
Totally Tonal Christmas Layout

To create this layout you will need:
- Totally Tonal Christmas Paper Pack or (Shop Canada | Shop Australia)
- Totally Tonal Christmas Border Stickers or (Shop Canada | Shop Australia)
- Black Sans Serif ABC/123 Letter Stickers or (Shop Canada | Shop Australia)
- Black Serif ABC/123 Letter Stickers or (Shop Canada | Shop Australia)
- White Solid Cardstock or (Shop Canada | Shop Australia)
- 12-inch Trimmer or (Shop Canada | Shop Australia)
- 2-Way Corner Rounder or (Shop Canada | Shop Australia)
- Micro-Tip Scissors (Shop Canada | Shop Australia)
- Tape Runner or (Shop Canada | Shop Australia)
- Repositionable Tape Runner or (Shop Canada | Shop Australia)
- Foam Squares or (Shop Canada | Shop Australia)
- Black Dual-Tip Pen or (Shop Canada | Shop Australia)

Step 1: Use a piece of red tartan paper as the base for this layout. Cut a 6-1/2″ x 12″ piece of light green diagonal gingham paper and adhere on the layout, about 1/2″ from the left edge. Cut a 6″ x 12″ piece of beige plaid paper and mount on top.
Step 2: Cut several border stickers in half. Arrange and adhere on the top and bottom of the beige piece, using the photo as a guide for placement.
Step 3: Crop a photo to 5-1/2″ x 4″ and mount on the beige piece. Cut a 3″ x 3″ piece of White Solid Cardstock. Round the corners with the 2-Way Corner Rounder and mount as shown.
Step 4: Crop two photos to 4″ x 5-1/4″ and mat with two 4-1/4″ x 5-1/2″ pieces of White Solid Cardstock. Mount on the right side of the layout.
Step 5: Add sections of a stitching border sticker and ABC/123 Letter Stickers titles. Journal as desired.
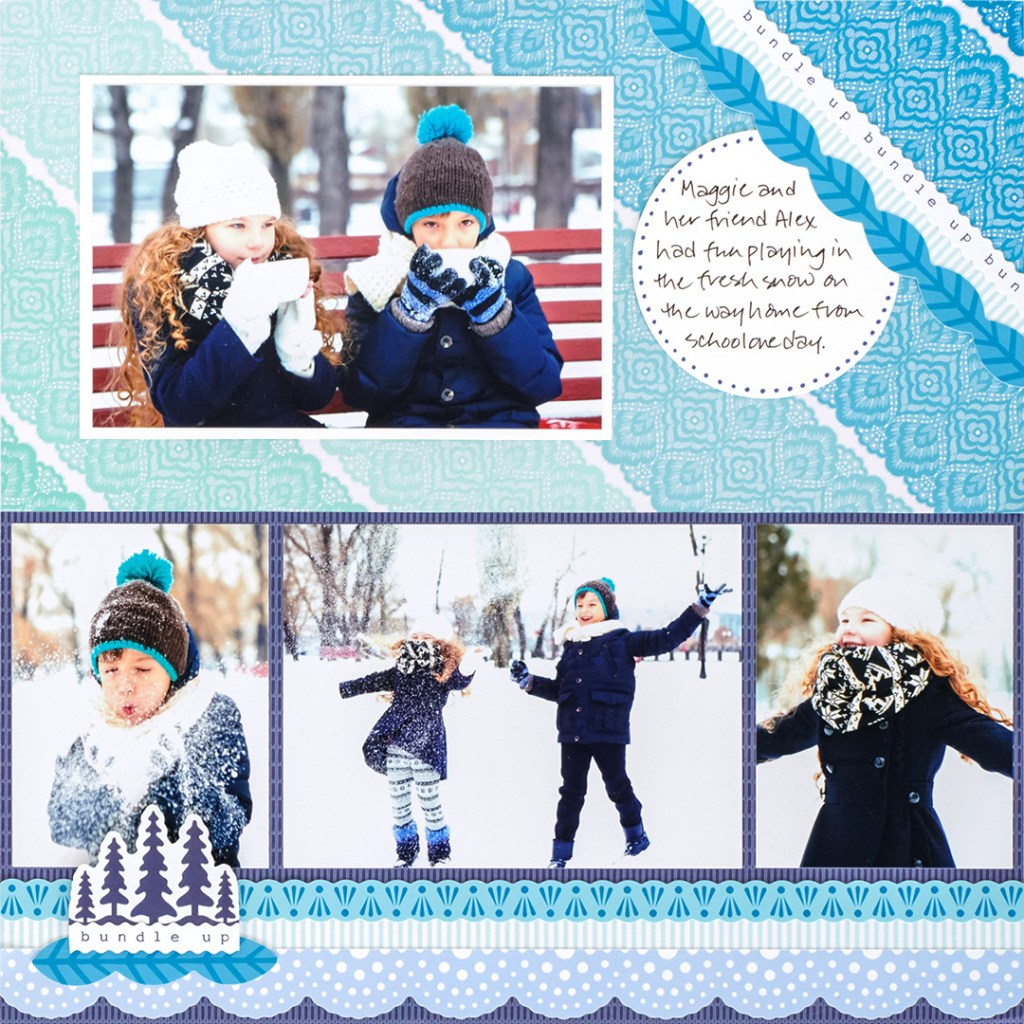
Totally Tonal Winter Layout
To create this layout you will need:
- Totally Tonal Winter Paper Pack or (Shop Canada | Shop Australia)
- Totally Tonal Winter Border Stickers or (Shop Canada | Shop Australia)
- White Solid Cardstock or (Shop Canada | Shop Australia)
- Custom Cutting System with Circle Patterns or (Shop Canada | Shop Australia)
- 12-inch Trimmer or (Shop Canada | Shop Australia)
- Micro-Tip Scissors (Shop Canada | Shop Australia)
- Tape Runner or (Shop Canada | Shop Australia)
- Repositionable Tape Runner or (Shop Canada | Shop Australia)
- Foam Squares or (Shop Canada | Shop Australia)
- Navy & Black Dual-Tip Pens or (Shop Canada | Shop Australia)
Step 1: Use a piece of White Solid Cardstock or a White Refill Page as the base for this layout. Cut a piece of diagonal lace paper in half. Mount half on the top of the layout. Flip the other half to the reverse side (navy) and adhere it to the bottom of the layout.
Step 2: Mat a 6″ x 4″ photo with a 6-1/4″ x 4-1/4″ piece of White Solid Cardstock. Adhere on the top of the layout as shown. Crop two photos to 3″ x 4″ and one photo to 5-3/8″ x 4″. Adhere on the bottom of the layout as shown.
Step 3: Adhere border stickers along the bottom of the layout. Adhere others along the top-right diagonally. Trim the excess. Trim out a section of trees, title and leaves stickers and add to the lower-left of the layout.

Step 4: Using the inside edge of the largest Custom Cutting System Circle Pattern and the Red Blade, cut a circle with White Solid Cardstock. Using the bold tip of the Navy Dual-Tip Pen, add dots around the edge. Adhere on the layout. Journal as desired.
Which of these three seasonal scrapbook layouts will you make? Or do you love all three?! Let us know in the comments below!

LOVE what looks like simple ideas, that pack a punch and show off the photos. Thanks so much Kristin for another stellar share!
The diagonals in the one layout are a great design idea.