December 16, 2022
Tweet With Glee: Cardinal Scrapbook Borders And DIY Christmas Card

“Cardinals appear when angels are near.”
To some, spotting a cheerful cardinal means that a loved one is watching over you. These vibrant visitors also offer a bright spot of scarlet in the whites of winter — and they’re a symbol of hope and joy, especially during the Christmas season. Well, if you’re wanting a treat (or tweet!) this season, then take a peek at these cardinal scrapbook borders and DIY Christmas card!

To create these borders and card you will need:
- Seasonal Sightings Paper Pack or (Shop Canada | Shop Australia)
- Seasonal Sightings Tone-on-Tone Paper Pack or (Shop Canada | Shop Australia)
- Seasonal Sightings Laser Cut Borders or (Shop Canada | Shop Australia)
- Seasonal Sightings Foiled Embellishments or (Shop Canada | Shop Australia)
- Seasonal Sightings Stickers or (Shop Canada | Shop Australia)
- Black, Cranberry, White and Canary Solid Cardstock or (Shop Canada | Shop Australia)
- Cardinals Border Punch or (Shop Canada | Shop Australia)
- Original Border Maker System with Poinsettia Edge Border Maker Cartridge or (Shop Canada | Shop Australia)
- Custom Cutting System with Circle Patterns or (Shop Canada | Shop Australia)
- 12-inch Trimmer with Straight, Scallop & Scoring Blades or (Shop Canada | Shop Australia)
- Micro-Tip Scissors or (Shop Canada | Shop Australia)
- Tape Runner or (Shop Canada | Shop Australia)
- Repositionable Tape Runner or (Shop Canada | Shop Australia)
- Foam Squares or (Shop Canada | Shop Australia)
- Precision Point Adhesive Pen or (Shop Canada | Shop Australia)
- Small hole punch

‘Tis the Season Border

Step 1: Using the 12-inch Trimmer and the Scallop Blade, cut a 12″ x 3-1/4″ strip of evergreen wash designer paper for the base. Switch to the Straight Blade and cut a 12″ x 2-3/4″ strip of red dots tonal paper. Adhere on the base. Cut a 12″ x 2-3/8″ strip of starry designer paper and mount on top.
Step 2: Adhere a pine boughs laser-cut border on the middle of the border. Using the Cardinals Border Punch, punch one cardinals border with evergreen wash designer paper and adhere it on the top edge of the laser-cut border. Punch another with red wash tonal paper, but this time position the edge of the paper in the middle of the punch rather than at the black line. Adhere on the bottom edge of the laser-cut border.
Step 3: Adhere embellishments, popping the title up with Foam Squares for added dimension.
Merry Days Card
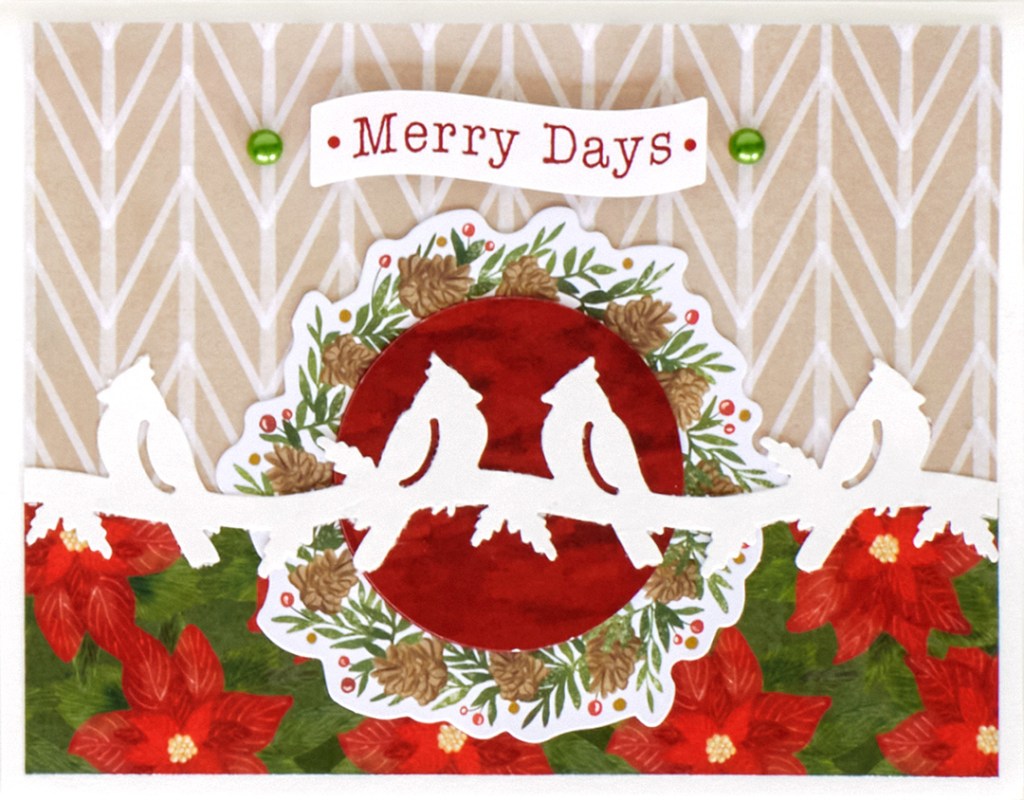
Step 1: Create the card base. Cut an 8-1/2″ x 5-1/2″ piece of White Solid Cardstock. Using the 12-inch Trimmer and the Scoring Blade, score along the long edge at 4-1/4″ and fold in half.
Step 2: Cut a 5-1/4″ x 2-1/2″ piece of tan chevron tonal paper and adhere on the top of the card. Cut a 5-1/4″ x 1-1/2″ piece of red poinsettia designer paper and adhere on the bottom of the card.
Step 3: Adhere a wreath embellishment in the middle. Using the inside edge of the medium Custom Cutting System Circle Pattern and the Blue Blade, cut a circle with festive dark red wash tonal paper. Adhere on top of the wreath.
Step 4: Using the Cardinals Border Punch, punch a cardinals border with White Solid Cardstock. Trim out a 5-1/4″ section and adhere over the seam. Add a title and gems.
Peace on Earth Border

Step 1: Using the Poinsettia Edge Border Maker Cartridge, punch a border with Black Solid Cardstock. Trim to 12″ x 3″ to create the base. Cut small circle shapes with Cranberry Solid Cardstock to adhere behind the poinsettias. Punch small circles with Canary Solid Cardstock and adhere to the middles of the poinsettias using the Precision Point Adhesive Pen.
Step 2: Cut a 12″ x 1-3/8″ strip of green chevron tonal paper and adhere near the top of the border. Cut a 12″ x 3/4″ strip of seasonal sayings designer paper and adhere just beneath the green strip.
Step 3: Using the Cardinals Border Punch, punch a cardinals border with green chevron tonal paper and adhere along the bottom edge of the green chevron strip. Punch a cardinals border with each Canary, Black and Cranberry Solid Cardstocks. Adhere the canary border just above the green border. Snip off the beaks of the black border and adhere on top of the canary border. Replace all the black wing pieces. Snip off a triangular section of the heads of the cranberry border. Adhere on top of the black border.
Step 4: Add an embellishment and a sticker title, popping them up with Foam Squares.
Christmas Reflections Border

Step 1: Cut a 3″ x 12″ strip of Santa stripes designer paper for the base. Cut a 2-1/2″ x 11-1/2″ strip of green chevron tonal paper and adhere on the base. Cut a 2-1/4″ x 11-1/4″ strip of holly tiles designer paper and mount on top.
Step 2: Using the inside edge of the medium Custom Cutting System Circle Pattern and the Blue Blade, cut three circles with evergreen wash tonal and two circles with light green tonal wash papers. Using the Cardinals Border Punch, punch one cardinals border with red wash tonal and one with dark red tonal papers. Trim out two-bird sections and adhere on the circles. Mount on the border as shown.
Step 3: Add embellishments and stickers.
How are you getting ready for the Christmas season? Will you be making these cardinal scrapbook borders And DIY Christmas card to prep ahead?

I love this new punch and the beautiful borders and card are so festive!
Beautiful!
Absolutely Beautiful Ideas! Thank you so much for sharing!