March 6, 2023
Cutting-Edge Ideas: Scrapbook Scissors Borders
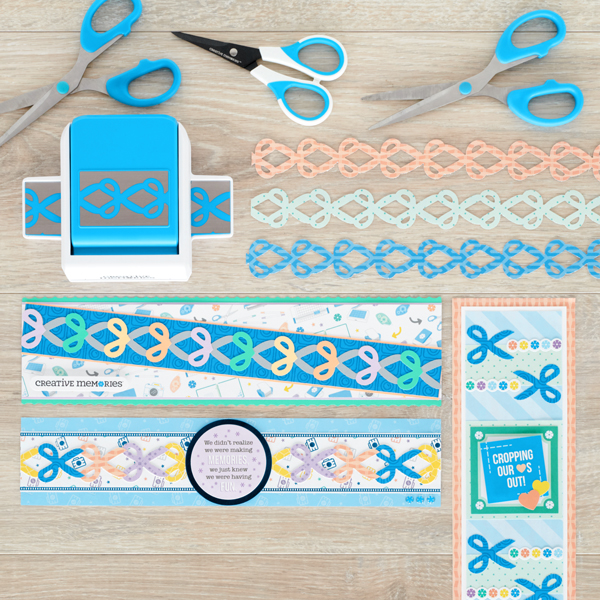
We know you have lots of work cut out for you when it comes to scrapbooking and crafting projects. And a good pair of sharp, precise scissors will make creating those layouts, borders, cards and more as smooth as butter. A good pair of scissors is a must-have for a scrapbooker! Speaking of scissors, the Scissors Border Punch is a cut above the rest — and for us scrapbookers, this punch is a perfect tool to document the crops, expos, Beginner Classes and more that go on in the creative scene! Take a look at these scrapbook scissors borders that truly make the cut!
To create these borders you will need:
- Scrap Happy 2 Paper Pack or (Shop Canada | Shop Australia)
- Scrap Happy 2 Foiled Accent Paper Pack or (Shop Canada | Shop Australia)
- Scrap Happy 2 Foiled Embellishments or (Shop Canada | Shop Australia)
- Scrap Happy 2 Stickers or (Shop Canada | Shop Australia)
- Scissors Border Punch or (Shop Canada | Shop Australia)
- Island Waters, Purple Ice, Tangerine, Canary, Platinum Shimmer & White Solid Cardstocks or (Shop Canada | Shop Australia)
- Custom Cutting System with Oval Patterns or (Shop Canada | Shop Australia)
- 12-inch Trimmer with Straight & Stamping Blades or (Shop Canada | Shop Australia)
- Micro-Tip Scissors or (Shop Canada | Shop Australia)
- Tape Runner or (Shop Canada | Shop Australia)
- Repositionable Tape Runner or (Shop Canada | Shop Australia)
- Foam Squares or (Shop Canada | Shop Australia)

Fun Memories Border

Step 1: Cut a 12″ x 2-1/2″ strip with light blue cameras accent paper for the base. Cut a 12″ x 1-3/4″ strip with filmstrip accent paper (making sure to capture two foiled filmstrip edges) and adhere on the base. Cut a 12″ x 7/16″ strip with multi-hued cameras accent paper and adhere on top.
Step 2: Using the Scissors Border Punch, punch a border with yellow pentagon designer paper. Adhere on the border. (Save the diamond pieces left behind for the “Oh, Happy Day Border.”) Punch borders with royal blue lenses accent paper and with orange and purple designer papers. Using Micro-Tip Scissors, cut apart several scissors and adhere on the yellow punched border as shown.
Step 3: Adhere a circle embellishment to the middle of the border. Top with a sticker title using Foam Squares for added dimension.
Oh, Happy Day Border
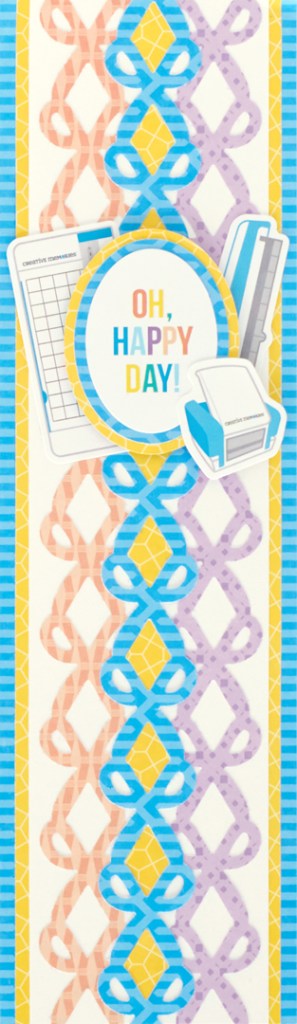
Step 1: Cut a 3-1/2″ x 12″ strip with blue zigzag designer paper for the base. Cut a 3″ x 12″ strip with yellow designer paper and adhere on the base. Cut a 2-3/4″ x 12″ strip with White Solid Cardstock and mount on top.
Step 2: Using the Scissors Border Punch, punch a border with blue zigzag designer paper, aligning the paper first at the black line on the front of the punch. Punch a border with each orange and purple designer papers, but align these at the edge of the punch arm to make the first punch (backtrack to punch the whole strip as necessary). Adhere the orange and purple borders side by side on the border. Adhere the blue border on top. Place the yellow diamond shapes (leftover from the “Fun Memories Border”) to the middles.
Step 3: Using the inside edge of the second-smallest Oval Custom Cutting System Pattern and the Red Blade, cut an oval with yellow designer paper. Using the Green Blade, cut a circle with blue zigzag designer paper. Layer the “Oh, happy day” sticker on top and mount on the border with Foam Squares, tucking tool stickers behind.
Fancy Scissors Border
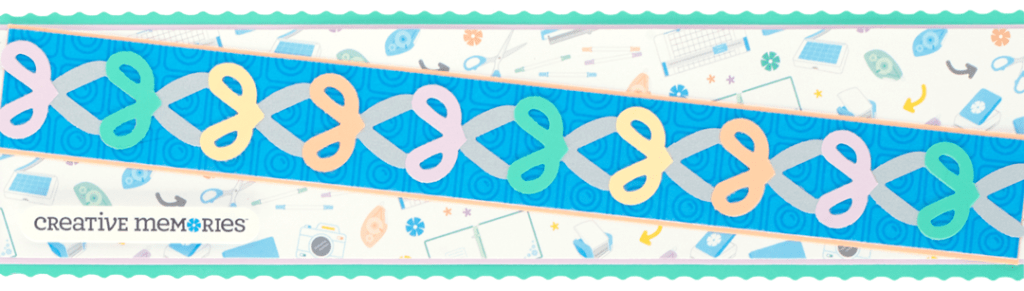
Step 1: Using the 12-inch Trimmer and the Stamping Blade, cut a 12″ x 3-1/8″ strip with Island Waters Solid Cardstock for the base. Using the 12-inch Trimmer and the Straight Blade, cut a 12″ x 2-3/4″ strip with Purple Ice Solid Cardstock and adhere on the base. Cut a 12″ x 2-5/8″ strip with CM tools designer paper and mount on top.
Step 2: Cut a 12″ x 1-1/2″ strip with Tangerine Solid Cardstock. Cut a 12” x 1-3/8” strip with royal blue lenses accent paper and adhere on top. Mount on the border at an angle as shown.
Step 3: Using the Scissors Border Punch, punch a border with Platinum Shimmer Solid Cardstock. Punch borders with Purple Ice, Island Waters, Canary and Tangerine Solid Cardstocks. Using Micro-Tip Scissors, trim out several scissor handles of each hues. Adhere to the platinum shimmer border, alternating hues as shown. Mount on the border.
Step 4: Add a sticker using Foam Squares for added dimension.
Cropping our Hearts Out Border
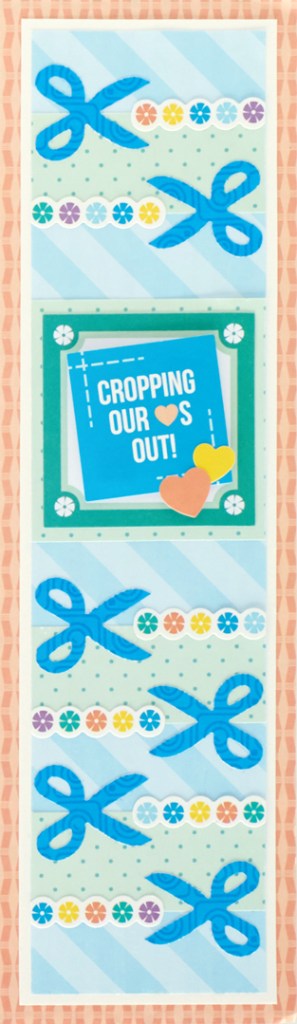
Step 1: Cut a 3-1/2″ x 12″ strip with orange designer paper for the base. Cut a 3″ x 11-1/2″ strip with White Solid Cardstock and adhere to the base. Cut a 2-3/4″ x 11-1/4″ strip with blue diagonal stripes designer paper and mount on top.
Step 2: Cut three 2-3/4″ x 1-1/8″ strips with green polka dots designer paper. Cut a 2-3/4″ x 2-3/4″ piece with green polka dots designer paper. Adhere all on the border as shown.
Step 3: Using the Scissors Border Punch, punch a border with royal blue lenses accent paper. Trim out six scissors using the Micro-Tip Scissors. Cut a shutter flower border sticker apart into five-flower sections. Adhere on the border along with the scissors, using the photo as a guide for placement.
Step 4: Adhere a square embellishment and stickers as shown.
What do you think of these scrapbook scissors borders?
P.S. Are YOU a member of the Virtual Crop Facebook Group? It’s your go-to place for MONTHLY Virtual Crops, MONTHLY Completed Album Challenges, WEEKLY LIVE STREAMING of Fast & Fun Projects with Noreen, LIVE QUARTERLY Secret Box Openings with project tutorials and so much more! We hope you’ll join our community of more than 30,000 fellow memory-keeping enthusiasts — you’ll feel right at home!

Such fun borders
Adorable
Papercrafters, card makers and people who sew use scissors too!
Cute!! Needed more ideas for these cute scissors! Thanks for sharing!
I love this! Is there a higher quality version of the first image?