March 23, 2023
Spice Up Your Project Spectrum: Tonal Scrapbook Borders And DIY Cards
There’s the old adage that “variety is the spice of life,” and that’s especially true of the hefty spectrum of hues in the world! From candy apple red to canary yellow, rich boysenberry and chartreuse, neutral tans and sleek white, you can always spice up your scrapbooking with the glorious pigments of personality and project possibilities out there. Want to get caught red-handed in some awesome tints and tones? Then take a peek at these tonal scrapbook borders and DIY cards from Creative Memories’ Product Development Coordinator Kris Rome!
Psst! Each of the projects Kris made integrated the Borders & Cards Recipe Template and How-Do-You-Do Warm & Cool Stickers — the exclusive gifts you can earn FREE during the spend/get promo (or while supplies last) going on now!
For more details, visit: US | CA | AU
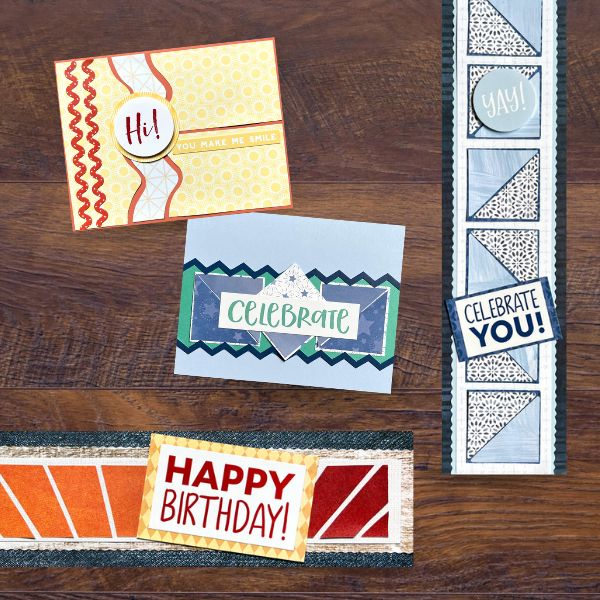
Happy Birthday Border

To create this border you will need:
- Borders & Cards Recipe Template & How-Do-You-Do Warm & Cool Stickers — exclusive gifts you can earn FREE during the spend/get promo through March 28 or while supplies last!
- Golden Harvest Tone-on-Tone Paper Pack or (Shop Canada | Shop Australia)
- 12-inch Trimmer with Straight & Scallop Blades or (Shop Canada | Shop Australia)
- Micro-Tip or All-Purpose Scissors or (Shop Canada | Shop Australia)
- Repositionable Tape Runner or (Shop Canada | Shop Australia)

Step 1: Using the 12-inch Trimmer, cut out three strips of paper. Cut the denim tonal paper to 3-1/4” x 12” — this will be the base of the border. Using the same paper (the reverse side is the lighter linen pattern), cut a 2” x 11-1/2” x strip. Using the 12-inch Trimmer and the Scallop Blade, cut the light-washed wood tonal paper to 2-1/2” x 12”.
Step 2: Using the Borders & Cards Recipe Template, place it on top of the red-orange ombré wash tonal paper and trace the shapes in the second border from the top. Cut out all pieces using either Micro-Tip Scissors or All-Purpose Scissors. Adhere these shapes to the linen paper strip using the Repositionable Tape Runner.
Step 3: Align and adhere the linen strip to the light-washed wood paper. Then align and adhere these to the denim border strip.
Step 4: Using the 12-inch Trimmer, cut out a frame from the gold harlequin tonal paper. Adhere the “Happy Birthday” sticker to this mat. Adhere to the border.
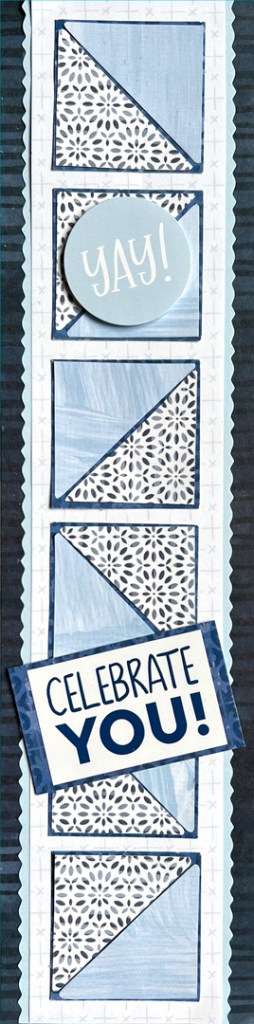
Celebrate You Border
To create this border you will need:
- Borders & Cards Recipe Template & How-Do-You-Do Warm & Cool Stickers — exclusive gifts you can earn FREE during the spend/get promo through March 28 or while supplies last!
- Cue the Blue Paper Pack or (Shop Canada | Shop Australia)
- Baby Blue Solid Cardstock or (Shop Canada | Shop Australia)
- 12-inch Trimmer with Straight & Deckle Blades or (Shop Canada | Shop Australia)
- Square Punch or (Shop Canada | Shop Australia)
- Micro-Tip or All-Purpose Scissors or (Shop Canada | Shop Australia)
- Repositionable Tape Runner or (Shop Canada | Shop Australia)
- Foam Squares or (Shop Canada | Shop Australia)
Step 1: Using the 12-inch Trimmer, cut out three border strips — the navy stripes at 3” x 12”, the white X-grid paper at 2-1/4” x 12” using the Straight Blade, and Baby Blue Solid Cardstock at 2-1/2” x 12 with the Deckle Blade.
Step 2: Using the Square Punch, punch out six squares from the blue ornate tiles paper.
Step 3: Place the Borders & Cards Recipe Template on the blue floral medallion paper and trace all 12 triangles on the top border on the template. Note: The light blue paintbrush stroke paper is the reverse side. Cut out all pieces using either Micro-Tip Scissors or All-Purpose Scissors. Adhere these triangles to the blue ornate tile squares punched out earlier with the Repositionable Tape Runner.
Step 4: Align and adhere the cardstock border to the navy stripes border base. Align and adhere the white X-grid border to the cardstock. Next, align and adhere the six squares you assembled from Step 3 to the white grid border.
Step 5: Using the 12-inch Trimmer, cut out a 1-1/2” x 2-1/2” mat and adhere the “Celebrate you!” sticker. Using a Foam Square, apply the “Yay!” sticker to the border.
You Make Me Smile Card

To create this card you will need:
- Borders & Cards Recipe Template, Rainbow Blank Card Kit & How-Do-You-Do Warm & Cool Stickers — exclusive gifts you can earn FREE during the spend/get promo through March 28 or while supplies last!
- Vivid Melodies Butterscotch Paper Pack or (Shop Canada | Shop Australia)
- Circle Punch or (Shop Canada | Shop Australia)
- Micro-Tip or All-Purpose Scissors or (Shop Canada | Shop Australia)
- Foam Squares or (Shop Canada | Shop Australia)
- Repositionable Tape Runner or (Shop Canada | Shop Australia)
Step 1: Use an orange card from the Rainbow Blank Card Kit for the base.
Step 2: Place the Borders & Cards Recipe Template on top of the smiling suns paper. Trace the bottom-left card layout on the template. Cut out using either Micro-Tip scissors or All-Purpose Scissors. Note: The reverse side of the smiling suns paper is the white-and-orange X-grid pattern.
Step 3: Arrange and adhere the three smiling suns pieces to the orange card base with Repositionable Tape Runner. Adhere the white-and-orange X-grid paper in the middle of the other three placed pieces.
Step 4: Using the Circle Punch, punch a circle out of the yellow lined ovals paper.
Step 5: Adhere the “Hi” circle sticker with a Foam Square to the punched circle paper. Adhere to the card.
Step 6: Adhere orange squiggle stickers and “You make me smile” sticker to the card.
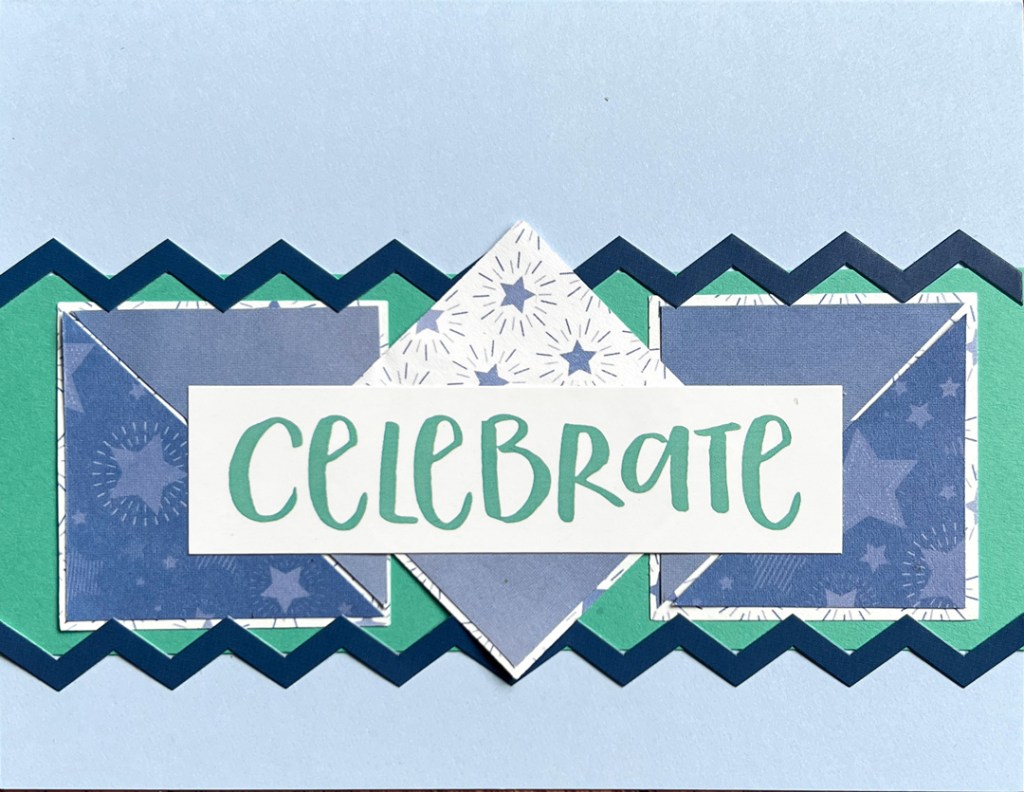
Celebrate Card
To create this card you will need:
- Borders & Cards Recipe Template, Rainbow Blank Card Kit & How-Do-You-Do Warm & Cool Stickers — exclusive gifts you can earn FREE during the spend/get promo through March 28 or while supplies last!
- Totally Tonal Baby Blue Paper Pack or (Shop Canada | Shop Australia)
- Island Waters Solid Cardstock or (Shop Canada | Shop Australia)
- 12-inch Trimmer or (Shop Canada | Shop Australia)
- Micro-Tip or All-Purpose Scissors or (Shop Canada | Shop Australia)
- Square Punch or (Shop Canada | Shop Australia)
- Repositionable Tape Runner or (Shop Canada | Shop Australia)
Step 1: Use the light blue card from the Rainbow Blank Card Kit for the base.
Step 2: Using the 12-inch Trimmer, cut Island Waters Solid Cardstock into a 2″ x 5-1/2” strip.
Step 3: Use the Square Punch to punch out three squares from the white stars paper for the background to layer the triangles on.
Step 4: Using the Borders & Cards Recipe Template, place it on top of the blue stars paper. Trace five triangles that make up the squares from the design at the top of the template, then cut out using either Micro-Tip Scissors or All-Purpose Scissors. Note: The reverse side of the blue stars paper is the blue ombré pattern.
Step 5: Adhere the triangles to the white star square pieces with Repositionable Tape Runner. Then adhere these to the card.
Step 6: Adhere the blue zigzag border stickers and the “Celebrate” sticker to the card.
What do you think of these dazzling, delightful and dynamic tonal scrapbook borders and DIY cards? Will you be piecing them together soon?
P.S. Are YOU a member of the Virtual Crop Facebook Group? It’s your go-to place for MONTHLY Virtual Crops, MONTHLY Completed Album Challenges, WEEKLY LIVE STREAMING of Fast & Fun Projects with Noreen, LIVE QUARTERLY Secret Box Openings with project tutorials and so much more! We hope you’ll join our community of more than 30,000 fellow memory-keeping enthusiasts — you’ll feel right at home!
