March 31, 2023
Be Full Of Whimsy And Warmth: These Spring Scrapbook Borders And Spring Card
When you think of a springtime palette, do you think of hues that are as bright, fresh and carefree as an early dewy morning? Picture soft pinks and corals, lovely yellows and budding greens, full of whimsy and warmth. Awaken your senses — and creativity — by piecing together these spring scrapbook borders and spring card, featuring the Painted Garden collection, for they will add a bouquets of happiness and harmony!
To create these borders and card you will need:
- Painted Garden Paper Pack or (Shop Canada | Shop Australia)
- Painted Garden Tone-on-Tone Paper Pack or (Shop Canada | Shop Australia)
- Painted Garden Embellishments or (Shop Canada | Shop Australia) — currently out of stock and will be returning in May
- Painted Garden Stickers or (Shop Canada | Shop Australia)
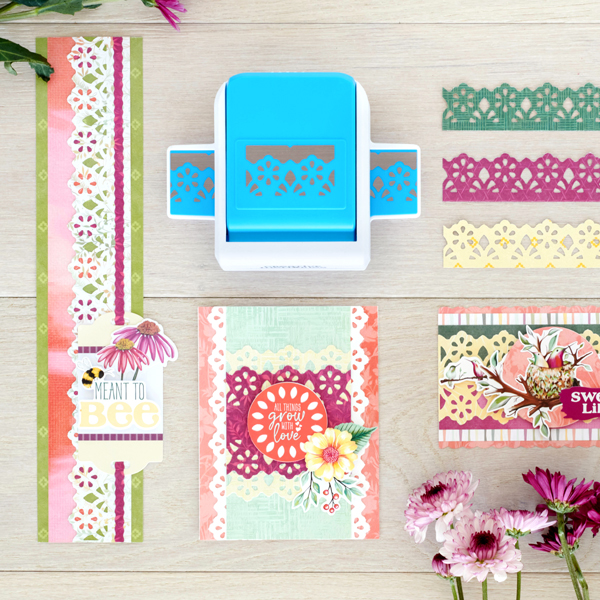
- Floral Peaks Border Punch or (Shop Canada | Shop Australia)
- Custom Cutting System with Circle Patterns or (Shop Canada | Shop Australia)
- 12-inch Trimmer with Straight, Scallop & Wave Blades or (Shop Canada | Shop Australia)
- Micro-Tip Scissors or (Shop Canada | Shop Australia)
- Tape Runner or (Shop Canada | Shop Australia)
- Repositionable Tape Runner or (Shop Canada | Shop Australia)
- Foam Squares or (Shop Canada | Shop Australia)

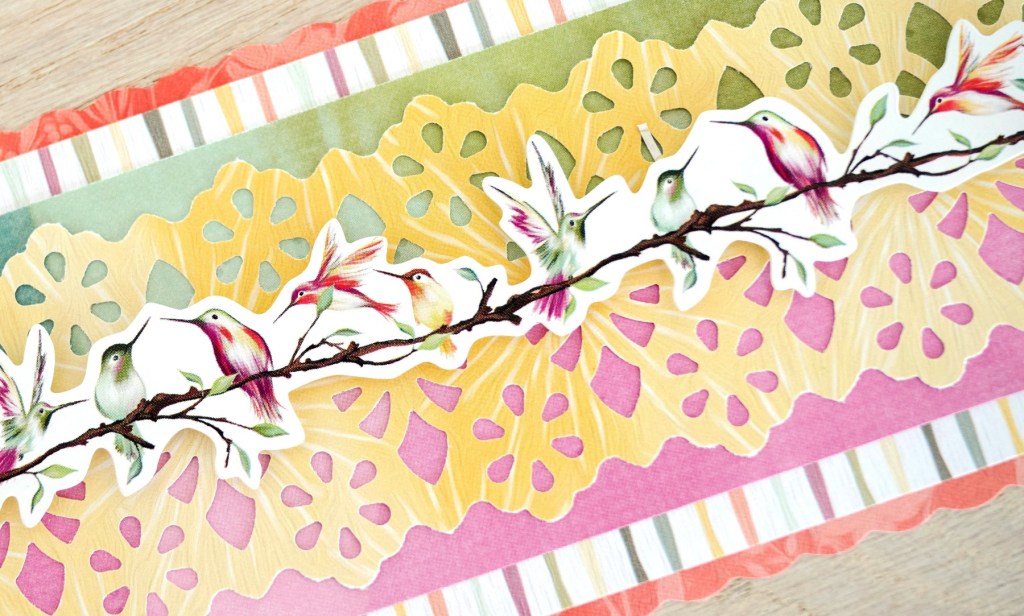
Sweet Life Border

Step 1: Using the 12-inch Trimmer and the Scallop Blade, cut a 12” x 3-1/4” strip with coral flowers and leaves designer paper for the base. Using the 12-inch Trimmer and the Straight Blade, cut a 12” x 3” strip with multi-hued stripes designer paper and adhere on the base. Cut a 12” x 1-1/4” strip with each green and violet wash tonal papers and adhere both on the multi stripes piece.
Step 2: Cut a 12” x 2-3/4” strip with golden yellow sunshine bursts designer paper. Punch both sides using the Floral Peaks Border Punch. Adhere on the border.
Step 3: Adhere a hummingbird border sticker to the middle of the border using Foam Squares. Using the inside edge of the medium Circle Custom Cutting System Pattern and the Red Blade, cut a circle with coral flowers and leaves designer paper. Adhere on the border using Foam Squares. Top with a nesting birds sticker. Adhere the “Sweet life” sticker using Foam Squares.
Meant To Bee Border

Step 1: Cut a 2-1/2” x 12” strip with olive green diamonds tonal paper for the base. Cut a 2” x 12” strip with coral wash tonal paper and adhere on the base.
Step 2: Using the Floral Peaks Border Punch, punch a border with ombré spring leaves designer paper. Trim to 1-1/2” x 12″. Cut several 1” squares with olive green diamonds tonal paper scraps. Cut them from corner to corner to create triangles. Adhere behind the “leafy” punch outs of the border. Using the inside of the smallest Circle Custom Cutting System Pattern and the Blue Blade, cut several circles with violet and coral paper scraps. Adhere behind the flower punch outs of the border, alternating hues. Adhere piece on the right side of the border.
Step 3: Using the 12-inch Trimmer and the Wave Blade, cut a 1/4″ strip with violet spring leaves designer paper. Thread through a tabbed embellishment and adhere on the border as shown.
Step 4: Add additional stickers and embellishments.
Hello, Spring Border

Step 1: Using the Floral Peaks Border Punch, punch a border with dark green blanket fabric tonal paper. Trim to 3-1/2” x 12” to create the base.
Step 2: Using the Floral Peaks Border Punch, punch a border with violet spring leaves designer paper, only this time align the edge of the paper at the “peak” of the flower instead of at the black line (turn it upside down to aid in placement). Trim to 1” x 12”.
Step 3: Using the Floral Peaks Border Punch, punch a border with coral flowers and leaves designer paper, aligning at the black line again. Trim to 2-3/4” x 12”. Adhere both violet and coral borders on the base, layering as shown.
Step 4: Cut a 1-3/4” x 12” strip with bold florals and leaves designer paper and adhere on the border. Adhere a leafy border sticker along the right seam.
Step 5: Add additional embellishments and stickers.
Love Card

Step 1: Create the card base. Cut an 8-1/2” x 5-1/2” piece of White Solid Cardstock. Using the 12-inch Trimmer and the Scoring Blade, score along the long edge at 4-1/4” and fold in half.
Step 2: Cut a 4-1/4” x 5-1/2” piece with coral flowers and leaves designer paper and adhere on the front of the card.
Step 3: Using the Floral Peaks Border punch, punch a border with White Solid Cardstock. Trim into two 1” x 5-1/2” pieces. Cut a 3” x 5-1/2” piece with mint blanket fabric tonal paper. Adhere the white borders behind it so only the lacy, floral scallops show. Adhere on the card.
Step 4: Cut a 3” x 4” piece with golden yellow blanket fabric tonal paper. Punch both 3” sides. Cut a 3” x 3-1/4” piece with violet spring leaves designer paper. Punch both 3” sides. Layer and adhere the pieces on the border.
Step 5: Using the inside edge of the medium Circle Custom Cutting System Pattern and the Blue Blade, cut a circle with White Solid Cardstock. Adhere the “All things grow with love” sticker on top. Mount on the card using Foam Squares.
Step 6: Adhere additional stickers.
What do you think of the pastel palette of these spring scrapbook borders and DIY spring card?
P.S. Are YOU a member of the Virtual Crop Facebook Group? It’s your go-to place for MONTHLY Virtual Crops, MONTHLY Completed Album Challenges, WEEKLY LIVE STREAMING of Fast & Fun Projects with Noreen, LIVE QUARTERLY Secret Box Openings with project tutorials and so much more! We hope you’ll join our community of more than 30,000 fellow memory-keeping enthusiasts — you’ll feel right at home!

I think these are my favorite borders! Thank you Kryslin!
beautiful borders!