April 17, 2023
Bug Out With These Promo Bundles: Spring Scrapbook Borders and DIY Cards

Ohh, goodness, we’re buggin’ out… there are two spring-tastic bundles waiting for you to swoop in and catch! For a limited time, you can get the Unbe-leaf-able Bundle and/or the Ladybugs Bundle FREE with qualifying orders! Each bundle contains two exclusive products you’ll love for creating fresh and verdant layouts of your spring and summer memories, from picnics to backyard BBQs, play dates in the park and visiting botanical gardens (or planting your own!). Buzzin’ and ready to go? Then check out these spring scrapbook borders and DIY cards using the promo items you can earn FREE for a limited time!
For more details, visit: US | CA | AU
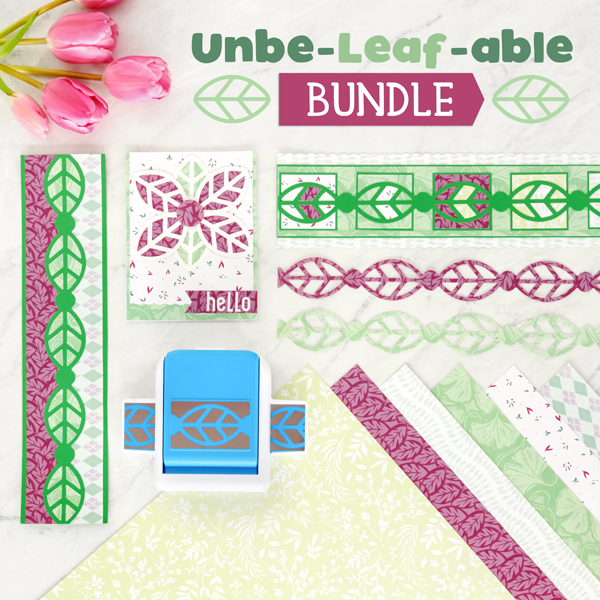

Check out the two options for gift bundles you can earn free above — the Unbe-leaf-able Bundle and the Ladybugs Bundle! AND for any quantity you earn, you can choose exactly which bundle(s) you would like to get FREE!
For more details, visit: US | CA | AU
To create the Unbe-leaf-able borders and card you will need:
- Unbe-leaf-able Bundle — Earn this bundle FREE during the current Spend/Get Promo!
- Unbe-leaf-able Paper Pack (6/pk)
- Unbe-leaf-able Border Punch
- White & Kelly Green Solid Cardstock or (Shop Canada | Shop Australia)
- Blank Card Kit or (Shop Canada | Shop Australia)
- White Sans Serif ABC/123 Letter Stickers or (Shop Canada | Shop Australia)
- 12-inch Trimmer or (Shop Canada | Shop Australia)
- Custom Cutting System with Circle & Oval Patterns or (Shop Canada | Shop Australia)
- Micro-Tip Scissors or (Shop Canada | Shop Australia)
- Repositionable Tape Runner or (Shop Canada | Shop Australia)
- Foam Squares or (Shop Canada | Shop Australia)

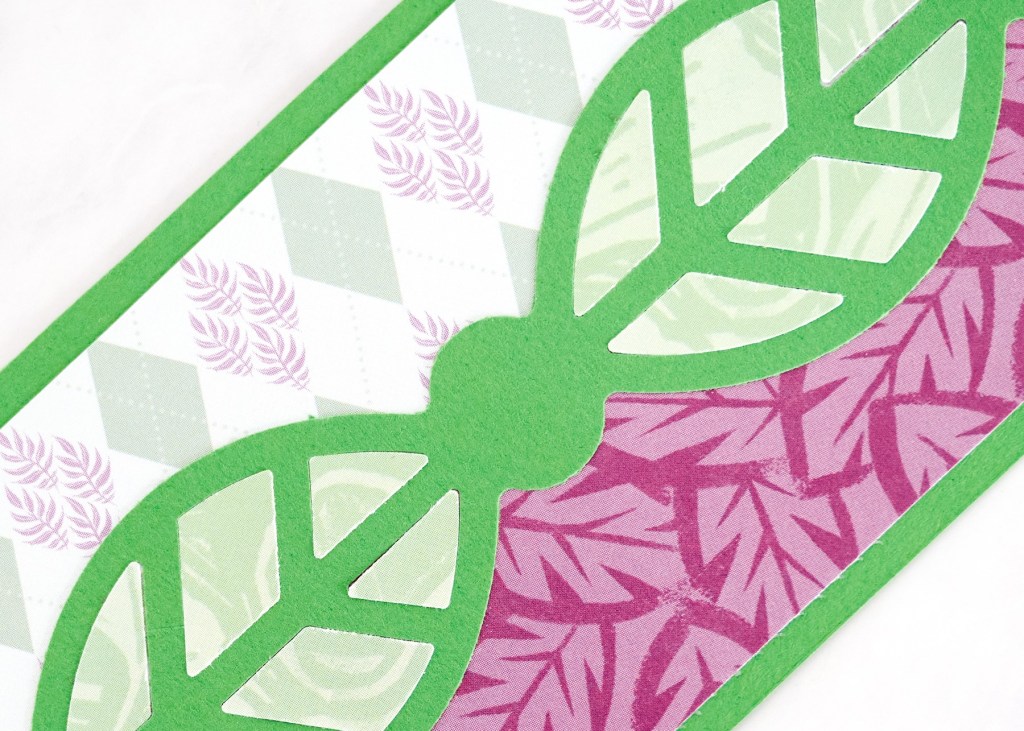
Unbe-leaf-able Border 1

Step 1: Cut Kelly Green Solid Cardstock to 2-3/4” x 12”.
Step 2: Cut argyle paper to 1-1/4” x 12”.
Step 3: Cut purple block-print tropical palm leaves paper to 1-1/4” x 12”.
Step 4: Adhere designer paper strips to the center of the Kelly green strip.
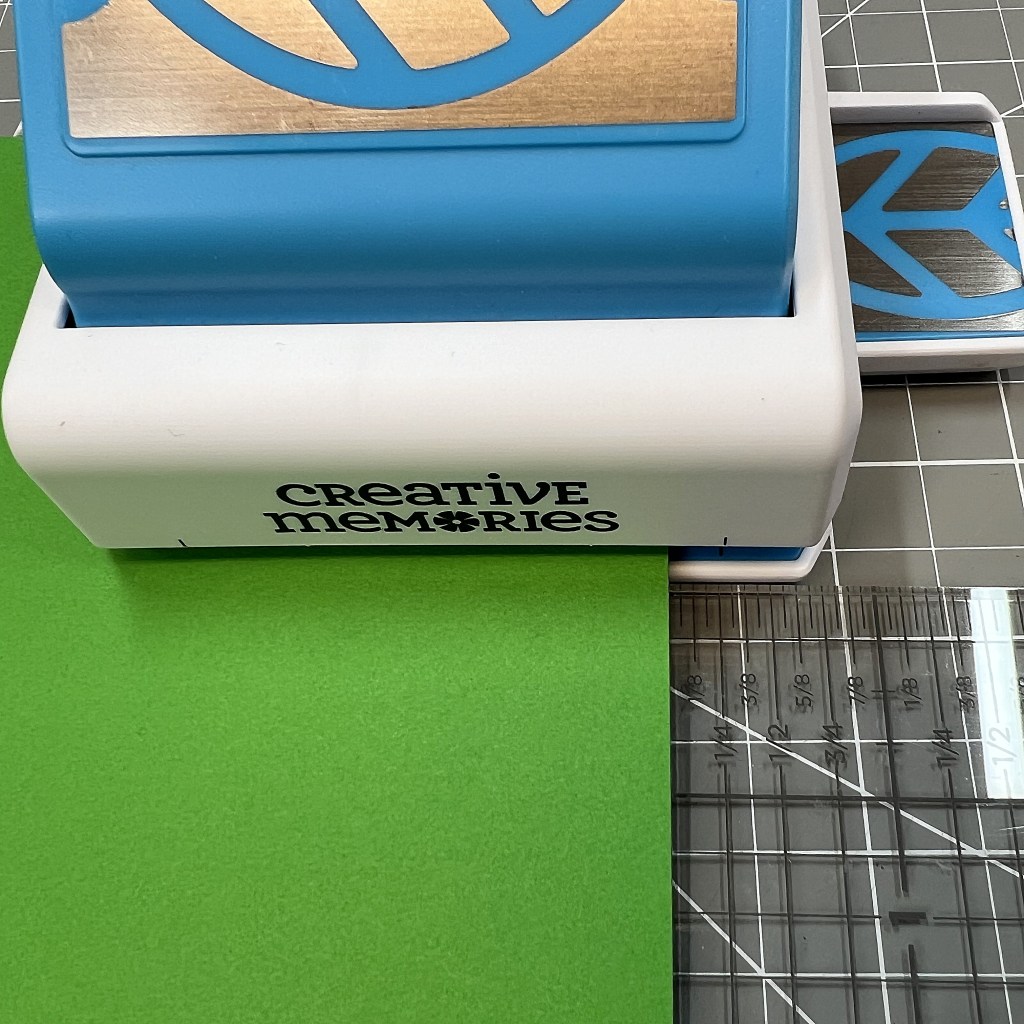
Step 5: Use the Unbe-leaf-able Border Punch to punch a border from Kelly Green Solid Cardstock. (To get a symmetrical border, line up the top edge of the cardstock 1/4” from one of the black lines on the front of the punch toward the middle of the punch and start punching. See photo.)
Step 6: Adhere the punched border to the middle of the border.
Step 7: Use the Unbe-leaf-able Border Punch to punch a border from the gingko leaf paper.
Step 8: Use the Repositionable Tape Runner to adhere the gingko leaf punch debris pieces into the spaces of the cardstock border.
Unbe-leaf-able Border 2

Step 1: Cut white wavy vines paper to 3” x 12” using the 12-inch Trimmer with the Scallop Blade.
Step 2: Cut Kelly Green Solid Cardstock to 2-3/8” x 12”.
Step 3: Cut gingko paper to 2-1/4” x 12”.
Step 4: Layer and adhere the strips to create a border.
Step 5: Cut Kelly Green Solid Cardstock into (5) 1-7/8” x 1-7/8” squares. Cut (5) 1-3/4” x 1-3/4” squares from a variety of papers.
Step 6: Use the Unbe-leaf-able Border Punch to punch a border from Kelly Green Solid Cardstock. (To get a symmetrical border, line up the top edge of the cardstock 1/4” from one of the black lines on the front of the punch toward the middle of the punch and start punching.)
Step 7: Adhere the square pieces behind the leaf border as shown. Adhere piece to the border.
Step 8: Use the Unbe-leaf-able Border Punch to punch a variety of papers. Use the Repositionable Tape Runner to adhere the punch debris pieces into the spaces of the leaf border as shown.
Unbe-leaf-able Card

Step 1: Cut gingko paper to 4-1/4” x 5-1/2”. Adhere to a blank card base.
Step 2: Cut white little leaves and florals paper to 4” x 4-7/8”. Cut the bottom edge using the 12-inch Trimmer with the Scallop Blade. Adhere to the card.
Step 3: Use the Unbe-leaf-able Border Punch to punch two borders from White Solid Cardstock. Use Micro-Tip Scissors to cut apart the borders into two segments of two leaves and two individual leaves.

Step 4: Using the inside edge of the second-smallest Oval Custom Cutting System Pattern and the Red Blade, cut ovals from purple block-print tropical palm leaves and gingko papers.
Step 5: Adhere the ovals behind the border pieces. Trim with Micro-Tip Scissors if needed.
Step 6: Adhere the border pieces into a flower pattern onto the card.
Step 7: Using the inside edge of the smallest Circle Cutting Pattern and Blue Blade, cut a circle from purple block-print tropical palm leaves paper. Adhere to the middle of the flower with a Foam Square.
Step 8: Cut a small tag piece from purple block-print tropical palm leaves paper and adhere to the card as shown.
Step 9: Add a title with White Sans Serif ABC/123 Letter Stickers.
To create the Ladybugs borders and card you will need:
- Ladybugs Bundle — Earn this bundle FREE during the current Spend/Get promo!
- Ladybugs Paper Pack (6/pk)
- Ladybugs Trio Punch
- Kelly Green, Red & Black Solid Cardstock or (Shop Canada | Shop Australia)
- Blank Card Kit or (Shop Canada | Shop Australia)
- Black Sans Serif ABC/123 Letter Stickers or (Shop Canada | Shop Australia)
- 12-inch Trimmer with Straight & Scallop Blades or (Shop Canada | Shop Australia)
- 12-inch Decorative Trimmer or (Shop Canada | Shop Australia)
- Micro-Tip Scissors or (Shop Canada | Shop Australia)
- Custom Cutting System with Gemstone Patterns or (Shop Canada | Shop Australia)
- Repositionable Tape Runner or (Shop Canada | Shop Australia)
- Foam Squares or (Shop Canada | Shop Australia)
- Black Dual-Tip Pen or (Shop Canada | Shop Australia)
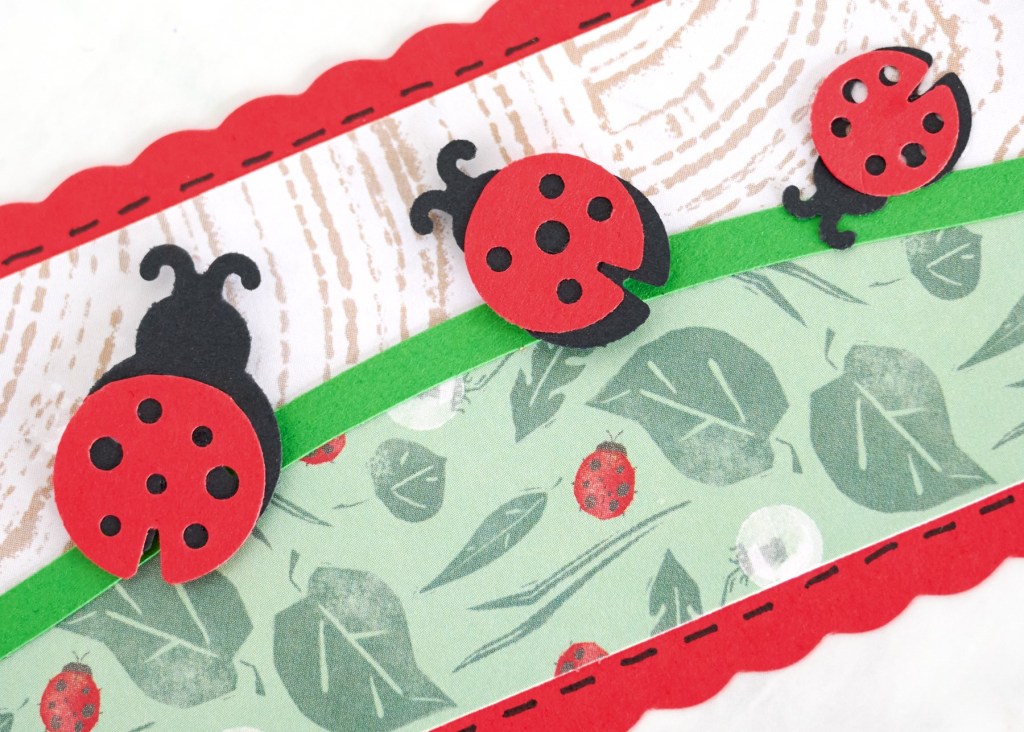
Ladybugs Border 1
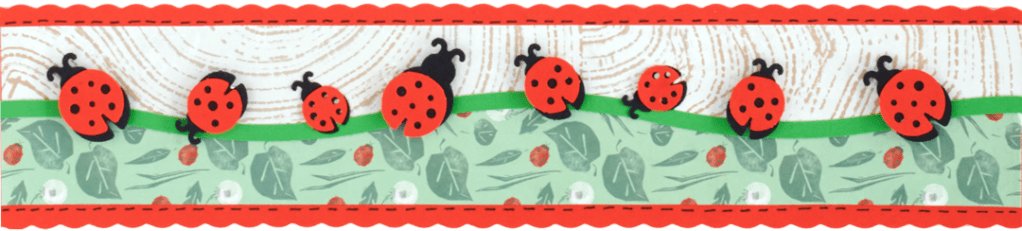
Step 1: Cut Red Solid Cardstock to 2-5/8” x 12” using the 12-inch Trimmer with Scallop Blade.
Step 2: Cut woodgrain paper to 1” x 12”.
Step 3: Cut dandelions and ladybugs paper to 1” x 12” using the 12-inch Decorative Trimmer on the swell side on one side.
Step 4: Align and adhere the designer paper strips to the cardstock piece.
Step 5: Cut Kelly Green Solid Cardstock to 1/4” x 12” using the 12-inch Decorative Trimmer on the swell side.
Step 6: Adhere the green swell strip to the middle of the border, covering the swell side of the dandelions and ladybugs leaf paper.
Step 7: Use the Ladybugs Trio Punch to punch ladybugs from Red and Black Solid Cardstocks.
Step 8: Use Micro-Tip Scissors to cut off the heads of the red ladybugs. Adhere the red bodies onto the black ladybugs with Repositionable Tape Runner.
Step 9: Adhere layered ladybugs to the Kelly green cardstock strip using Foam Squares.
Step 10: Use the Black Dual-Tip Pen to add pen stitching as shown.
Ladybugs Border 2
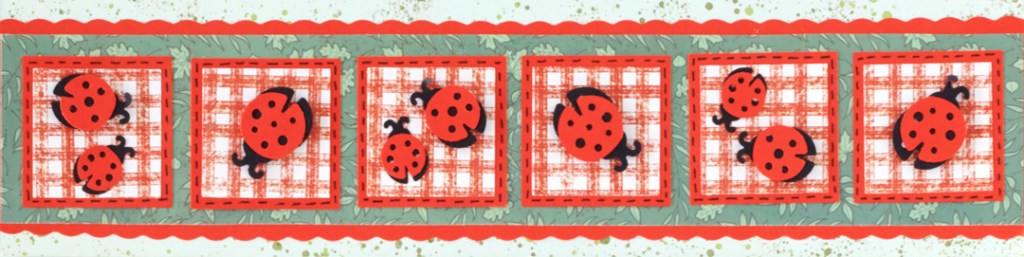
Step 1: Cut splattered speckles paper to 3” x 12”.
Step 2: Cut Red Solid Cardstock to 2-1/2” x 12” using the 12-inch Trimmer with the Scallop Blade. Adhere to the splattered speckles strip.
Step 3: Cut mixed tree leaves paper to 2-1/4” x 12” and adhere to the cardstock strip.
Step 4: Cut (6) 1-3/4” x 1-3/4” squares from Red Solid Cardstock. Cut (6) 1-1/2” x 1-1/2” squares from red gingham paper.
Step 5: Layer and adhere square pieces to the border.
Step 6: Use the Ladybugs Trio Punch to punch ladybugs from Red and Black Solid Cardstocks.
Step 7: Use Micro-Tip Scissors to cut off the heads of the red ladybugs. Adhere the red bodies onto the black ladybugs with Repositionable Tape Runner.
Step 8: Use Foam Squares to adhere the layered ladybugs to the gingham squares.
Step 9: Use the Black Dual-Tip Pen to add pen stitching as shown.
Ladybugs Card

Step 1: Cut dandelions and ladybugs paper to 5-1/2” x 4-1/4”. Adhere to a blank card base.
Step 2: Using the outside edge of the smallest heart from the Gemstones Custom Cutting System Pattern and the Red Blade, cut a heart from the red stripe painterly ladybug paper. Use the Green Blade on the outside edge to cut a heart from Black Solid Cardstock.
Step 3: Layer and adhere the heart pieces to the card.
Step 4: Use the Ladybugs Trio Punch to punch ladybugs from Red and Black Solid Cardstocks.
Step 5: Use Micro-Tip Scissors to cut off the heads of the red ladybugs. Adhere the red bodies onto the black ladybugs with Repositionable Tape Runner.
Step 6: Adhere the ladybugs to the card using Foam Squares.
Step 7: Add title using Black Sans Serif ABC/123 Letter Stickers.
Which of these spring scrapbook borders have you itching for springtime memories? Will you be making the DIY cards, too?
P.S. Are YOU a member of the Virtual Crop Facebook Group? It’s your go-to place for MONTHLY Virtual Crops, MONTHLY Completed Album Challenges, WEEKLY LIVE STREAMING of Fast & Fun Projects with Noreen, LIVE QUARTERLY Secret Box Openings with project tutorials and so much more! We hope you’ll join our community of more than 31,000 fellow memory-keeping enthusiasts — you’ll feel right at home!

Love these borders.
Will we be able to purchase the paper packs separately in the future? The punches and layouts are AMAZING!
They pretty much never offer incentive bundles separately. Better to get them now!