April 18, 2023
Find Your Path: Camp Scrapbook Borders With The Trail Sign Punch
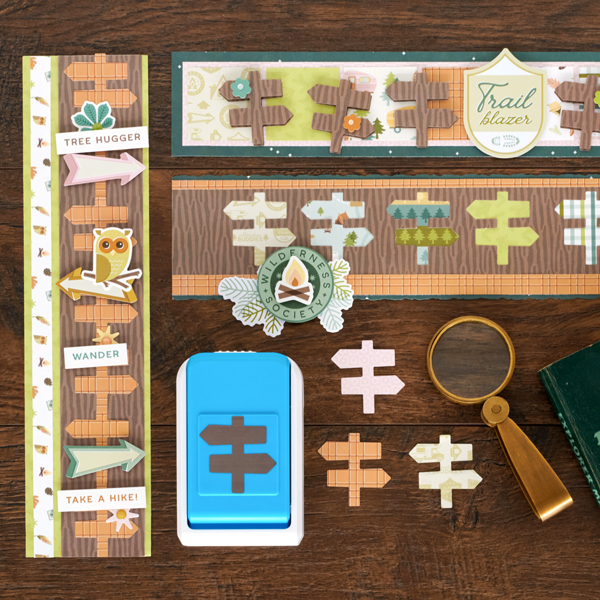
We’re mapping out a good time, for today’s blog features the Trail Sign Punch (available for purchase through April 28 at noon CT (AU: 28 April at midnight AET), however, the punch is expected later this summer (AU: winter) for you to find directions on how to piece these camp scrapbook borders together with ease! Point your creative compass toward these adventures now!
To create these borders you will need:
- Set Up Camp Paper Pack or (Shop Canada | Shop Australia)
- Set Up Camp Stickers or (Shop Canada | Shop Australia)
- Set Up Camp Embellishments or (Shop Canada | Shop Australia)
- Trail Sign Punch (Reserve Now – Expected Summer 2023) or (Shop Canada | Shop Australia) — Available for purchase through April 28 at noon CT (AU: 28 April at midnight AET), however, the punch is expected later this summer (AU: winter). Reserve yours now.
- 12-inch Trimmer with Straight & Deckle Blades or (Shop Canada | Shop Australia)
- Tape Runner or (Shop Canada | Shop Australia)
- Repositionable Tape Runner or (Shop Canada | Shop Australia)
- Foam Squares or (Shop Canada | Shop Australia)
- CM Zero-Centering Ruler or (Shop Canada | Shop Australia)
- Pencil/eraser

Wilderness Society Border

Step 1: Using the 12-inch Trimmer and Deckle Blade, cut a piece of dark green night sky paper to measure 12” x 3”.
Step 2: Cut a piece to measure 12” x 2-3/4” from the rust plaid paper. Adhere to the border.
Step 3: Cut a piece of wood bark paper to measure 12” x 2”. Use a ruler and make a pencil mark at 2”, 4”, 6”, 8” and 10” along the bottom edge. Then insert into the Trail Sign Punch, with the pencil mark aligned (to the middle) on the front of the punch. Punch. Repeat on the rest of the pencil markings.
Step 4: Cut five pieces from various papers to measure 2” x 2”. Adhere on the back side of the wood bark paper to cover the openings of the trail signs.
Step 5: Adhere wood bark border piece to the top of the border.
Step 6: Adhere stickers, using Foam Squares for added dimension.
Trailblazer Border
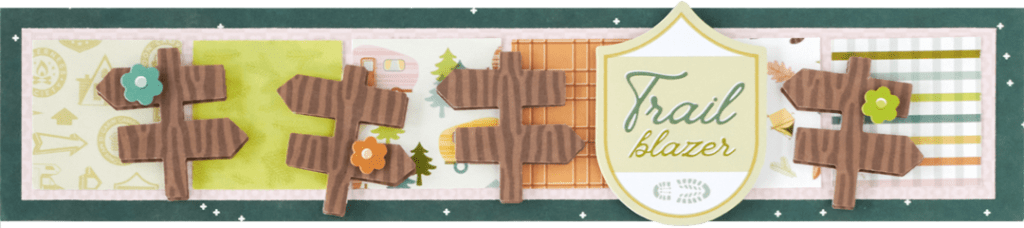
Step 1: Cut a piece to measure 12” x 2-1/2” from the dark green night sky paper. Use this as the base for the border.
Step 2: Cut a piece from the pink flower checkers paper to measure 11-1/2” x 2”. Adhere to the border.
Step 3: Using the Square Punch, punch six squares from a variety of papers. Adhere to the pink paper.
Step 4: Using the Trail Sign Punch, punch eight pieces using the wood bark paper. Adhere four of the pieces at angles in between each square. Adhere four of the punched pieces over the top of the previous four using Foam Squares for dimension. This will allow some shadowing.
Step 5: Adhere the embellishment title to the border using Foam Squares.
Tree Hugger Border

Step 1: Cut a piece of pine needles paper to measure 3” x 12”.
Step 2: Cut a piece of wood bark paper to measure 2” x 12”. Adhere along the right side of the border.
Step 3: Cut a piece of camping icons paper to measure 1/2” x 12”. Adhere along the left side of the border.
Step 4: Using the Trail Sign Punch, punch seven pieces from the rust plaid paper. Adhere the pieces vertically on top of each other.
Step 5: Adhere arrow stickers/embellishments, using Foam Squares on some for added dimension.
What are your thoughts on these camp scrapbook borders featuring the Trail Sign Punch?
P.S. Are YOU a member of the Virtual Crop Facebook Group? It’s your go-to place for MONTHLY Virtual Crops, MONTHLY Completed Album Challenges, WEEKLY LIVE STREAMING of Fast & Fun Projects with Noreen, LIVE QUARTERLY Secret Box Openings with project tutorials and so much more! We hope you’ll join our community of more than 31,000 fellow memory-keeping enthusiasts — you’ll feel right at home!

This is really cool. Is there anyway to get this as a PDF please?
Hi there! We’re so happy to hear that you’re loving these borders! To get a PDF of the instructions, you’ll want to go onto your computer and scroll down to the bottom of this blog post and click the “Print” button right above the comment section. This will pop open another tab where you will have an option to “Save as PDF”. Hope this helps!
Any updates on when this punch will arrive? We ordered in the spring but have not gotten updates. Thank you!