April 26, 2023
Plow Through Possibilities With These Farm Scrapbook Borders Featuring The Tractor Punch
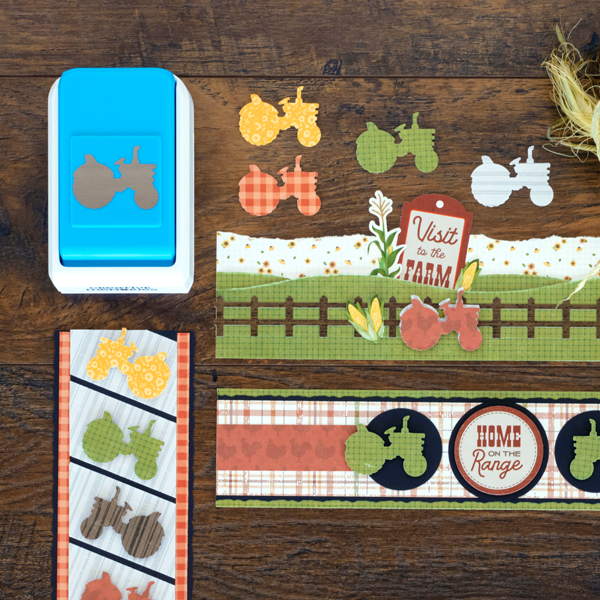
Ready for a wheel-y good time? Today’s blog features the Tractor Punch (available for purchase through April 28 at noon CT (AU: 28 April at midnight AET — however, the punch is expected later this summer (AU: winter)) for you to take a ride down memory lane. Want to cultivate some creativity? Then make way for these farm scrapbook borders!
- On the Farm Paper Pack — out of stock
- On the Farm Stickers or (Shop Canada | Shop Australia)
- Tractor Punch (Reserve Now – Expected Summer 2023) or (Shop Canada | Shop Australia) — Available for purchase through April 28 at noon CT (AU: 28 April at midnight AET), however, the punch is expected later this summer (AU: winter). Reserve yours now.
- Black Solid Cardstock or (Shop Canada | Shop Australia)
- 12-inch Trimmer with Straight & Deckle Blades or (Shop Canada | Shop Australia)
- Custom Cutting System with Circle Patterns or (Shop Canada | Shop Australia)
- Circle Punch or (Shop Canada | Shop Australia)
- Tape Runner or (Shop Canada | Shop Australia)
- Repositionable Tape Runner or (Shop Canada | Shop Australia)
- Foam Squares or (Shop Canada | Shop Australia)

Home On The Range Border
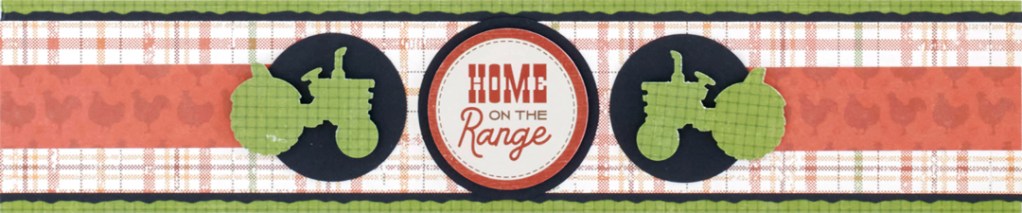
Step 1: Cut a piece from the green grid paper to measure 12” x 2-1/2”. Use this as the base of the border.
Step 2: Cut a piece from Black Solid Cardstock to measure 12” x 2-1/4”, using the 12-inch Trimmer and Deckle Blade on the long edges. Adhere to the border.
Step 3: Cut a piece of plaid paper to measure 12” x 2”. Adhere to the border.
Step 4: Cut two pieces from brick red fowls paper to measure 3-1/2” x 1”. Adhere from each of the ends of the border.
Step 5: Using the Circle Punch, punch two circles from Black Solid Cardstock. Adhere along the ends of the brick red fowls strips.
Step 6: Using the inside edge of the medium Custom Cutting System Circle Pattern with the Green Blade, cut a circle from Black Solid Cardstock. Adhere to the middle of the previous circles.
Step 7: Punch two tractors with the Tractor Punch from green grid paper. Adhere along the top of the smaller black circles.
Step 8: Adhere the circle sticker to the larger circle using Foam Squares.
Visit The Farm Border
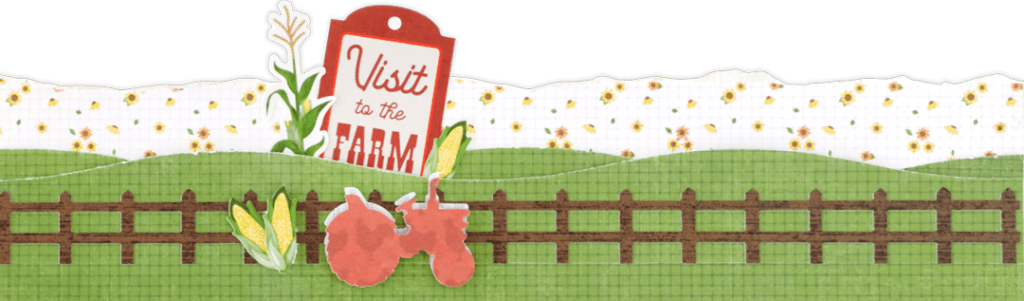
Step 1: Cut a piece from the mini sunflowers paper to measure 12” x 3”. Tear the top edge of the paper.
Step 2: Cut two pieces from green grid paper using the 12-inch Decorative Trimmer that measures 12” x 1-3/4”. Layer these two pieces on top of the mini sunflowers paper.
Step 3: Adhere the fence border sticker along the top of the green grid paper.
Step 4: Punch two tractors using the Tractor Punch, from brick red fowls and white chicken wire paper. Adhere the brick red tractor slightly offset on top of the white one with Foam Squares. Adhere to the border.
Step 5: Adhere stickers.
Tractor Border

Step 1: Cut a piece of Black Solid Cardstock to measure 3” x 12” using the 12-inch Trimmer and Deckle Blade on the long edges.
Step 2: Cut a piece of red gingham paper to measure 2-3/4” x 12”. Adhere to the border.
Step 3: Cut a piece of Black Solid Cardstock to measure 2-1/4” x 12”.
Step 4: Cut eight strips from the white striped paper to measure 3” x 1-1/2”. Adhere angled along the top of the cardstock. Cut any excess off of the edges using some scissors.
Step 5: Using the Tractor Punch, punch 8 tractors from different colors of paper. Adhere them to the border rotating the direction of the tractor using Foam Squares.
Will you be making these farm scrapbook borders using the Tractor Punch?
P.S. Are YOU a member of the Virtual Crop Facebook Group? It’s your go-to place for MONTHLY Virtual Crops, MONTHLY Completed Album Challenges, WEEKLY LIVE STREAMING of Fast & Fun Projects with Noreen, LIVE QUARTERLY Secret Box Openings with project tutorials and so much more! We hope you’ll join our community of more than 32,000 fellow memory-keeping enthusiasts — you’ll feel right at home!
