May 4, 2023
Embellishments Buffet: Easy-Peasy Scrapbook Borders and DIY Cards
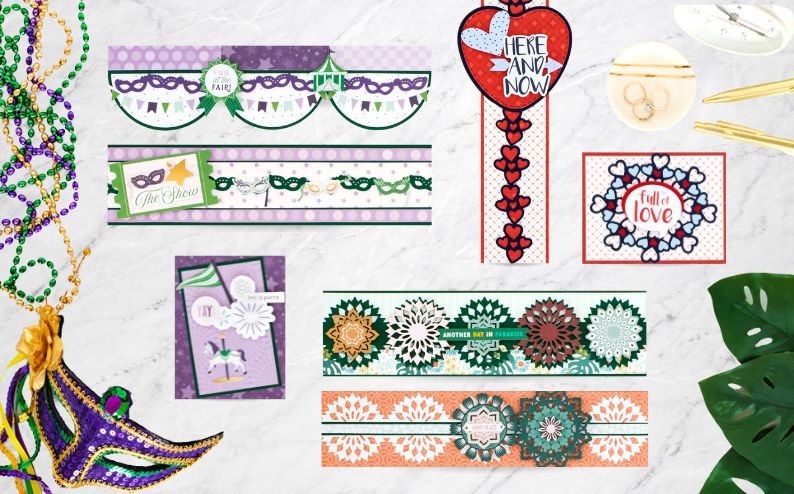
Wowee! Talk about a hot promo! Several of the limited-edition embellishments packs from the Embellishments Promo have sold through, however, quantities still remain of the Boho Mandala, Lots of Love and Carnival Fun Embellishments… which is perfect, because today’s blog is all about those three!
As a reminder: For a limited time, you can purchase limited-edition embellishments packs AND have the opportunity to earn exclusive Vivid Melodies Heart Sticker Packs and Mauve & Violet Metallic Dot Tip Pens FREE! PLUS, when you purchase 6+ limited-edition embellishments packs, you’ll enjoy the freebies as the perfect complement to your layouts and projects of any theme. Ready for another edition (to part one earlier this week)? Then let these scrapbook borders and DIY cards inspire and invigorate you!
For more details, visit: US | CA | AU

To create the Boho Mandala borders you will need:
- Boho Mandala Laser Cut Embellishments or (Shop Canada | Shop Australia) — limited-edition embellishments pack that qualifies for the Embellishments Buffet
- Mandala Burst Border Punch or (Shop Canada | Shop Australia)
- Tropic Time Paper Pack or (Shop Canada | Shop Australia)
- Tropic Time Stickers or (Shop Canada | Shop Australia)
- Navy, Dark Green & White Solid Cardstocks or (Shop Canada | Shop Australia)
- 12-inch Trimmer or (Shop Canada | Shop Australia)
- Repositionable Tape Runner or (Shop Canada | Shop Australia)
- Foam Squares or (Shop Canada | Shop Australia)
Vacay Border
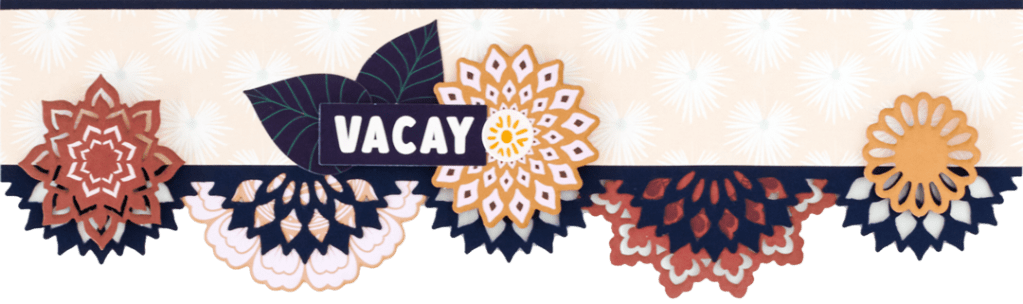
Step 1: Use the Mandala Burst Border Punch to punch an edge of Navy Solid Cardstock. Cut off of the cardstock at 3”.
Step 2: Cut coral tropical palm leaves designer paper to 12” x 1-3/4”. Adhere to the navy border.
Step 3: Cut two large mandala embellishments in half and adhere behind the border as shown.
Step 4: Adhere mandala embellishments to the top of the border as shown.
Step 5: Add stickers using Foam Squares for the title.
Happy Place Border
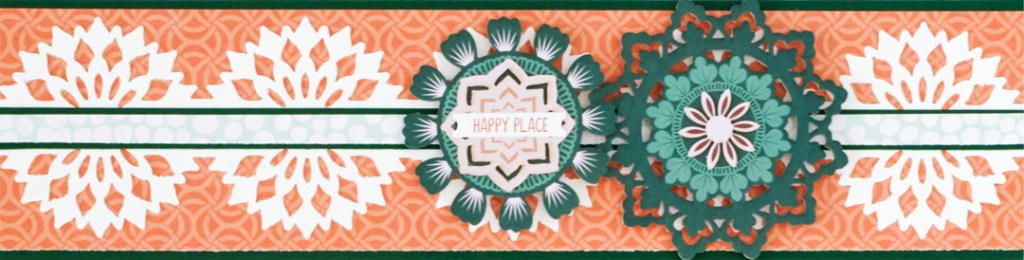
Step 1: Cut Dark Green Solid Cardstock to 12” x 3”.
Step 2: Cut tangerine geometric weave designer paper to 12” x 2-3/4” and adhere to the dark green strip.
Step 3: Use the Mandala Burst Border Punch to punch an edge of White Solid Cardstock. Cut off of the cardstock at 2-3/4”. Punch the other side of the border. (Use a sticky note to create a handle on the top edge of the border. Line up the sticky note with the black line on the punch and punch the second side.) Adhere the piece to the middle of the border.
Step 4: Cut a 12” x 1/4” strip from Dark Green Solid Cardstock. Cut a 12” x 3/8” strip from mint dots designer paper and adhere to the dark green strip. Adhere the layered strip to the middle of the border.
Step 5: Adhere mandala embellishments with Foam Squares.
Step 6: Add a title sticker.
Another Day In Paradise Border
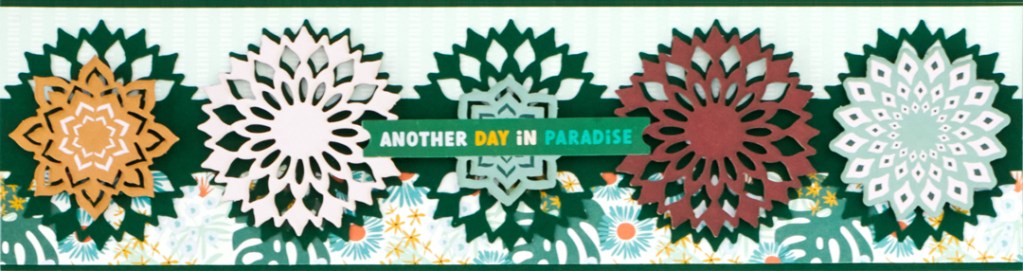
Step 1: Cut Dark Green Solid Cardstock to 12” x 3-1/4”.
Step 2: Cut 12” x 1-1/2” strips from mint dots designer paper and tropical garden paper. Adhere to the dark green strip.
Step 3: Use the Mandala Burst Border Punch to punch an edge of Dark Green Solid Cardstock. Cut off of the cardstock at 3”. Punch the other side of the border. (Use a sticky note to create a handle on the top edge of the border. Line up the sticky note with the black line on the punch and punch the second side.) Adhere the piece to the middle of the border.
Step 4: Adhere mandala embellishments with Foam Squares.
Step 5: Add a title sticker.
To create the Lots of Love borders and card you will need:
- Lots of Love Embellishments or (Shop Canada | Shop Australia) — limited-edition embellishments pack that qualifies for the Embellishments Buffet
- Full of Love Punch or (Shop Canada | Shop Australia)
- Totally Tonal Red Paper Pack (Shop Canada | Shop Australia)
- Navy, Baby Blue & Cranberry Solid Cardstocks or (Shop Canada | Shop Australia)
- Blank Card Kit or (Shop Canada | Shop Australia)
- 12-inch Trimmer with Straight & Scallop Blades or (Shop Canada | Shop Australia)
- Micro-Tip Scissors (Shop Canada | Shop Australia)
- Custom Cutting System with Oval & Gemstone Patterns or (Shop Canada | Shop Australia)
- Repositionable Tape Runner or (Shop Canada | Shop Australia)
- Precision Point Adhesive Pen or (Shop Canada | Shop Australia)
- Foam Squares or (Shop Canada | Shop Australia)
- Navy Dual-Tip Pen or (Shop Canada | Shop Australia)
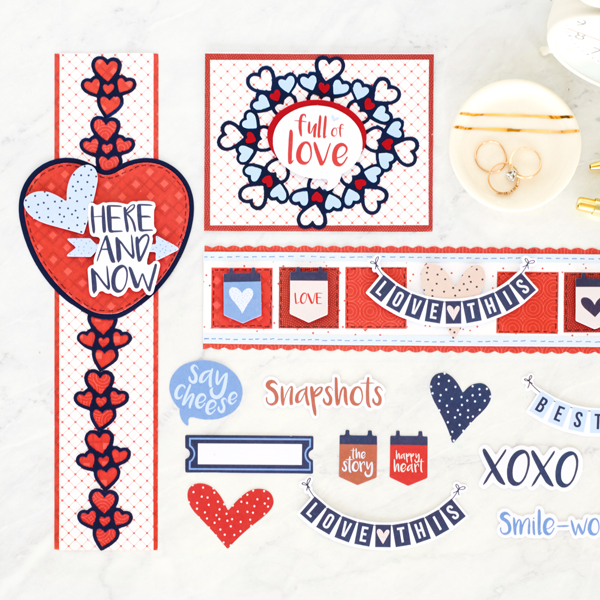
Here And Now Border

Step 1: Cut plaid paper to 2-1/2” x 12”.
Step 2: Cut white crosshatch paper to 2-1/4” x 12” and adhere to the previous strip.
Step 3: Use the Full of Love Punch to punch six pieces from Navy Solid Cardstock. Adhere the pieces to circle tiles paper. Use Micro-Tip Scissors to cut around the pieces. Adhere the pieces down the middle of the border as shown.
Step 4: Using the outside edge of the small heart Gemstone Custom Cutting System Pattern and the Green Blade, cut a heart from Navy Solid Cardstock. Use the Red Blade on the outside edge to cut a heart from plaid paper and adhere to the navy heart. Adhere the heart to the border as shown.
Step 5: Add embellishments with Foam Squares.
Step 6: Use the Navy Dual-Tip Pen to add faux stitching to the heart.
Love This Border
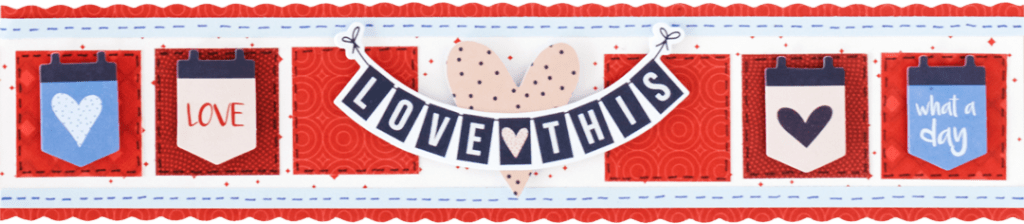
Step 1: Use the 12-inch Trimmer with the Scallop Blade to cut dotted scallops paper to 12” x 2-1/2”.
Step 2: Cut white diamonds paper to 12” x 2-1/4” and adhere to the previous strip.
Step 3: Cut two 12” x 1/4” strips from Baby Blue Solid Cardstock. Adhere the strips to the top and bottom of the white diamonds strip.
Step 4: Cut six 1-1/2” x 1-1/2” squares from three different papers. Adhere as shown to the border.
Step 5: Adhere the embellishment pieces to the border using Foam Squares.
Step 6: Use the Navy Dual-Tip Pen to add faux stitching as shown.
Full Of Love Card
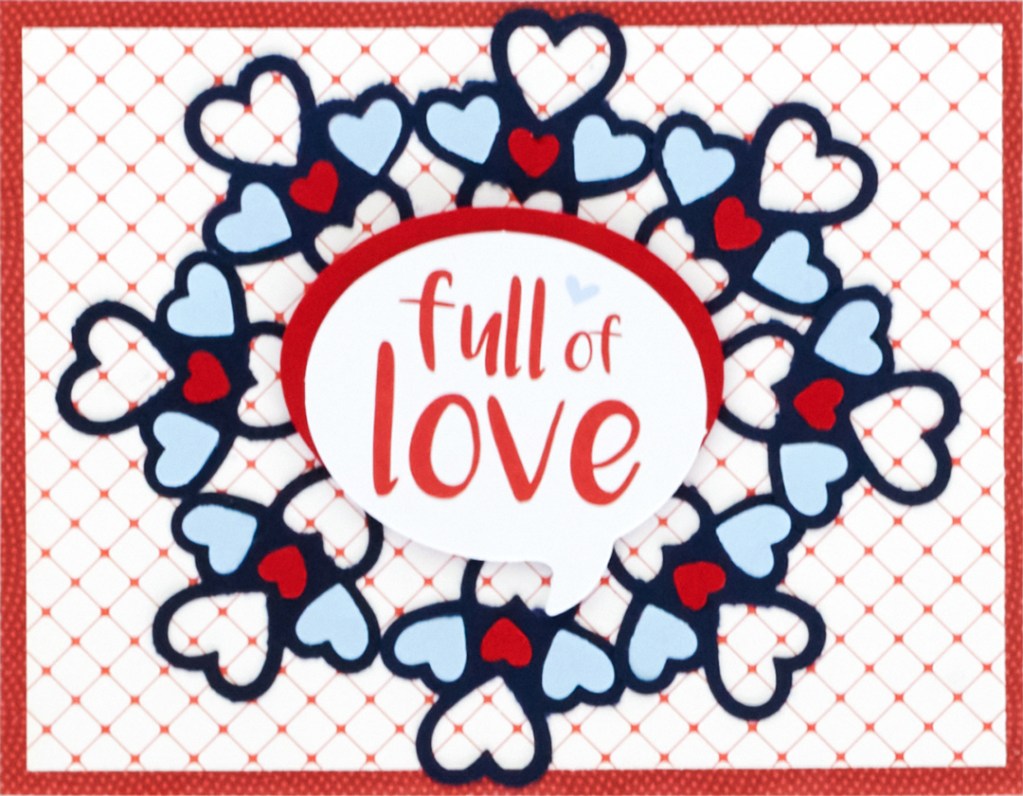
Step 1: Cut dotted scallops paper to 5-1/2” x 4-1/4” and adhere to the top of a Blank Card base.
Step 2: Cut white crosshatch paper to 5-1/4” x 4” and adhere to the middle of the card.
Step 3: Using the inside edge of the third-largest Oval Custom Cutting System Pattern and the Green Blade, cut an oval from Cranberry Solid Cardstock. Adhere a title embellishment to the oval and adhere to the middle of the card with Foam Squares.
Step 4: Use the Full of Love Punch to punch eight pieces each from Navy, Baby Blue and Cranberry Solid Cardstocks. Adhere the navy pieces around the title piece on the card. Use the Precision Point Adhesive Pen to adhere Baby Blue and Cranberry Solid Cardstock hearts to the navy pieces as shown.

To create the Carnival Fun borders and card you will need:
- Carnival Fun Embellishments or (Shop Canada | Shop Australia) — limited-edition embellishments pack that qualifies for the Embellishments Buffet
- Masquerade Border Punch or (Shop Canada | Shop Australia)
- Totally Tonal Purple Ice Paper Pack or (Shop Canada | Shop Australia)
- Eggplant & Dark Green Solid Cardstocks or (Shop Canada | Shop Australia)
- Blank Card Kit or (Shop Canada | Shop Australia)
- 12-inch Trimmer or (Shop Canada | Shop Australia)
- Custom Cutting System with Circle Patterns or (Shop Canada | Shop Australia)
- Micro-Tip Scissors (Shop Canada | Shop Australia)
- Repositionable Tape Runner or (Shop Canada | Shop Australia)
- Foam Squares or (Shop Canada | Shop Australia)
The Show Border
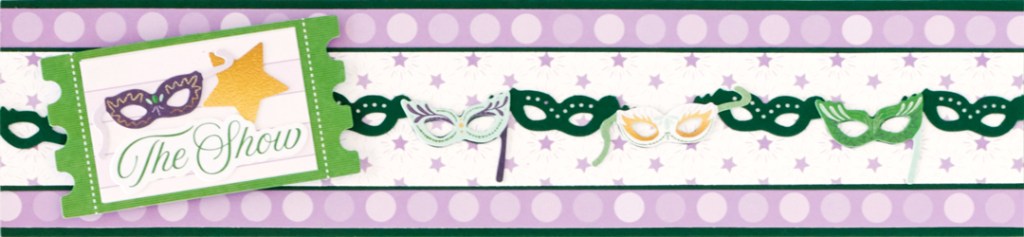
Step 1: Cut Dark Green Solid Cardstock to 12” x 2-3/4”.
Step 2: Cut large dots paper to 12” x 2-1/2”, making sure to have a full row of dots at the top and bottom of the strip.
Step 3: Cut Dark Green Solid Cardstock to 12” x 1-5/8”.
Step 4: Cut white stars paper to 12” x 1-1/2”.
Step 5: Use the Masquerade Border Punch to punch a border from Dark Green Solid Cardstock.
Step 6: Layer and adhere all of the pieces.
Step 7: Layer and adhere embellishments as shown. Use Foam Squares to adhere the ticket embellishment.
Fun At The Fair Border
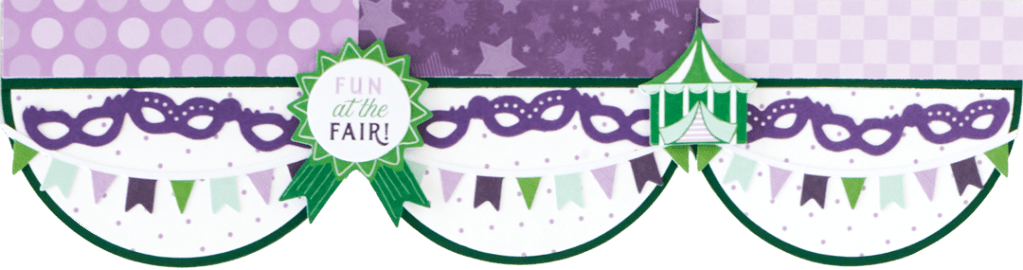
Step 1: Using the outside edge of the smallest Circle Custom Cutting System Pattern and the Green Blade, cut three circles from Dark Green Cardstock. Use the 12-inch Trimmer to cut 1-1/4” off the tops of the circles.
Step 2: Using the outside edge of the smallest Circle Custom Cutting System Pattern and the Red Blade, cut two circles from white small dots paper. Cut circles in half.
Step 3: Adhere the three semi-circle pieces to the dark green circles.
Step 4: Cut a 12” x 1” strip from Dark Green Solid Cardstock.
Step 5: Cut three 4” x 7/8” strips from three various papers. Adhere to the dark green strip, leaving a dark green edge at the bottom of the strip.
Step 6: Adhere the circle pieces underneath the straight border.
Step 7: Use the Masquerade Border Punch to punch a border from Eggplant Solid Cardstock. Use Micro-Tip Scissors to cut into three segments of three masks. Adhere to the half-circle pieces as shown.
Step 8: Adhere embellishments as shown using Foam Squares on some.
Let’s Party Card
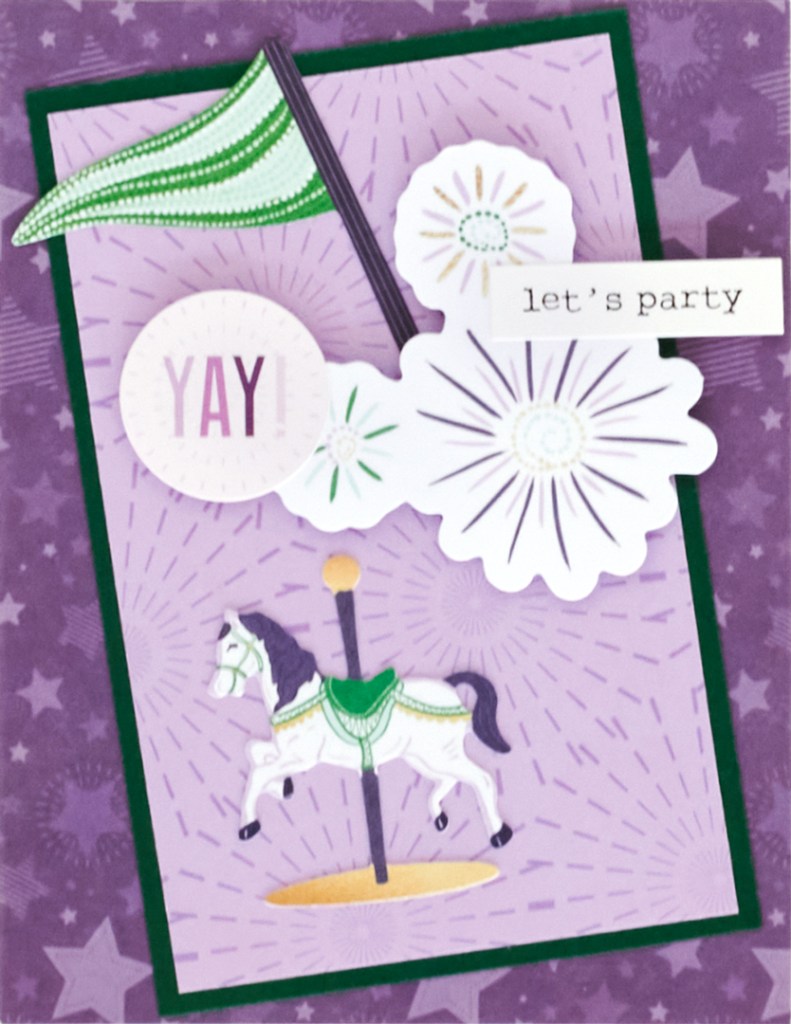
Step 1: Cut purple stars paper to 4-1/4”x 5-1/2” and adhere to a Blank Card base.
Step 2: Cut Dark Green Solid Cardstock to 3-1/4” x 5” and adhere to the card as shown.
Step 3: Cut fireworks paper to 3” x 4-3/4” and adhere to the dark green rectangle.
Step 4: Layer and adhere stickers and embellishments as shown.
Which set of projects grabs your attention the most? The Boho Mandala, Full of Love or Carnival Fun? Or all of them?! Have you ordered your limited-edition embellishments packs and gotten your FREE gifts yet?
P.S. Are YOU a member of the Virtual Crop Facebook Group? It’s your go-to place for MONTHLY Virtual Crops, MONTHLY Completed Album Challenges, WEEKLY LIVE STREAMING of Fast & Fun Projects with Noreen, LIVE QUARTERLY Secret Box Openings with project tutorials and so much more! We hope you’ll join our community of more than 32,000 fellow memory-keeping enthusiasts — you’ll feel right at home!
