August 29, 2023
Revel A Rustic Retreat: Fence Borders For Your Fall Scrapbook Layouts

Jump in your car and get your camera ready — it’s time for a foliage drive! Whether you’re capturing memories of an autumnal journey through mountainous landscapes, a gorgeous getaway to the countryside or enjoying the brilliantly hued deciduous trees, it’s clear there’s no shortage of sights to see during the season! On the fence about where to begin scrapbooking your fall-filled photos? Corral your scrapbooking supplies, buckle down (or buckle in!) and try out these three scrapbook border ideas!

To create these borders you will need:
- Autumn Harvest Paper Pack or (Shop Canada | Shop Australia)
- Autumn Harvest Stickers or (Shop Canada | Shop Australia)
- Autumn Harvest Foiled Embellishments or (Shop Canada | Shop Australia)
- 12-inch Trimmer or (Shop Canada | Shop Australia)
- Circle Punch or (Shop Canada | Shop Australia)
- Original Border Maker System with Rustic Fence Border Maker Cartridge or (Shop Canada | Shop Australia)
- Hot Fudge & Pumpkin Solid Cardstocks or (Shop Canada | Shop Australia)
- Tape Runner or (Shop Canada | Shop Australia)
- Repositionable Tape Runner or (Shop Canada | Shop Australia)
- Foam Squares Variety Pack or (Shop Canada | Shop Australia)

Autumn Tree Border

Step 1: Cut a piece of Pumpkin Solid Cardstock to measure 12” x 2”. Use this as the base for the border.
Step 2: Cut a piece of white speckles paper to measure 12” x 1-1/2”. Adhere to the middle of the cardstock base.
Step 3: Using the Rustic Fence Border Maker Cartridge in the Original Border Maker System, punch along the edge of the dark woodgrain paper, then cut at 1-1/4”. Adhere to the bottom edge of the white speckles paper.
Step 4: Using the Circle Punch and the maple leaves paper, punch four circles. Cut in half and adhere along the top edge of the white speckles paper.
Step 5: Using the Circle Punch and the blue juniper leaves paper, punch four circles. Cut in half, then adhere atop/in between the maple leaves half circles. Cut off any excess paper with a scissors.
Step 6: Adhere the tree embellishment and other stickers/embellishments to the border using Foam Squares on some for dimension.
Simple Days Border
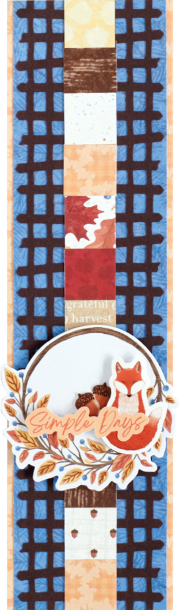
Step 1: Cut a piece of maple leaves paper to measure 3-1/4” x 12”. Use this as the base for the border.
Step 2: Cut a piece of blue juniper leaves paper to measure 3” x 12”. Adhere to the border.
Step 3:Cut a piece of Hot Fudge Solid Cardstock to measure 3” x 12”. Punch along each edge using the Rustic Fence Border Maker Cartridge in the Original Border Maker System. Adhere to the border.
Step 4: Cut scraps of paper to measure 1” x 1”. Adhere along the middle of the border.
Step 5: Adhere stickers/embellishments to the border using Foam Squares on some for dimension.
Cool, Crisp, Comfy Border
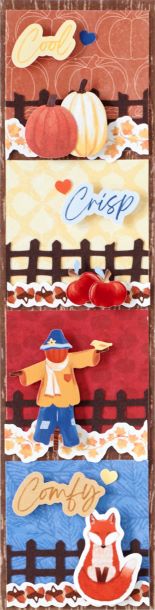
Step 1: Cut a piece of dark woodgrain paper to measure 3” x 12”. Use this as the base for the border.
Step 2: Cut four pieces of various papers to measure 2-3/4” x 2-3/4”. Adhere to the border.
Step 3: Using the Rustic Fence Border Maker Cartridge in the Original Border Maker System, punch along the edge of Hot Fudge Solid Cardstock. Then use your 12-inch Trimmer to cut at 1-1/4”. Cut this border into four segments that measure 2-3/4”. Adhere to the bottom edge of each of the four previous pieces.
Step 4: Adhere stickers/embellishments to the border using Foam Squares on some for dimension.
Are you ready to add rustic flair to your fall scrapbook layouts? Will you corral creativity by making these fence borders?
P.S. Are YOU a member of the Virtual Crop Facebook Group? It’s your go-to place for MONTHLY Virtual Crops, MONTHLY Completed Album Challenges, WEEKLY LIVE STREAMING of Fast & Fun Projects with Noreen, LIVE QUARTERLY Secret Box Openings with project tutorials and so much more! We hope you’ll join our community of more than 35,000 fellow memory-keeping enthusiasts — you’ll feel right at home!

Love these borders…
I love the layouts! The rustic fence is one of my favorite border punches. It flew off the shelf this time too!