October 23, 2023
Embrace Cold-Weather Comforts With This Winter Scrapbook Layout

Our weather forecast right now is showing brisk beauties, snow-filled memories, Scandinavian serenity and a 100% chance of flurries… of fun! The Nordic Winter collection is a cold-weather comfort that’s ideal for ceasing (or freezing!) the days of snowboarding, weekend getaways to a ski resort or cabin, hygge happenings, playing in the powder, sipping warm beverages by a fireplace and visiting the Nordic region. So bundle up your memories and photos with this winter scrapbook layout that is pure brrr-illiance!
To create this layout you will need:
- Nordic Winter Paper Pack or (Shop Canada | Shop Australia)
- Nordic Winter Variety Mat Pack or (Shop Canada | Shop Australia)
- Nordic Winter Embossed Embellishments or (Shop Canada | Shop Australia)
- Nordic Winter Stickers or (Shop Canada | Shop Australia)
- White Solid Cardstock or (Shop Canada | Shop Australia)
- 12-inch Trimmer or (Shop Canada | Shop Australia)
- Tape Runner or (Shop Canada | Shop Australia)
- Repositionable Tape Runner or (Shop Canada | Shop Australia)
- Foam Squares Variety Pack or (Shop Canada | Shop Australia)
- Black Dual-Tip Pen or (Shop Canada | Shop Australia)

Make brrr-illiant creations with the new winter collection — Nordic Winter — take a peek at the collection in the video below!

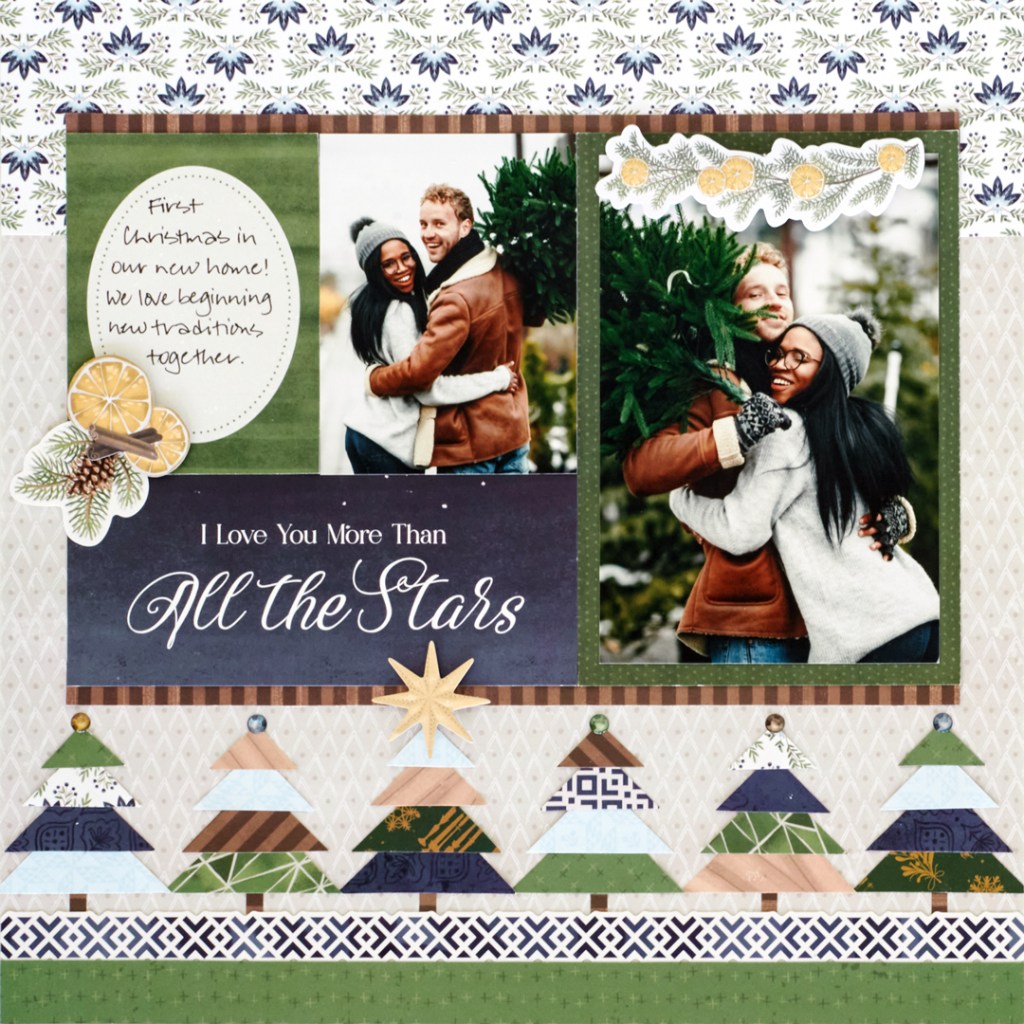
Step 1: Use a piece of beige diamonds paper as the base for this layout. Cut a 12” x 2-3/4” strip with folk florals paper and adhere to the top of the layout. Cut a 12” x 3/4″ strip with plus signs paper and adhere to the bottom of the layout. Adhere a geometric border sticker just above this strip.
Step 2: Mount a 4” x 6” photo on a 4-1/2” x 6-1/2” variety mat and adhere on the right side of the layout as shown. Crop a photo and a variety mat to 3” x 4” and adhere next to it. Crop the “I love you more than all the stars” variety mat to 6” x 2-3/4” and adhere beneath the 3” x 4” elements. Cut two 10-1/2” x 1/2″ strips with brown stripes paper. Tuck above and below the grid section.
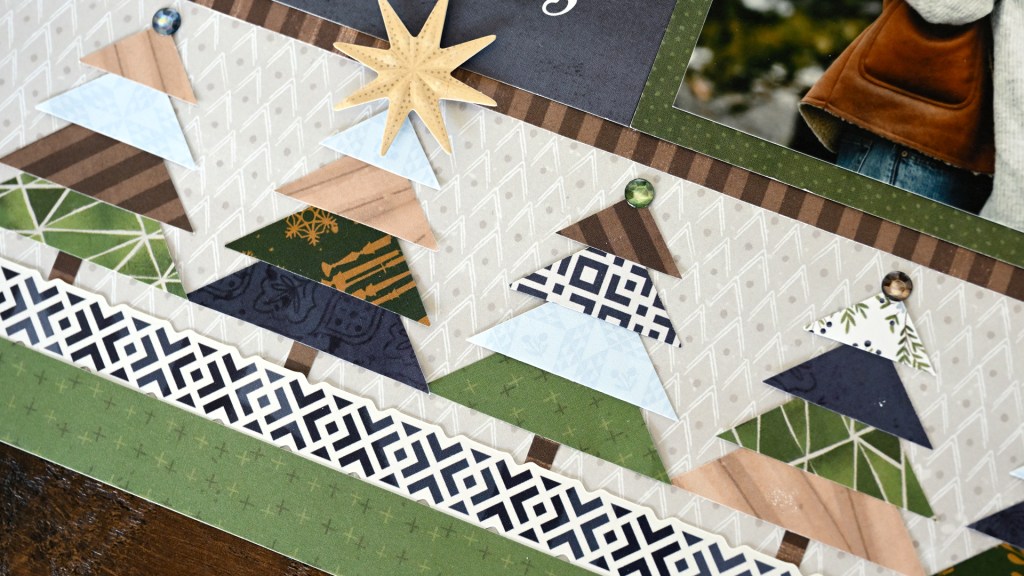
Step 3: Cut a variety of 3/4″, 1”, 1-1/4” and 1-1/2” squares with paper scraps. Cut in half to make triangles. Cut 1/4″ x 2-1/4” strips with brown stripes paper. Layer and adhere large to small triangles on the “trunk” as shown. Adhere on the layout and top each with an epoxy sticker. Top one with a star embellishment.
Step 4: Adhere embellishments and stickers, popping some up with Foam Squares for dimension.
Step 5: Journal as desired.
Are you embracing the serene beauty of this winter scrapbook layout? What cold-weather memories would you freeze upon it?
P.S. Are YOU a member of the Virtual Crop Facebook Group? It’s your go-to place for MONTHLY Virtual Crops, MONTHLY Completed Album Challenges, WEEKLY LIVE STREAMING of Fast & Fun Projects with Noreen, LIVE QUARTERLY Secret Box Openings with project tutorials and so much more! We hope you’ll join our community of more than 36,000 fellow memory-keeping enthusiasts — you’ll feel right at home!

I love this layout. Clean and crisp…nothing says Christmas is coming like this. Thank you for the idea!
Very pretty. Is there a sketch and instructions for the stocking hat layout?